Tall Modular LEGO Walls
To Fit with the Current CCC Castle Wall


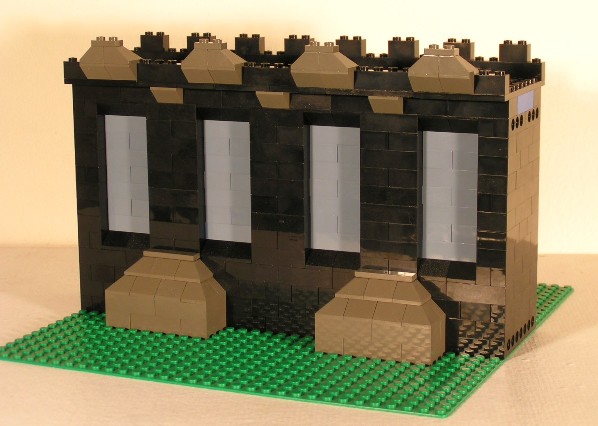
This is a new type of tall LEGO castle wall that is made to be built in modular sections.


Let me say at the beginning that this tall wall standard is NOT meant to replace
the current Classic Castle City (CCC) wall standard.

This tall wall standard is meant to be used along with the current CCC walls.


Here's a quick rundown of the similarities and differences that the tall walls have with the CCC walls


Similarities
Differences
• Tall wall sections will be built along the center of 32X32 baseplates • They're taller (of course)


• They will be modular so that they connect with the sections of other builders • They are 8 studs thick, and the top walkway plate is 10 studs wide/thick


• They will be a standard number of bricks high + 1 plate for the top walkway • If connected to the regular CCC walls, they'll require height adaptor sections


• The ends of the tall walls will have Technic bricks in them at a certain height for connecting it to the next section • A section that has a gate needs to be at least 2 baseplates wide


• Builders can include structures that are built into the wall • The crenellations don't have to be one 1X layer with an intermitant 1X2 brick top layer


Tall Wall Specifications


As with any LEGO building standard, everyone who is building sections needs to make sure that the ends of their module that attach to the next module are built to a very specific height and width. On the other hand, since this is LEGO that we're talking about, the rest of each person's section can be just about whatever they feel like making it.

Just like the basic building formula for the current CCC Wall, the standard for the Tall Wall is fairly straightforward:

• Build along the center of a 32X32 baseplate

• The basic wall is 8 studs thick/deep

• The wall height is 14 bricks tall under the walkway plate

• The walkway plate is 1 plate thick and 10 studs deep (2 studs deeper/wider than the wall itself)

• Technic bricks that allow the walls to be joined by pins, are placed at bricks #1 and #13

• The crenellations along the top of the wall can be two layers of 1X bricks, but they don't have to be

Here you can see the cross-section layers at the end of a Tall Wall. The Tall Wall's extra thickness allows you to use some of your less needed colors as filler where they won't be seen.


Here you can see a Tall Wall's cross-section with the bricks numbered.


Notice that the Technic bricks used in this wall are different than the ones used in the previous wall. When Tall Walls are connected with Technic pins, the pins go in the two outer holes of the Technic brick layers. You can use four 1X2 Technic bricks, two 1X4 bricks, one 1X8 brick or any other combination of Technic bricks, since the two outer holes will end up in the same potition. Of course, using pins to join wall sections is sometimes unnescesary on smaller displays.


Tall Wall sections usually fit together well with just the pins in the bottom layer of holes. Because of their height, we decided to include the second layer of Technic bricks near the top to provide a way to further solidify a wall if desired.


Aspects and Examples of the Tall Wall


Now you may be wondering to yourself, "What are you supposed to do if you have both CCC Walls and Tall Walls, and you want them to join?"

One way to avoid joining CCC Walls and Tall Walls would be to make two concentric rings of walls--the taller on the inside and the shorter on the outside. However, this would require a LOT of wall sections, and would thus be out of the question for most displays. A simpler solution would be to build adaptor wall sections.

Adaptor wall sections have to bring the thickness of the wall from 4 studs to 8 studs, the height from 6-1/3 bricks to 14-1/3 bricks and the walkway plate's width from 6 studs to 10 studs.

At the left you can see an adaptor wall section that does this. The adaptor shown is 1 baseplate long, but that is only the minimum. Adaptor sections can be as many baseplates long as you'd like.

Just remember to make an even number of wall adaptor sections, so that for every time the wall goes up, it will have another adaptor to take it back down.


This is what a Tall Wall looks like when joined to a CCC Wall with an adaptor section


Here's what the top walking surface looks like


Since the Tall Wall is 8 studs thick, you can save bricks by leaving the middle hollow. In fact the large, unseen, hollow area in the interior of a Tall Wall lets you use gray modified bricks that you might otherwise toss into the "seldom used parts" bin.


This example of a Tall Wall footprint shows how those ubiquitous bricks with an axle pin on one side can be used just as well as plain 2X2 bricks can. Pieces like this are generally cheaper to buy than regular bricks.


The hollow interior of a Tall Wall also allows you the opportunity to build recessed interiors of attached buildings, secret passageways, latrines, prisoner cells, or whatever else you'd like.


There's no doubt that the Tall Walls do use more pieces than the CCC Walls. We don't want you to stretch your collection of light gray beyond its limits, so we would like to encourage building Tall Wall sections in multiple colors. Now mind you, we're not encouraging building Tall Walls in EVERY color; just some basic earth tones.

Color alternatives to light gray for Tall Walls are Black, Dark Gray, Tan and White. Please keep in mind that a castle wall made of alternating patchwork colors would not look good. If you decide to build a non-gray section, make sure that you can produce multiple sections of that same color. That way you can put together a section of like-colored wall modules to make a more solid looking and unified wall.

Here's an example of a black wall. Black bricks are common and fairly inexpensive. Notice that this module has been made with nonstandard crenellations on the outer ledge. Once you've chosen your base color, almost any other color can be used as your "accent" color.


Before going willy-nilly and making scads of non-gray walls, be sure to plan your color coordination. Discuss what colors of walls your group will be using so that you can decide how many of which color each person will be making. This will allow you to better color coordinate your wall as a whole.
Color choice can be a deciding factor on your fortress' "attitude". Is your wall protecting the Bad Guy's Castle? Black may be your best choice. Does your fortress wall surround the palace of a desert shiek? Tan may be the way to go.


Coming soon -- Frequently Asked Questions section