 . . .
. . . 
I hear of so many homebrewers that have horror stories of breaking carboys, some of which resulted in serious injury. I'm sure that there are literally thousands of similar stories that are near misses, and go unmentioned. Hopefully the information provided here will help in preventing someof these terrible and unnecessary accidents.
The carriers shown help to protect the carboys from impacts and stresses that could cause breakage. They allow you to handle the carboy without having to deal with lifting it by the slippery, smooth and frequently wet glass surface. I came up with an original design, and my friend came up with another. Either one will work, but hopefully you will come up with added features that will make them better for your particular use.
In addition, these carriers are designed to make homebrewing easier. They provide a means to make lifting the carboy easier, with less back stress. They also provide a means for sitting the carboy upside-down for drainage and drying. If designed right (see text below), they will even allow carboys to be stacked (EMPTY, of course!!!) to save storage space.
While these devices can help make a safer homebrewing environment, they are not going to prevent breakage in all circumstances; it is up to the individual to still take whatever safety precautions are necessary. Always be careful when handling glass containers! These things work great, but they can't prevent brainfarts!
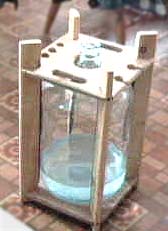
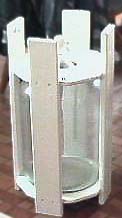
They say a picture is worth a thousand words. Here's a couple of thousand worth ...
. . . My version is on the left, My friend's is on the right. We'll use his, its simpler and easier to make, although there are some features of both that work well.
The idea is to provide support for the carboy on the bottom, sides, and top. The carrier is simple, made of wood, and should be easy to make using common tools available to most homebrewers. Uh, if you can figure out how to make beer, these should be no problem to build!!!
The basic design consists of a bottom plate on which the carboy normally sits. It is made from plywood, and 1/2" works well for all of the parts. There are 4 legs attached to the bottom, which keep the carboy from moving around and support the carboy when on its side for cleaning. The legs extend below the bottom plate for support, and above the top plate so the whole assembly can be sat upside-down for drying (or whatever other things you can think of.) Finally, there is the top plate, with a center hole for the carboy neck to stick through.
The carboy should just fit in its new home, with padding provided by strips of sticky-backed foam insulation strips along the sides. You need to make sure that there is room on the top, too, to provide room for expansion; if the carboy slips up and down just a bit you've made the carrier the right size. Here's the idea behind this; the carboy should not be stressed by being too tightly held in place, while it shouldn't be so loose that it can gain much momentum flopping around in the gaps either. It should be free but limited in its travels.
Here's a drawing showing some of the construction details . . .
The strength of the assembly lies in the joints. The grooves that the top and bottom plates fit into should be about 1/3 the thickness of the side pieces. The shoulders of the joints should take all the stresses, with the Stainless Steel screws merely holding the joints together. Do NOT eliminate this part of the construction. Screws will come out if stressed, and we don't like stress, right.
Oh, and Don't Relax, Have a Homebrew when working around power tools!!! Be aware and safe!!!
The finger grooves on the bottom of both the top and bottom plates are also very important; they are what allow you to get a good grip on the assembly. A router is very handy for creating them, although several passes with a table saw will also work. Here are the details on how the carriers could be interlocked when stacked; the finger grooves on the bottom of the upper unit rest on the top of the legs of the lower unit, makeing it a very stable stack. Again, EMPTY!

***NEW*** Here is a set of pictures of one of these things being made!
Carboy Carrier Construction Photos!
That should help explain a lot! Don't worry if you don't have all those fancy tools, just find someone that likes homebrew and also has enough woodworking tools to get the job done. You'll think of something to trade for the help, I'm sure!
You not only can grab it by the finger grooves, but the sides and their top and bottom extensions can be a place for a firm grip. The upside-down drying option is also very nice, particularly with that foaming sanitizer stuff. Cleaning the exterior only involves a bit more work than normal; I suggest a good waterproof semi-glossy exterior coating (Rot-oleum?) like an exterior paint or marine varnish, both to make cleaning easier and to protect the wood, since it occasionally gets wet.
Why this page? I don't want to go into the business of selling these things, I have enough to do already. But, I did want to do what I could to help the homebrewing community. If you find these designs useful, or have any suggestions on how to improve the carriers, please let me know. Spread the word on using these things, if we can prevent just one unnecessary accident I'll be happy.