I built this page originally to help people newly interested in robotics, who didn't have a lot of electrical or mechanical skill, to be able to build a robot easily, cheaply and yet still get some nice results. I myself didn't have a huge amount of electrical knowledge but I did know Ohms law and had taken a year of electronics in high school so off I went. One of the best parts of this bot is that once you are completed you have a nice platform that can be expanded on and used as a prototype for other designs. This projects' total cost is about $75 if you buy all new parts but only about $40 if you hack old electronic equipment for the sweet nuggets inside.
 My real interest in robotics came from the Discovery channels piece on robotics
called 'Robots Rising'. They did a section on
BEAM robotics and Mark Tilden. That
immediately got me interested and I scoured the Internet for information with beam-online
being the best source. The only problem was
the only cool BEAM robots were walkers and they were so hard to make that if I didn't get
some results pretty soon, it would be hard to justify the costs and time. So after playing with some moderately successful
light following heads I started looking into more robust designs including embedded
software and recalled a site I had seen quite a few months previous about this guy who had
built a robot that he controlled with an old IR remote control. I remember the picture of the guy on his site and
recalled he looked a little on the quirky side and figured, well if he can do it I bet I
can, plus his site included everything and I mean everything on how to do it, schematics,
source code, parts, etc. So now I was
looking into Basic Stamp. Parallax had a nice
site setup with information all about basic stamp I & II but the starter kit for stamp
I was over $100 at that time, a little more than I could justify since I didn't know how
well it would work for me (had been a long time since last I programmed in basic) So I
found some information on how to build your own interface cable (actually very easy) and
downloaded the editor and manual from parallax ftp site with some sample programs and
started tinkering, and all it cost me was $34 for the stamp I module (from Radio Shack).
My real interest in robotics came from the Discovery channels piece on robotics
called 'Robots Rising'. They did a section on
BEAM robotics and Mark Tilden. That
immediately got me interested and I scoured the Internet for information with beam-online
being the best source. The only problem was
the only cool BEAM robots were walkers and they were so hard to make that if I didn't get
some results pretty soon, it would be hard to justify the costs and time. So after playing with some moderately successful
light following heads I started looking into more robust designs including embedded
software and recalled a site I had seen quite a few months previous about this guy who had
built a robot that he controlled with an old IR remote control. I remember the picture of the guy on his site and
recalled he looked a little on the quirky side and figured, well if he can do it I bet I
can, plus his site included everything and I mean everything on how to do it, schematics,
source code, parts, etc. So now I was
looking into Basic Stamp. Parallax had a nice
site setup with information all about basic stamp I & II but the starter kit for stamp
I was over $100 at that time, a little more than I could justify since I didn't know how
well it would work for me (had been a long time since last I programmed in basic) So I
found some information on how to build your own interface cable (actually very easy) and
downloaded the editor and manual from parallax ftp site with some sample programs and
started tinkering, and all it cost me was $34 for the stamp I module (from Radio Shack).
 I started really from Corky's robot site and really just copied what he did but did
things a little easier. I tried using his 556
h bridge design which on the breadboard worked awesome but on the robot did not pass
enough current for the servos to move. Lucky
enough for me this was Christmas 99 and my wife had gone to Solarbotics web site and
ordered me a whole bunch of cool stuff including a L298N dual H bridge driver capable of 4
amps ohhhh yeahhh, costs $5 bucks though, ouch. I
work at a Volvo dealer in Washington state as a technician and one of the best parts of
the job is getting the 'sweet nuggets' of old electrical stuff that has failed but has
some good parts in it still. Well I got an
old audio amp that had failed (burnt circuit board at the regulator) and found out that it
had two Phillips TDA1515 on it. After
searching some chip directories I found out that these are basically a single version of
the L298N for audio applications. The nice
thing about the L298N and TDA1515 is the ease of hookup and the ability to tie into the
enable/disable pin for each input on each bridge. So
the moral is just because you aren’t familiar with the chip name/number doesn’t
mean you can’t use it. Phillips web site
had tons of info on their chips and even included schematics on how to hook up.
I started really from Corky's robot site and really just copied what he did but did
things a little easier. I tried using his 556
h bridge design which on the breadboard worked awesome but on the robot did not pass
enough current for the servos to move. Lucky
enough for me this was Christmas 99 and my wife had gone to Solarbotics web site and
ordered me a whole bunch of cool stuff including a L298N dual H bridge driver capable of 4
amps ohhhh yeahhh, costs $5 bucks though, ouch. I
work at a Volvo dealer in Washington state as a technician and one of the best parts of
the job is getting the 'sweet nuggets' of old electrical stuff that has failed but has
some good parts in it still. Well I got an
old audio amp that had failed (burnt circuit board at the regulator) and found out that it
had two Phillips TDA1515 on it. After
searching some chip directories I found out that these are basically a single version of
the L298N for audio applications. The nice
thing about the L298N and TDA1515 is the ease of hookup and the ability to tie into the
enable/disable pin for each input on each bridge. So
the moral is just because you aren’t familiar with the chip name/number doesn’t
mean you can’t use it. Phillips web site
had tons of info on their chips and even included schematics on how to hook up.
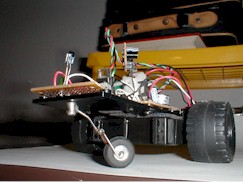
I always thought the mechanical side of robotics was the hardest to make so I started making that first. My design is like a tricycle, front wheel pivots and the rear wheels do the turning. I initially wanted a tank design but then convinced myself that simpler is better and I could always build it up later. Which brings me to another point, make your design modular that way if you want to add on or change circuitry the mechanics, propulsion, and electronics are separate removable pieces. So off to the hobby store for some misc. parts including tail rudder wheels from RC airplanes. I used the tail wheel and some paperclips (the big ones) and made a nose wheel assy. I'm telling you I have built some rippin' designs with just paper clips, since you can join them to almost anything metal you can fabricate some pretty cool stuff-be imaginative. Make sure you use soldering flux even if your solder has flux in it or the joint will be weak and hard to attach. The base of my robot is part of an old car alarm housing (plastic) that holds some cheap Futaba servos I got from Tower Hobbies for $9 each. The servos had the stop and the potentiometer taken out of them so they can turn 360 degrees. I used double back foam tape and attached the servos to the plastic frame. I am too lazy to take this project to work or bring home a drill so I just used my soldering iron to make a hole in the front of the frame to attach the nose wheel - I know, I know its bad for the iron but I clean it pretty regularly. So now that I had my basic design it was time for the electronics.
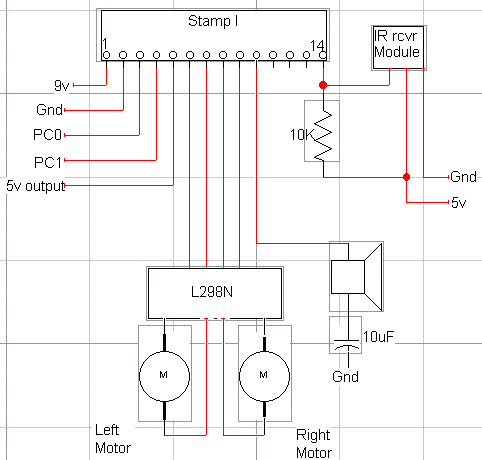
I started by setting up my basic stamp to a breadboard powered by 9v battery and hooked up to my pc. Went to Radio Shack and bought an IR receiver module for $3, best investment I ever made. See, IR remotes transmit on a 40 KHz frequency and then modulate (turn on/turn off) that signal. The receiver module sees this Amplitude Modulated signal and filters the 40 KHz so you are left with the actual transmitted data (on/off signal). I tied a 10K ohm resistor to the output of the receiver to keep it high until an incoming signal drives it low (you could also connect the resistor to ground, it doesn't matter in this application). Pretty cool huh? Have you started to think of other cool stuff you could do with that?? I took a 556 timer used one timer circuit to produce 40 KHz and the other timer circuit to Modulate (turn off/on) that 40 KHz signal (2 KHz) 2000 times per second fed the output to an IR LED and then used the receiver module to pick up the 2 KHz signal. This way I can transmit data without ambient light screwing up the works. I am going to implement this as object detection soon on my robot. Just point your Infrared light emitting diode ($0.99 radio shack) straight ahead and when reflected by an object the receiver will pick it up and recognize that there is an object ahead. Also use this to check for edge on a table, no reflection=no edge. So back to subject. I programmed my remote to broadcast Sony codes since there seems to be more information about this type of code than any other. Now I hooked up a red LED (Light emitting diode) to my output of the IR receiver module so I would be able to tell whether or not it was working. I then downloaded the basic program from Corky's site into my Stamp and VIOLA..... It didn't work!!
Well turns out my very old remote was using a different Sony broadcast than his because who knows why so I changed the time division in the program and it worked great, in hindsight it probably would have been easier to just change the Sony code I was using to a more recent one. Ohhh wwelll. Regardless I had some success and was very pleased, this helped justify the expense to me although when I showed my wife she seemed less than enthused.
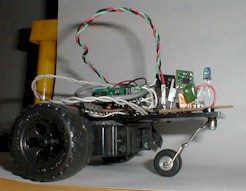
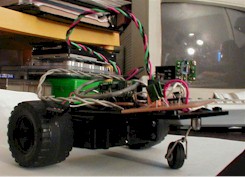
Now was the time to decide exactly what this little guy would do. I knew I wanted basic locomotion and some audio of some kind but wasn't sure what else I wanted but thought that a mini flame thrower might be nice... don't laugh I'm serious. You know those lighters you can get with the one button push lighting?? All you got to do is hook up a servo or solenoid and you are set, plus you can really increase the size of the flame if you disassemble it and manually turn the flow control all the way up. Just think a remote control fire hazard of your very own!! Well this is something that could be added on later. I decided I wanted some visual response from my robot so I added a two 7-segment display from an old burned up CB radio. I soldered the backsides of the LED's so that when powered up it spelled ‘HI’, not very original but whatever. One problem was I didn't want to run the LED's off the 5v supply from the stamp since I knew it would overload and I already was powering the IR receiver from it so I thought I would see if the LED's could handle 9v. Well the CB ran off a 12v auto circuit so I figured sure it'll work.... well it burned 'em up REAL quick so that part of the design didn't make it onto the semi-finished bot. I also added a manual reset button to restart the basic program in case somehow he got confused... you could run the reset by connecting it to one of the I/O pins and then driving that pin low but then if he isn't responding to the IR remote then that wouldn't work very well now would it?? I also added a piezo speaker like Corky did so I could get some audio output when ever it received a valid command and like Corky's I wanted it to play a little tune.
Well I had my design and it all fit on a mini prototype board from Radio Shack and I still had 3 I/O pins to use, now all there was left to do was solder, program and run! I'm not to modest to admit that it all worked on the first try... of course I did mass testing on the breadboard to make sure it would work first time. I feel pretty good about the way it turned out but it doesn't have as much character as I had hoped for... Corky's was so much more Corky. I have some more ideas I want to add to this guy plus I need a good ideas so let me know. This is my first piece on robotics and I have come from the basics to really understanding it, I hope you can gain something from it. If you have read this far then you too must be really interested don't hesitate to send mail with any questions, comments, whatever. Let me know what projects you would like to see on this page, I am always looking for new cool ideas.
ADDITIONAL NOTES:
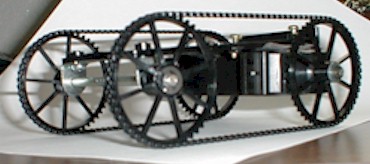
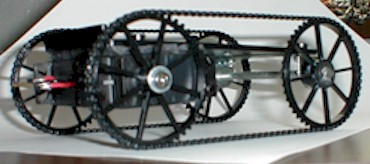
After pretty much competing this project I finally decided to be very mobile I had to go with tank tracks, the tricycle drive setup could barely go over even the smallest of obstacles on my desk. I looked around and found www.jameco.com had sprockets and adjustable length chain but it was kinda spendy at $34 for just four sprockets and 24 inches of chain. Luckily Yahoo turned up www.servolink.com the actual manufacturer of the product who's prices were incredibly low, only $14 for the same amount of stuff. Only problem is your order must be at least $30 but what the hey, you get 3 times as much stuff and you can use the extras for all kinds of cool projects. I also added two bump sensors, the same kind I used on switchy that I had originally seen at www.beam-online.com and they worked very well so now stampy is totally autonomous but I can override that with the IR remote. One more note on this - I put some wide rubber bands around the tracks and they grip like nobody's business now!