Version 1.5
4 November 2000
Written and maintained by Don Munsil (don@munsil.com)
When you're done reading Don's VW10HT FAQ check out these other FAQ pages:
In version 1.5 (11/4/00):
In version 1.4 (8/25/00):
In version 1.3 (8/21/00):
In version 1.2 (8/17/00):
The Sony VPL-VW10HT is the only currently-made LCD projector with native 16x9 panels. It is one of the few projectors with enough pixels to display HDTV properly, and in its native aspect ratio. It handles a wide variety of inputs, is very quiet, and is reasonably priced given its high resolution and ease of use. It has a very nice deinterlacer and scaler for handling interlaced inputs, and is generally optimized for video projection, unlike most LCD projectors, which are optimized for business presentations.
Resolution: 1366x768 pixels
Inputs: 1 composite, 1 s-video, 2 5-RCA
Video Formats: NTSC, PAL, RGBHV, RGBS, RGsB, YCbCr, YPbPr, 480i, 480p, 720p, 1080i
Computer Formats: RGBHV, RGsB, 640x480, 800x600, 1024x768, 1280x1024 (scaled down to 1024x768)
Brightness: 1000 lumens.
Weight: 17 pounds, 10 oz. (around 8kg.)
Size: 15 5/8" x 6 5/8" x 16 7/8" (395 x 168 x 427mm)
Most projector dealers carry them, along with many home theater dealers. If you’re buying mail order, a source many people (including me) recommend is Medical Video Systems, www.medicalvideosystems.com. They have a no-questions-asked return policy, and great service.
The MSRP started at US$6999, and was soon raised to $7999. Soon it will apparently go up again (possibly to $8499, though this is unconfirmed). Why? Sony is selling all of them that they can make, and the projector has been on continuous back order since it was introduced. If you hunt around, you can generally find mail order prices of around $6500-7000, which may go up with the next price hike from Sony.
While most VW10HT's are problem-free, there are three problems that have been most commonly reported: hotspots or uniformity problems, light-colored blobs caused by dust in the optical path, and stuck pixels. It's not known how many projectors have the serious uniformity or stuck pixel problems, but it's likely fairly small.
Hotspots are large blobs of color or uneven light across the screen, generally only easily visible with an all-black picture (easily seen by hitting pic mute). Some people have been able to get this problem fixed by Sony, but Sony has refused in other cases, depending on how bad the problem is. This is a fundamental problem with LCD technology, and if you buy the 10HT or any other projector, you should ensure that your dealer will take it back if you are unhappy with the uniformity. It's worth checking to see if your screen is aggravating the problem. Try pointing the projector at a nice white wall, at a normal projection distance. If the hotspot is still there, and is visible while watching normal movies, you have a problem.
Dust blobs are small (3-5 cm on a 3 meter diagonal screen) bright spots, again generally visible only on a completely dark screen. They are caused by dust sticking to something in the optical path, like a lens or prism. One can easily tell if the problem is dust by changing the focus back and forth. If it is dust, one can bring it in to focus, and it will usually look like a small glowing fiber. The fiber refracts the light going around it, and creates a bright spot on the screen. These problems are relatively easy to fix. You can send the projector in for cleaning, or if you want you can open the projector and clean it yourself (see "How do I clean dust spots," below).
Stuck pixels are pixels that are completely stuck in the on or off position. This is a problem with all LCD panels; while some are perfect, many have a few stuck pixels on them, and whether it harms the viewing experience is a subjective opinion. Pixels that are stuck on (open) show up as bright spots of color on an all-black screen, and are generally the most annoying. Pixels that are stuck off (closed) show up as off-color spots on an all-white screen, and often are hard to spot. Again, if you buy a 10HT (or any LCD projector), you should be sure your dealer will take it back if you are unhappy with the number or location of stuck pixels. Sony considers a few stuck pixels to be "within spec" so it’s difficult to get this problem fixed under warranty.
First off, check the lamp time. If it’s near 1000 hours, you might want to factor in the cost of a new bulb.
Second, get the room completely dark, wait for it to warm up, then mute the picture. Look for overall large washes of color or bright spots. If there are some, try aiming the projector at the wall to see if perhaps the screen is part of the problem. If there are uniformity problems, watch a dark movie or a space scene to see if the problem is distracting in normal viewing. If it is, take a pass on that unit, as it is difficult to get Sony to fix this problem unless it is really obviously bad (and sometimes not even then). If it doesn’t have this problem when you buy it, it is unlikely to develop later.
Third, in pic mute, look at the whole screen for small blobs. If you see any, defocus the projector and see if they are dust. If there is dust in the projector, see if the dealer will clean it before you buy it. If they won’t, it’s not a deal-breaker. Sony can clean it under warranty, and you can clean it yourself it you’re handy. (See below).
Fourth, also in pic mute mode, get close to the screen and scan for bright (stuck "on") pixels. If you find any, stand back to normal viewing distance and see if they stand out. Similarly, if you can, bring a copy of Avia, and put up a 100 IRE field pattern, which is just a full white screen. Check again for stuck pixels. Perhaps watch some normal video. If the pixels are distracting, again, you may want to take a pass, as there is no guarantee Sony will fix them.
Many dealers are showing the VW10HT poorly, usually due to lack of knowledge about how to set it up properly. If your dealer is willing to let you get into the menus and adjust things, then here are a few things to check:
If you do all these things, guaranteed the projector will look better. You may want to bring a printout of this section of the FAQ to show the dealer so they know you're not just making this stuff up.
On the plus side, it won't get any worse, and on the down side, it won't get any better.
You have a few choices:
If it's any consolation, Sony is used to dealing with this. Dead pixels have been a problem with LCD panels from day one, and not just in projectors, but also video cameras, laptops, etc. And uniformity problems are common in LCD projectors. My guess is that if someone tries to get a repair or replacement, they quote the party line about "within spec" and then if the customer keeps pushing, they just replace it. I doubt they could do business any other way. But as I said above, it's important to always keep your cool. If you shout or get angry, they won't be nearly as disposed to help you.
Black level, in this context, refers to the amount of light the projector is producing when the picture is supposed to be full black. LCDs cannot produce complete black, i.e. the complete absence of light, because even when the LCD panel is completely black, with every pixel at full "off" position, some light leaks through and is projected onto the screen. This means that areas on the screen that are supposed to be black will look gray under certain conditions. This is especially true of the letterbox bars on super-widescreen movies (2.35:1). Because they are generally next to a completely black reference (the black border around the screen) they tend to look slightly gray.
Different people have different reactions to black level. Some people really are distracted by the lack of deep black, while others find it not a problem. It's important to see the 10HT, properly calibrated, before buying it, because you don't want to get it home and find that you can't stand the black levels. That said, there are thousands of people who are not bothered by the black levels on the 10HT. I've had many people view movies, including dark movies, on my 10HT, and people have never been bothered by the black level. But your mileage may vary.
There are ways to improve the black levels. Your visual system is more sensitive to changes in light level than to absolute light level. For example, there is more light coming from the black areas of text on a newspaper being illuminated by direct midday sunlight, than there is coming from the white areas of the same newspaper being illuminated by a single 60 watt bulb. Yet your eyes adjust to the huge differences in absolute light level, and see the newspaper as black and white in both instances because the contrast (the difference in level) is the same.
The practical value of this is that if you take steps to increase the contrast of the projector, you can decrease the apparent black level. The absolute black level won't change, but your eyes will see it as darker because of the contrast with the lighter areas of the screen. See section 4.3, on increasing contrast, for more on this subject.
Here are some web sites of people who own the 10HT, complete with pictures.
In general you need to mount the projector such that the exact center of the lens is located at exactly the same height as the top or bottom edge of the screen, and centered horizontally on the screen, on a line perpendicular to the plane of the screen. You align to the top of the screen if you are mounting the projector from the ceiling, upside-down, and to the bottom of the screen if you are mounting the projector on a table, right side up. Any deviation from this position vertically will result in keystone distortion, which can be somewhat mitigated by the digital keystone correction on the Sony, but this will not work in the computer or through modes. Any deviation from this position horizontally will cause horizontal keystoning, which cannot be corrected digitally. Minor deviations from this mounting position (a few inches either way) will usually not be tremendously noticeable.
There is a Windows utility called PJCalc that will show you the potential mounting distances for any screen size, which can be downloaded from Sony at the following URL: http://www.sonydisplaysystems.com/display/downloads.html.
You can also calculate the mounting sizes/positions manually, using the following calculations supplied by Bill Cushman, and slightly augmented for the FAQ:
When you know the screen width (all numbers in inches, and represent horizontal width, not diagonal):
Distance (minimum) = (1.510 x screen width) - 3.0
Distance (maximum) = (1.739 x screen width) - 2.8
When you know the distance:
Screen width (maximum) = (Distance + 3.0)/1.510
Screen width (minimum) = (Distance + 2.8)/1.739
Converting screen width to diagonal width or height (for any 16x9 screen):
Height = Width x .56
Height = Diagonal Width x .49
Width = Height x 1.78
Width = Diagonal Width x .87
Diagonal Width = Width x 1.15
Diagonal Width = Height x 2.05
There are four known brands, and all are good mounts (click on the manufacturer name to go to their web site, or the model number to go to the page for that model, or nearest to it):
Sony. PSS-610. This is the standard mount, sold by Sony. It comes with a ceiling plate and extension pipe, which the others do not. It is a good, sturdy mount. Several people are using it with good results. (Sony doesn't have a picture on their web page, but take a look at Robert A. Fowkes's home theater page, which has several good pictures of it in place.)
Peerless. PJRL-SNY1. Has setscrews to allow for pitch, roll, and yaw adjustments.
Chief. RPA-020. Has setscrews to allow for pitch, roll, and yaw adjustments, and once it is aimed properly, one can take the projector down for service without disturbing the aim, then mount it again exactly in place.
Premier. PBM-632L-1. Has setscrews to allow for pitch, roll, and yaw adjustments, and once it is aimed properly, one can take the projector down for service without disturbing the aim, then mount it again exactly in place.
You will need a separate ceiling plate for the Chief, Peerless, and Premier mounts unless you are mounting the projector flush to the ceiling. All four mounts can be dropped from the ceiling plate with an extension tube sold by each manufacturer. However, a standard iron pipe can be used instead, for substantial savings. The Chief, Premier, and Peerless use 1.5" Outside Diameter pipe, which can be cut to custom length and threaded at any Home Depot or other home center. (Not sure about the Sony, but I suspect it's the same.)
Premier offers a sliding ceiling plate for sliding the projector back and forth, useful if you want to use a 2.35:1 screen and slide and zoom the projector for different aspect ratios. Premier and Peerless also have a special ceiling mount for drop ceilings, which is handy if you have one. Chief has mounting plates for an enormous variety of situations, including angled ceilings, drop ceilings, mounting to pipes, walls, etc. Check their accessory page for details.
Many.
For composite, any normal 75 ohm video cable will do. These are usually labeled "video cable," "coaxial video cable," or "75 ohm video cable." They should have male RCA connectors on both ends.
For S-Video, use a decent quality s-video cable, which will have male mini-DIN 4-pin connectors on both ends.
For component video, you can use three normal 75 ohm video cables of the same length, or buy "component" cables, which are just three video cables of the same length tied together and properly color coded.
For computer, you need a VGA->5RCA cable. This is not a normally stocked cable for most suppliers, but there is an off-the-shelf VGA->5BNC cable available just about anywhere. Then you can get 5 normal BNC->RCA adapters, and have a fairly inexpensive solution. This solution is around $35-40 for a 6 foot cable. A custom VGA->5RCA cable will run more like $40-50, which is not bad, and then you don't have your signal going through multiple extra connectors.
Make sure to get cables rated for video use. It is not necessary to buy hideously expensive "boutique" cables, but well-shielded cables will make a difference, especially if you are running cables longer than 10 feet.
Some cable suppliers that can sell both standard and custom cables:
MVS is a great dealer, and I'm sure their cables are excellent. I have purchased cables at Redmond Cable, and can attest to the quality. Better Cables also has a very fine reputation, and is well known for making good cables. Radio Shack’s Gold series are also perfectly decent cables, though their RCA connectors have a tendency to be very tight.
You may also want to look at Chris White's DIY cable page, which shows how to make cables yourself with RG-6 coax and crimp-on connectors. RG-6 is kinda overkill for video cables, but there's no doubt they'll work like a charm. Bill Cushman also makes his own cables this way, and recommends Canare LV61S for normal "hookup" cables (audio and video), which is an RG-59 sized flexible cable, and Canare L5CFB for long runs of video, RF, and satellite signals. L5CFB is RG-6 sized. I have made my own cables using Chris's instructions, and it was as easy as he said it would be.
If the deck is VHS, the composite connection is probably the only one available. If an S-Video output is available, use it; it may make a small difference. With an S-VHS deck, definitely use the S-Video output, as otherwise you will lose some of the resolution and especially the chroma bandwidth.
You should probably use the composite input, if possible. The 10HT has a really fine comb filter, and Laserdiscs are inherently analog, composite media. S-Video is also acceptable, but it’s likely that the 10HT has a better comb filter than your disc player.
The best connection is component, which maximizes the color bandwidth and produces richer colors. It uses 3 normal 75 ohm video cables. These can be connected to the Sony on either input A or B, using the first three RCA jacks on those inputs; the ones labeled "Y," "Pb," and "Pr." The other two RCA jacks on the Sony's input A or B are left open.
The next best is S-Video, if your DVD player doesn’t offer component output. Use any decent quality S-Video cable.
You can use composite video, but it would be a crime. Don’t do it.
Generally a progressive scan DVD player will have component (YPbPr) outputs, which use three RCA connectors. These can be connected to the Sony on either input A or B, using the first three RCA jacks on those inputs. The other two RCA jacks on the Sony are left open.
Some high-end progressive players use a VGA-style connector, and will require a VGA->5RCA cable (see section 2.3). Depending on the player, it may output component, or RGsB (sync on green), in which case you will only use three of the cables, or it may output RGBS, which will use 4 of the 5 cables, or it may output RGBHV, which uses all five. It may also be switchable between two or more of these formats. Given a choice, you will probably want to use component (YPbPr). If the player offers a choice of resolutions, 720p and 480p should both be good. You should switch between them, if you can use either one, and see which looks best to you.
If you connect a progressive DVD player with the composite or S-Video connections, you lose the progressive output. This would be a crime against nature.
You need a VGA->5RCA cable. See the cable section above (2.3) for details.
The biggest problem with using a computer to play DVDs is that the Sony locks into 4x3 mode when it detects any of the standard computer resolutions, and you can’t select "Full" mode to fill up the screen. If you use a card that can handle non-standard resolutions (the Nvidia GeForce and the Matrox G200 & G400), and create a 1366x768 resolution, the Sony will effectively scale it to 1024x768 and still lock to 4x3. There is some hope that Sony will change this with a new firmware revision, but for now there is no way to drive the whole panel at 1366x768.
However, if you have one of the above-mentioned cards, you can create an 1184x666 resolution, with the appropriate front/back porch settings so that the Sony will recognize it as 720p HDTV. You will need either the Matrox Powerdesk software, or a program called PowerStrip which allows custom resolutions on supported cards. The Powerdesk program can be downloaded from matrox (www.matrox.com) if it wasn’t included with your install disks, and PowerStrip can be purchased from Entech at http://www.entechtaiwan.com/ps.htm
Here are the numbers you need to create the custom resolution (from Turo Heikkinen):
                720p50Hz  720p60Hz
Pixel rate      64500000  74520000
Visible pixels  1184      1184
Front porch/H   138       138
Sync pulse/H    56        56
Back porch/H    342       278
Visible lines   666       666
Front porch/V   31        31
Sync pulse/V    6         6
Back porch/V    47        47
You will need a VGA->5RCA cable. See the cables section (2.3) for details. One difficulty at this time is that with the 1.03 ROM version on the 10HT, you must manually switch between DTV GBR and Computer when moving from Hi Def channels to Standard Definition channels. Apparently, with the earlier, 1.01 ROM, you could just leave the 10HT in Computer mode, but Sony "fixed" it.
Since moving from DTV GBR to Computer mode on the 10HT takes some time, as the Sony tries (and fails) to "lock" every time you move the menu, you can instead switch to an inactive input (like S-Video or Composite), switch Input A to Computer or DTV GBR, then switch to input A.
You can also make a macro on the Philips Pronto remote that will quickly do the switch, and possibly with other remotes as well.
Some people prefer to just switch to S-Video output when watching normal channels, because it’s an easier switch than to do the Computer/DTV change, and you don’t really lose much watching normal channels through the S-Video output.
This uses a normal component output. Use component cables, as detailed above in the "cables" section (2.3). Normally, you would want to leave this unit in the "pass through HDTV signals unchanged" mode, as the Sony can handle any of the formats, including 720p. However, as of this writing, the 6000 units are having trouble with the 720p modes, and they have intermittent video dropouts. The 1080i mode works OK, so you will want to switch to that mode until Echostar gets the problem worked out and either downloads a fix or produces a new unit that you can swap for.
This unit uses a normal component output. Use component cables, as detailed above in the "cables" section (2.3). You will want to leave this unit in the "pass through HDTV signals unchanged" mode, as the Sony can handle any of the formats, including 720p.
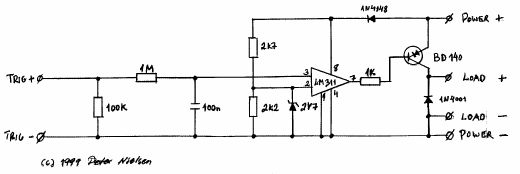
Peter Nielsen writes:
"The trig output of the 10HT 12 volts, 2.6mA (output impedance: 4700 ohms). Consequently it is not powerful enough to directly trigger some screen relays directly. Here's a schematic for a control unit that will do the trick:
If you don't want to build this unit yourself you can buy a ready-to-use unit from Dave Beatty (the guy who makes the W400 WhisperFlow)."
Stewart Filmscreen also has a relay that will work with their screens.
Most scalers have a VGA output, and require a VGA->5RCA cable (see the cables section, 2.3). Some scalers may have RCA outputs or BNC outputs. In those cases, you'll want either RCA->RCA cables or BNC->RCA cables. Make sure that if you use separate cables rather than tied-together "component" cables that all the cables are the same length (to within an inch or so).
Scalers usually have selections for multiple output resolutions and video types. If possible, have the scaler output an HDTV-like output, either RGB or YPbPr, preferably 720p, though 1080i is also acceptable if the scaler can produce it. The difficulty with computer-like resolutions like 1024x768 is that the 10HT will only recognize them as computer signals, and will lock into 4x3 mode. The one exception to this is 640x480 (really, anythingx480) at 60Hz, which the 10HT will recognize as either computer or DTV GBR, and in DTV GBR mode, you get aspect control. Unfortunately, the timings for computer signals at 640x480 are not the same as HDTV at 480p, and you get really excessive overscan on the top of the picture, losing about 15% of the top of the image. You can see this clearly with a computer outputting 640x480x60Hz, and the DVDO IScan+. I suspect that the same would hold for any scaler outputting 640x480.
A deinterlacer, also called a line doubler, simply converts 480 line interlaced video to 480 line progressive video. A scaler then scales the image up to the native resolution of the projector. The 10HT has both a scaler and deinterlacer internally, and both are quite good. However, the Sony deinterlacer does not appear to recognize and undo 3:2 pulldown, such as you would find on video that was originally sourced from film. Some outboard deinterlacers do in fact detect this pattern of fields and are able to do a better job with film material. If you want this capability for all your sources, you may want to look into getting a scaler such as the DVDO IScan+, the AVScience CrystalImage, or the TView Quadscan Pro. None of these units will be able to bypass the Sony's internal scaler, so the image will be scaled twice. The preferred output formats, from most preferred to least, are 720p, 1080i, and 480p.
Note: The IScan+ and the Quadscan (and probably the CrystalImage) will only output computer-like signals, which have slightly different timings from HDTV or NTSC signals. This causes about 10% extra vertical overscan on the Sony in any mode but Computer. This is subtle, but is a real problem, as it cuts off the tops of people's heads, and stretches the image vertically slightly, making the geometry wrong. Hence these are probably not a great match for the 10HT, unless you only want to use them for 4:3 material, which will look fine with the Sony in Computer mode.
If you just want the benefit of 3:2 pulldown detection with DVDs, a simpler, cheaper, and better-looking solution is to get a progressive-scan DVD player, such as the Toshiba 5109, 9100, or 6200, or the Panasonic H1000, all of which do great 3:2 pulldown detection, and produce a very smooth, film like image. Sadly, the Pioneer 434 unit does not appear to have the same advanced deinterlacing circuitry as the other progressive DVD players, and is not recommended. Most users of the 10HT find that between a progressive DVD player and the internal scaler/deinterlacer in the 10HT itself, the extra benefit they might get from an external unit are not worth the money.
The 10HT produces plenty of light, so generally a screen with gain is not a requirement unless you want to use it in a fairly bright room. However, screens with gain tend to enhance contrast by reducing the effects of off-axis light. When you use a matte white screen, the light reflecting off the screen is then reflecting off your walls, and back onto the screen, washing everything out slightly. With a higher gain screen, reflections from the walls are first minimized by the directional nature of the screen, and then secondary reflections are reflected either back at the walls (for retro-reflective screens) or onto the opposite wall (for angular reflective screens).
Overall, people have gotten good results from everything from Matte White to High Power. However, there are three screens that have had the most positive feedback:
Both the High Power and the StudioTek will increase the contrast of your image by reducing the effects of ambient washout. If you have to deal with lots of ambient light in the room, the High Power is a great choice, but otherwise it’s a real tossup. Stewart has an excellent reputation, and their service is second to none, and the StudioTek is a great screen. On the other hand, Bill Cushman and others recommend the High Power strongly, and it is a very nifty screen. I finally went with the High Power, and I like it a lot. I would recommend getting the fixed screen or a tab-tensioned, as the standard pulldown (Model B or C) has a tendency to have waves in it.
In short, any of these three screens are fine. There have been good reports of people using Draper M1300 material, but not enough to get a consensus of opinion. There have been scattered negative reports about Draper M2500 and Da-Lite Cinema Vision, but not enough to call it a consensus.
Important note: the VW10HT (and all fixed-pixel displays) have problems with moiré effects when projecting onto microperforated acoustically transparent screens. The moiré patterns look like repeating straight or slightly curved lines in the image, and result from the non-integer relationship between the pixel frequency and the microperf frequency. To mitigate this problem, some have reported good results with a Cygnus IMX image processor, which is a lens-like attachment which helps fill in the gaps between pixels, making the screen image smoother.
If it wasn't already clear by now, I like Medical Video Systems. They stock just about every item you might need for the 10HT, and have excellent service. Surprisingly, their prices are generally extremely good, if not the best. They will sell you accessories even if you haven't bought the projector from them. And now would probably be a good time to point out that I am not affiliated with them, nor do I get any compensation for plugging their outfit. I am genuinely amazed by their level of service and attention to detail, and it's difficult to amaze me after 15 years of buying electronics and computers mail order.
Full – the main 16x9 mode, used for 16x9 enhanced DVDs. This takes the signal and stretches it to fit the whole 16x9 screen.
Normal – the main 4x3 mode, used for regular TV and 4x3 format DVDs, Laserdiscs, and VHS. This puts the 4x3 picture in the middle of the 16x9 screen, with black bars on either side.
Zoom – used for letterboxed, but not 16x9 enhanced, DVDs, Laserdiscs, Videotapes, etc. This zooms a 4x3 TV image so the top and bottom are cropped off, but the width fills the 16x9 screen.
Wide Zoom – A hybrid mode that stretches a 4x3 image to fit the 16x9 screen, but squishes the bottom and top of the screen so it doesn't cut off as much as the Zoom mode would. Used to make normal 4x3 images fill up the screen, but makes the picture weirdly distorted. This is the way they watch TV in hell.
Subtitle– A mode for zooming letterboxed material while keeping the lower portion of the image so you can read the subtitles. Possibly useful for subtitled widescreen laserdiscs or DVDs where the bottom of the subtitles would be cut off in Zoom mode. This does distort the image, so purists may want to watch subtitled non-16x9 movies in 4:3 (Normal) mode. With 2.35:1 movies, you can shift the picture up on the screen using the image shift control in the menu, and make the entire black letterbox area appear on the bottom of the screen, instead of half on top and half on the bottom.
Full Through – A 16x9 mode, exactly the same as full, except that the picture is shrunk to a 853x480 pixel window in the center of the screen. This maps the 480 lines of NTSC video 1:1 on the screen, so there is essentially no scaling going on, which makes the picture somewhat sharper. It also makes it smaller, but you can’t have everything.
Normal Through – Same as Full Through, but the picture is in a 640x480 (4x3) window. This is actually a useful mode for watching lower-quality video, like VHS tapes. The smaller window helps hide the artifacts and noise of lousy video, but is still larger than most normal TVs.
Bill Cushman says it best:
"Video memories 1 thru 6 are global memories whose settings are independent of the input which is selected.
Your normal default memory for each input should be 'Memory Off'. This memory is specific to each input, and to every scan rate on that input. By using 'Memory Off' you can save settings that are input specific, and they will be invoked each time that input is selected.
I suggest that you go to each and every input and select 'Memory Off'. Then set your preferred values for that input. These values are automatically saved for that input and scan rate. Use one of the numbered memories when you desire alternate settings that you only use for special situations.
It may appear that there is only one video memory per input in 'Memory Off', but there are actually many (perhaps 60), one for each scan rate. You will never see these memories unless you change the scan rate on a specific input. If you change the scan rate feeding the projector, a new video memory automatically is selected. If you hook up a progressive DVD player (set to progressive output) to Input A, select 'Memory Off', and enter your desired video settings, they will appear on that input every time the player is set to progressive output. If, in addition, you set that player to output an interlaced signal, a new video memory will be selected that will allow you to save your preferred settings, and these will be automatically selected any time you go to Input A and feed it with you DVD player's interlaced output. The same is true for Input B, the Video input, and the S-Video input.
In summary, 'Memory Off' should be your default setting. This is a huge group of automatically selected memories that is specific to each input and scan rate on that input. The six numbered memories should be used for alternate settings."
One tricky issue with this scheme is that if you want to change aspect ratios on a particular input, say to move between Normal, Zoom, and Full, you have to go into the menus, as there are no aspect ratio buttons on the remote. Thus, you may want to dedicate some of the video memories to the main aspect ratios you use most often. I have mine laid out as follows:
| Video Memory | Aspect & Calibration | Usage |
| Video 1 | Full, 0 IRE | Progressive 16x9 DVD |
| Video 2 | Normal, 0 IRE | Progressive 4x3 DVD |
| Video 3 | Zoom, 0 IRE | Progressive Letterbox DVD |
| Video 4 | Normal Through, 7.5 IRE | Cable, VHS |
| Video 5 | Normal, 7.5 IRE | 4x3 Laserdiscs |
| Video 6 | Zoom, 7.5 IRE | Letterbox Laserdiscs |
This is just a suggestion to help you see how it can be laid out. The progressive DVD uses 0 IRE calibration, so it needs separate memories. The other video sources like cable, VHS, and laserdisc use 7.5 IRE. I use the Normal Through mode for watching lower-quality video sources, and Normal for watching high-quality sources. (See 4.1, calibrating black and white level, for more on 0 vs. 7.5 IRE signals.)
Go into the Service or Factory mode (see section 4.0), and look on the projector info menu. Known ROMs are 1.01 and 1.03. The currently shipping ROM (as of 8/21/2000) is 1.03.
There may be a new ROM about to be released, which may fix some or all of the following problems:
When this firmware revision will come out is not known, or which of the above problems it will fix. Most likely, upgrading will require sending your unit into a Sony service center (see 5.3 "Where should I send my Sony for service," below). It will probably be numbered 1.04, but all of this is speculation at this point. Certainly it would be a bad idea to buy the Sony thinking that a ROM will be released to address any of these, as Sony has promised nothing, and there has been no word on a new ROM for a long time.
The only two color temperatures that are actually calibrated at the factory are Low and High. Low is calibrated to US NTSC standard for white, which is D65 (6500K). High is calibrated to Japanese standards, which is D95 (9500K). The others are created from Low and High by adding specific numerical values.
Custom 1 is just the High setting, with an arbitrary value added to the blue and green Gain. Custom 2 is the High setting with higher red gain, and even more blue and green gain than Custom 1. Custom 3 is the Low setting with higher blue and green, and Custom 4 is the Low setting, with lower blue and green. The Custom settings are not meant to represent any kind of calibrated color temperature, but rather to provide the user with some "punchier" settings than the calibrated ones. You can reset any of the color temperature settings, not just the Custom ones, but it is recommended to leave the Low and High alone, as it may come in handy to know what the original factory settings are, and even if you write them down, papers can get lost. (See 4.2, calibrating Gain and Bias, for more.)
If you are not planning to have a calibrator come and set up your projector for maximum contrast with correct color temperature, or set up one of the Custom settings as outlined in this FAQ, then it's best to just use Low. This will give you the closest to correct colors with NTSC signals.
The Service mode allows you to adjust color temperature (Gain and Bias) check the ROM version, and a few other useful bits and pieces. The service mode is accessed by pressing on the remote (enter)(enter)(up)(down)(enter), then (up) when it asks "do you want to enter the service mode?"
The Factory mode gives you access to everything, included cryptic settings that adjust all kinds of video decoding parameters, the 3D gamma settings, and more. The chances that you will need to adjust anything in this menu are essentially nil. The factory mode is accessed by pressing on the remote (enter)(enter)(left)(enter), then (up) when it asks "do you want to enter the factory mode?"
To leave either of these modes, use the same key sequence used to enter them.
Once in either of these modes, hit the menu button, and new menus and new items on old menus will appear. The factory menu has all of the service menus as well, plus a bunch of settings that are pretty much best left alone unless you are a service technician or really want to risk messing up your projector badly.
The first rule when changing anything in the Service or (especially) Factory modes is: write down the original parameters!
I’ll say that again: write down the original parameters!
There is no way to get back the original factory settings. Even if you send it to the service center, they may not have the ability to figure out what the appropriate settings are. Some of the settings are done at the factory, and only the factory has the equipment necessary to recalibrate them. All of these projectors have different numbers in almost every setting, because of the natural variability of LCD panels. So don’t change a number until you’ve written it down first.
You should first get a copy of Avia Guide to Home Theater (which is a DVD, not a book, despite the name), available from any well-stocked DVD retailer, like Amazon or Express. This has lots of test signals and complete instructions for lots of home theater calibrations. Avia is better for setting up the 10HT than Video Essentials, though you can use Video Essentials if that's what you have. The instructions in Avia and VE are pretty good. Here are some additional notes.
Using Avia:
Adjust the black level (brightness) on the pattern that is all black with moving bars. Turn up the brightness so you can see both moving bars clearly. Then turn it down until the left (lighter) bar is almost, but not quite, invisible. For interlaced NTSC inputs, you should end up right around 30. For progressive inputs, or PAL inputs, you should end up in the neighborhood of 50.
White balance is set using the needle pulse pattern. You want to adjust the contrast so that both white bars are visible, and you don’t get any color shift in the white area of the pattern, just under the black area. You may be able to turn the contrast all the way up without losing the moving white bars, but you will probably want to turn the contrast down to 95, to allow some headroom for extra-bright sources. Numbers between 85 and 95 are pretty normal for this setting.
Using Video Essentials:
With Video Essentials, you will need to have a DVD player that reproduces blacker-than-black signals. If your does not, you should probably use Avia. With Video essentials, you want to use the PLUGE (Picture Line-Up Generation) signal, and turn the brightness up until you see the blacker-than-black bar, then turn it down again until the blacker-than-black bar disappears, but the slightly lighter bar is still visible. For interlaced NTSC inputs, you should end up right around 30. For progressive inputs, or PAL inputs, you should end up in the neighborhood of 50.
VE's white level (contrast) pattern is not optimal for setting contrast on an LCD. But turn up the contrast such until the whitest part of the screen starts to change color (it gets bluer), or until you hit max (100). Then back off about 5 notches. You should end up somewhere between 85 and 95.
Keep in mind that normal NTSC sources use 7.5 IRE as black, while HDTV, most progressive DVD players, and PAL sources use 0 IRE. The upshot is that if you watch both normal NTSC and a progressive DVD player, you will need to calibrate twice. The brightness setting will be about 30 for normal NTSC (7.5 IRE) sources, and about 50 for PAL/HDTV/Progressive DVD (0 IRE) sources.
It cannot be overemphasized that this calibration is essential to getting a good picture on your unit. If your unit is calibrated for 0 IRE (as it is from the factory), and you show video based on a 7.5 IRE standard (like any NTSC signals from a VCR, DVD player, etc.), the black level of your picture will be at around 8% of full white, which makes your contrast level around 13:1, which is terrible. On the other hand, if you calibrate for 7.5 IRE, then connect a progressive DVD player or HDTV receiver using 0 IRE, the lowest black areas of the picture will all become one solid black shade, and the picture will lose all of the shadow detail. This also looks terrible, but in a different way.
Properly calibrated, your VW10HT should be able to get 140:1 or so contrast ratio, which is not as good as DLP or CRT units, but still quite decent.
First off, you really can’t "calibrate" these without a color analyzer, and furthermore a color analyzer that can handle LCD displays. Apparently most color analyzers are designed for CRT displays, which use slightly different R, G, and B shades. So don’t expect to be able to do an ISF calibration by yourself. If you do bring in a calibrator, make sure they are using an analyzer that is known to work properly with LCD projectors. The Sencore analyzer is optimized for CRTs, and seems to not give good results with the 10HT. The Philips PM5639 analyzer or a Photo Research spectrometer are both good. An optical comparator can also give good results.
All that said, given that the Sony has 6 different memory settings for color balance, why not use one of them for your own settings? You can't permanently screw anything up (assuming you write down the numbers before you change them), and you may like the new settings better. You'll need Avia Guide to Home Theater DVD, or Video Essentials. (See section 4.1 for sources)
Gain is used to set the highest brightness that the Sony will display for the highest reasonable video signal amplitude it recognizes. So if the Red Gain was 127 (half of 255), the Sony would display red at 50% of the projector’s physical maximum limit when it got a red video signal at maximum amplitude.
Bias sets the minimum video amplitude that will be recognized as black (with the brightness control at 50). It is not, apparently, exactly mapped from 0 being zero amplitude to 255 being maximum amplitude, so the numbers are in arbitrary units. Generally, unless you have a video analyzer, you shouldn’t fiddle much (if at all) with bias. Instead, you should use whatever bias numbers are in your factory Low setting, which is calibrated to US standards.
The goal is to get a gray step pattern from the Avia or Video Essentials disc to display a nice, even gradation from full white to full black, with no color shifts on either end or in the middle. We also want the projector to be using the maximum amount of possible range from white to black, so we want to get the maximum gain numbers we can without introducing hue shifts. We could just set all three gains to 255, but that would have too much blue and green, because of the color temperature of the lamp. So we max out red at 255, and set the green and blue to get the projector to as close to standard (D65) as we can.
Following are three methods, which are designed to be used together. Start with the first one, write down the numbers you get, then go back and forth between the second and third, tweaking until you get something you're satisfied with.
Before you start, go into the Service menu and write down the Gain and Bias settings for all 6 memory settings. There are 6 numbers: Gain and Bias for R, G, and B. When you’re done, you should have a grid with 36 numbers from 0 to 255 on them. Stash this paper someplace safe.
Pre-adjustment:
According to Bill Cushman's data, Sony has been calibrating the projectors just slightly too green, compared to the D65 reference. Therefore, as a starting point, you'll probably want to lower the Green Gain on your Low color temp about 10%, typically around 15 units. This will provide you with a closer reference than the factory Low setting.
A recap of the formulas:
RN = 255
GN = GO * (255/RO)
BN = BO * (255/RO)
This method is based on the idea that people have a fairly narrow range of hues they recognize as "yellow" and a similarly narrow range of hues that is "cyan." Since yellow and cyan are two of the basic complementary colors you get from red, green, and blue, that makes it reasonable to fine tune your color balance by checking for yellows that are too red (orange) or green, and cyan that is too blue or green.
You may want to go back and forth between method 2 and 3 several times, narrowing in on the settings that get you a color temperature close to Low, with good yellow and cyan complements. When both checks look good, or you get completely bleary-eyed and tired, and your spouse starts whining at you to come to bed, you're done.
Again, keep in mind that this seat-of-the pants adjustment is no substitute for a good calibration by someone who has an analyzer and knows what they’re doing, but it should increase your contrast and be no worse than any of the other Custom settings. If you find it to be an improvement, then that’s what’s important.
Keep in mind that you should re-calibrate white and black level (brightness and contrast) after adjusting your gain and bias.
For what it’s worth, (remember that all 10HT’s have very different settings for Gain and Bias) here are the Gain and Bias settings for my Custom 1, after this procedure:
And here are some other folks’s numbers after calibrating (not with the procedure above):
As you can see, the numbers are all over the map. Only Bill Cushman’s represents the results of a real calibration with a color analyzer, but given the huge variability of the starting numbers, you really can’t use any of these as a starting point.
(Huge thanks to Bill Cushman for much of the material used to write this section.)
The 10HT (or any other projector) looks its best when the contrast is maximized. Maximizing the contrast will also improve the black levels, because your eye will adjust to the increased contrast and perceive the blacks as blacker. Following is a list of steps you can take to improve the contrast, including links to other sections of the FAQ where necessary.
I turn the floor over to Jeff Lederman, who describes the process in detail:
"My new VW-10HT arrived on Monday (7/11), after about a 30 day wait. Upon unpacking and setup the first thing I noticed was that there were no dead pixels (thankfully). However, there was a green blob in the lower left portion of the screen, and upon defocusing the image, and focusing on the blob, it was clearly a curly fiber/fur or hair. The blob turned magenta in color in bright scenes. I could actually move a 2:35:1 picture to a point where it was above the blob, but it was still clearly visible on the black bar below the picture, and it bothered me.
I'm a brave soul when it comes to carefully inspecting the insides of items, even still under warranty, and I had read a report about discussions with Bill Cushman on this forum, who had apparently successfully cleaned his VW10. No harm in looking inside, right?
I found a clean, dry area of the house, made sure the cats were outside, and asked my wife and kids to give me about an hour without coming close to the table I was working at. I have built computers as a hobby, and thought it wouldn't hurt to hook up a wrist strap to the chassis, since I'd be around the circuit boards, chips, etc.
Well, it took a few minutes to figure out how to get into the thing, but it's actually pretty simple: The dark gray plastic piece on top which hooks into the white cabinet has a tab on the portion to the rear of the dark gray piece, which is clearly visible at the intersection of the white case lid. Take a thin flat blade screw driver, and very carefully and lightly press down on the tab. This will let you carefully slide the dark gray piece forward enough to clear the tab, and then work it off around the lens and off of the projector.
There are six screws, four around the outside of the lid, and two under the gray piece you just removed. A # 2phillips head screwdriver is used to remove these. IMPORTANT: The lid is connected via a small wire loom to the rest of the projector because the controls are mounted on a board on the lid. I did not attempt to disconnect them, because you don't need to. Simply slide the lid back far enough to reveal the prism and lcd panels surround it. If the lid is still in your way, it can be slid all the way back to back of the projector and carefully balanced against the rear of the projector resting on the table, without pulling on the wires.
Covering the prism is a screen, on the top front of which is a foam seal, which is stuck to the screen. The screen is held on by two screws, one of which (the one towards the front of the projector) has a small plastic keeper on it. Very carefully remove the two screws (same screwdriver) and be sure not to drop them into the unit. Tweezers standing by are a good idea at this point so you're not reaching in with your fingers unnecessarily. The foam piece will now slide out around the lens, as will the screen, BUT be very careful around the ribbon cables going to the lcd panels, and gently push them out of the way as you work the screen and foam piece out. It actually comes out pretty easily.
I bought "Dust Remover Spray" from Radio Shack, catalog No. 64-4326. However, I had no confidence in it whatsoever without some experimenting, because it contains tetraflouroethane, and it wasn't clear whether it would leave a residue. I used about 1/3 of the can experimenting by spraying it on my hand, a paper towel, tissue paper, and a window, to see if there was any sign of residue. There wasn't. So I hooked up the straw, and ran the tests again. Still dry. Swallowing hard, I decided to try cleaning the prism with it. IMPORTANT: Hold the can upright at all times, to avoid liquid spraying out. Bend the straw down close to (a few inches from) the area between the prism and the lcd panels, and blow a bit of air into the area, aiming at the prism. Don't blast it, but control the air pushing on the button just enough to get a good flow going through there.
I cleaned all three sides of the prism this way, and also blew some air between the lens and the prism on the fourth side as well. Trouble was, I didn't know if I'd accomplished anything, or whether I had even made it worse by blowing more dust onto the prism than I removed. Only way to tell was to put the projector back together, and try it. I did, and the blob was gone. I watched a full 1:78 movie with no blobs, no distractions, etc. I then watched a 2:35 movie, and the black bar area where the blob was before showed no sign of it.
Best of all, there's no way to tell I've been inside the thing, so no warranty voiding concerns.
It was not a difficult operation, and the whole thing took less than 30 minutes. Just be very careful, go slowly, and best of luck. I won't hesitate to try it again if the thing sucks up more fibers."
The lamp is a UHP lamp, and will keep its light output relatively constant over its life. You should expect around 2000 hours of life if you consistently use Cinema Black mode, and 1000 hours with Cinema Black mode off. These numbers are averages, and your lamp may last more or less time. It is useful to have a spare lamp handy, as when the lamp goes, it just shuts off with no warning. New lamps tend to cost around $350 or so at this time.
Medical Video Systems has them, and most any other Sony projector dealer should also keep them in stock.
Dan Baugh no longer works on 10HTs under normal circumstances. All 10HT repair is being handled through the On Time service program, which includes free shipping to and from the service center and a loaner projector while yours is being repaired. The On Time operators can be reached at 877-350-3477. You can read about the program here.
The owner's manual can be ordered from Sony Parts (1-800-538-7550), or the UK version of the manual (which is nearly identical to the US version except for spelling) can be downloaded from here (Adobe Acrobat file). A copy also comes with the projector.
The two page brochure can be downloaded from here (Adobe Acrobat file).
The service manual is only available from Sony Parts (1-800-538-7550), and is $60. Shipping is $11. Its usefulness to the home user is essentially nil.
There is also a Theory of Operation manual, available from Sony Parts (1-800-538-7550), which tells how the signals flow through the unit and what the various ICs do, in general terms, which is also available from Sony parts, for $10. Shipping is still $11, though if you buy it with other parts (like the service manual) it's $11 for the whole order.
See also 6.1, on controlling the 10HT with a computer, which has the link to the protocol manual.
You will need a null modem cable, to start with. This is available at any decent computer store.
You then need a copy of Sony’s protocol manual, and the PJSerialComm software to send the codes, both of which are available at http://www.sonydisplaysystems.com/display/downloads.html.
You can also download Niklas Eriksson’s VPLControl software, available at http://www.neriks.com. This is a nifty program that allows you to control and adjust just about anything on your 10HT from a computer via the service connector.
The Big Picture VW10HT Forum is a great place to ask questions and post info.
The Big Picture VW10HT FAQ is also a great resource. It has some overlap with this FAQ, but is well worth reading.
Also on the Big Picture site is a wonderful document put together by Allen Monroe, which compiles all of the estimable Bill Cushman's posts on the VW10HT and W400Q forums. Bill is a one-man encyclopedia of information about this projector (and lots of other things). This is a must-read for people who want to know more about the way the VW10HT ticks. Get it here (MS Word format doc).
Peter Finzel's VW10HT FAQ page. This is a translation from the original German page. Great reading.
Sony's own VW10HT home page. This lists specs, accessories, and marketing info.
Other forums that are worth checking out:
AVScience Forum. This is a great forum for all kinds of info about projectors in general, HDTV, and all sorts of other stuff relating to home theater.
Home Theater Forum. This is one of the oldest and best home theater forums around.
The following people directly or indirectly helped with this FAQ, by posting useful info on one or more forums:
If I've forgotten you, apologies. It was late. Please let me know. All errors are my responsibility. Please send comments and corrections to don@munsil.com.
This FAQ is copyright 2000 by Don Munsil, except for quoted sections, which are copyright the original authors. Permission is granted to copy or mirror this document for non-commercial use provided that it is left intact, including all attributions, version, date, and copyright notices. This document is provided as is without any express or implied warranty.