Restoring a Watch Master G7 Watch Timing Machine (Update Summer, 2016)
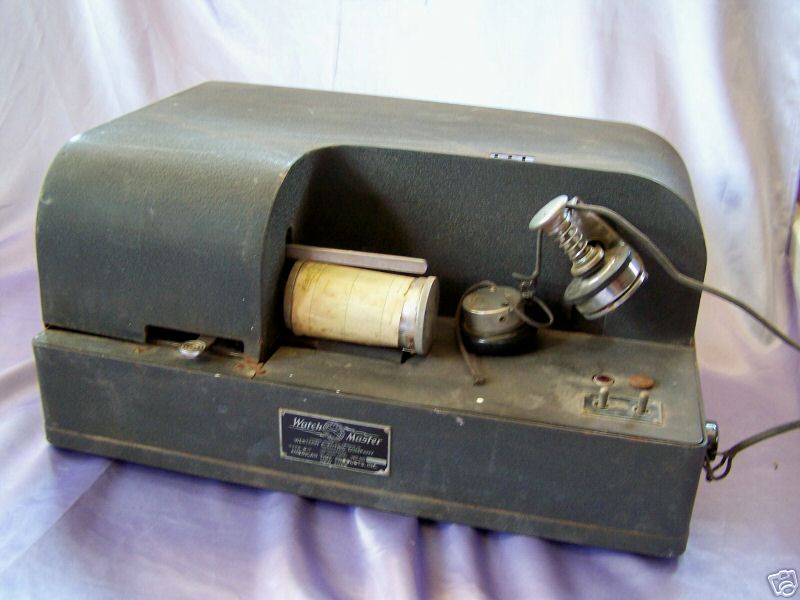
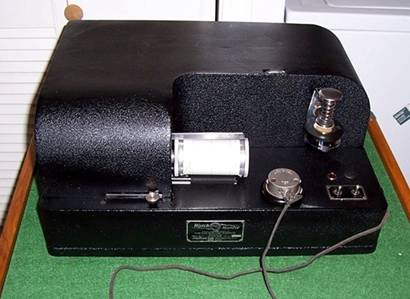
The author recently acquired a Watch Master G7 watch timing machine manufactured by American Time Products, under license from Western Electric in c.1948
Information seems to be scarce. As Web and Usenet searches turned up
very little useful data, I decided to publish this page as a helpful
service to others.
As an electrical engineer who enjoys restoring antique radios and pocket
watches, I felt positioned to restore and put one of these old workhorses
back into service. I realize that there are many modern devices which can
do a better job, but they aren't nearly as amusing. Also, how can you go
wrong with black wrinkle finish with chrome accents?
The following discussion is not intended as a step-by-step set of instructions for the novice. Rather, the intent of this article is to highlight problem areas encountered by the author, and provide the needed factory service data and chart interpretations from the oft missing booklets which originally accompanied the machines.
Restoration discussions assume familiarity with some basic circuit theory,
component nomenclature, soldering, etc. If you don't feel comfortable,
please seek the help of an electronics repair professional. There are dangerous
voltages running around in this equipment.
History (additions are welcome)
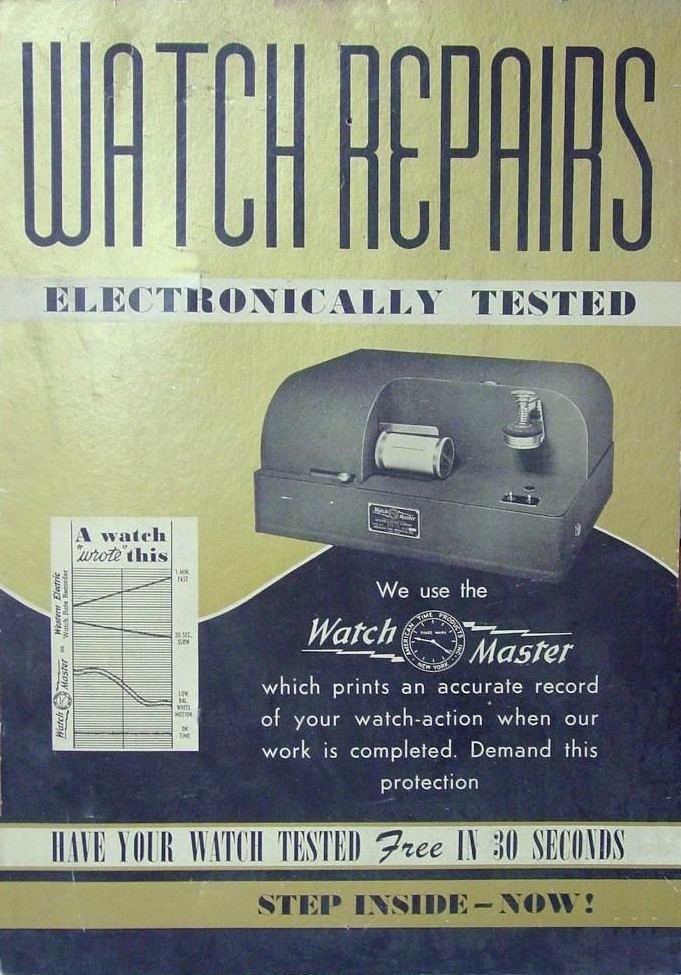
These devices were among the earliest of their kind. Finally a convenient electronic method of quickly establishing the timekeeping characteristics of mechanical watch movements was within reach. Build quality is excellent and the user interface is simple and straightforward. One proprietor of a shop near my home had one of these in service in his business well into the 21st Century. Apparently he liked using it, and maintained a fleet of "hanger queens" to keep it going. Untold thousands of these machines must have been produced to satisfy the needs of the armies of watchmakers and manufacturers which once thrived in this country.
The subsequent version, the model G11, was essentially the same device. It incorporated some minor user interface changes, such as co-locating all the controls and headphone jack into one panel on the front. The rotating pickup was made user-detachable, but the circuit and mode of operation remained the same.
The next generation, the G47, was quite different. Migration to miniature tubes, a completely different form factor, remote pickup, selectable time bases and gone is the cool black wrinkle finish with chrome bits. The G47 Manual and Service data is available for download here.
Here is the link to some storefront placards for the G7 and the G11.
Mode of Operation
A sealed mechanical tuning fork assembly is used to provide a stable time base of 240 Hz. This signal is electronically divided by 4 to derive a 60 Hz time base. This signal is then imposed onto the control grid of a 6L6 power amplifier tube. This tube is used to provide power for an AC synchronous motor which runs at 1800 RPM. The motor output is geared down by a factor of 6 to rotate a drum at 300 RPM. Around the drum is chart paper calibrated in 5 second/24 hour lined increments.
One might wonder why all the fuss just to generate 60 Hz to run an off-the-shelf AC motor? The answer is that AC mains frequency just wasn't accurate enough to provide a usable time base for watch calibration. It is much better today, however. One source indicating a range of only about +/- 0.02 Hz. The onboard time base also solved the issue of differing mains frequency standards, such as 50 Hz.
A crystal microphone pickup is used to "listen" to the ticking of the watch and fire a 2050 thyratron tube which energizes a small electromagnet. The electromagnet actuates a stylus which marks the chart paper on the spinning drum. This creates a printout of the performance of the watch over a 30 second period. This can be extrapolated to seconds/day with the help of the calibrated chart paper.
If the printed markings have a positive slope, then the watch is gaining, and if it has a negative slope, then the watch is losing time.
Here is link to the Watch Master Handbook in
PDF format. In it you will find verbose interpretations and pictures of
timing traces, which will not be duplicated here.
Availability and Cautions
These show up on eBay with relative frequency. I've seen them at estate sales, swap meets and, of course, from retiring watchmakers.
Do not expect any electronic device built in the 1940's to just turn on and function. When I work on any newly acquired vintage radio or television, I NEVER plug it in until I have gone through all the power supplies and inspected for shorted components. The last thing you want to do is damage some expensive and difficult to obtain part. Many machines may not have seen power for decades.
Prices vary greatly. I have seen nonfunctional examples either free or in the sub $50 range. Truthfully, I have never encountered a restored and functional example for sale, so I have no idea of what one would bring. Here is a brief breakdown of my particular G7 to establish a data point.
Auction close $9.00
Shipping
$36.00
Misc. Film Capacitors ~$20.00
Misc. Electrolytic Capacitors ~$8.00
6L6G Tube (good used) $12.00
6SN7 Tube (good used) $6.00
Misc. resistors, wire, cord, shop supplies, bushings, potentiometer,
etc. $20.00
My time to complete job (including debug and fine
tuning) ~15 hours while climbing learning curve.
Material cost turns into about $111.00.
Since I don't charge myself an hourly rate, I can stop here. Let’s assume
shop time of $50/hour. That's an extra $750!!!
Clearly it is more economical to purchase a modern timer, or locate a Watch
Master in much better condition than mine was in when I purchased it.
Primary Failure Modes--Electrical 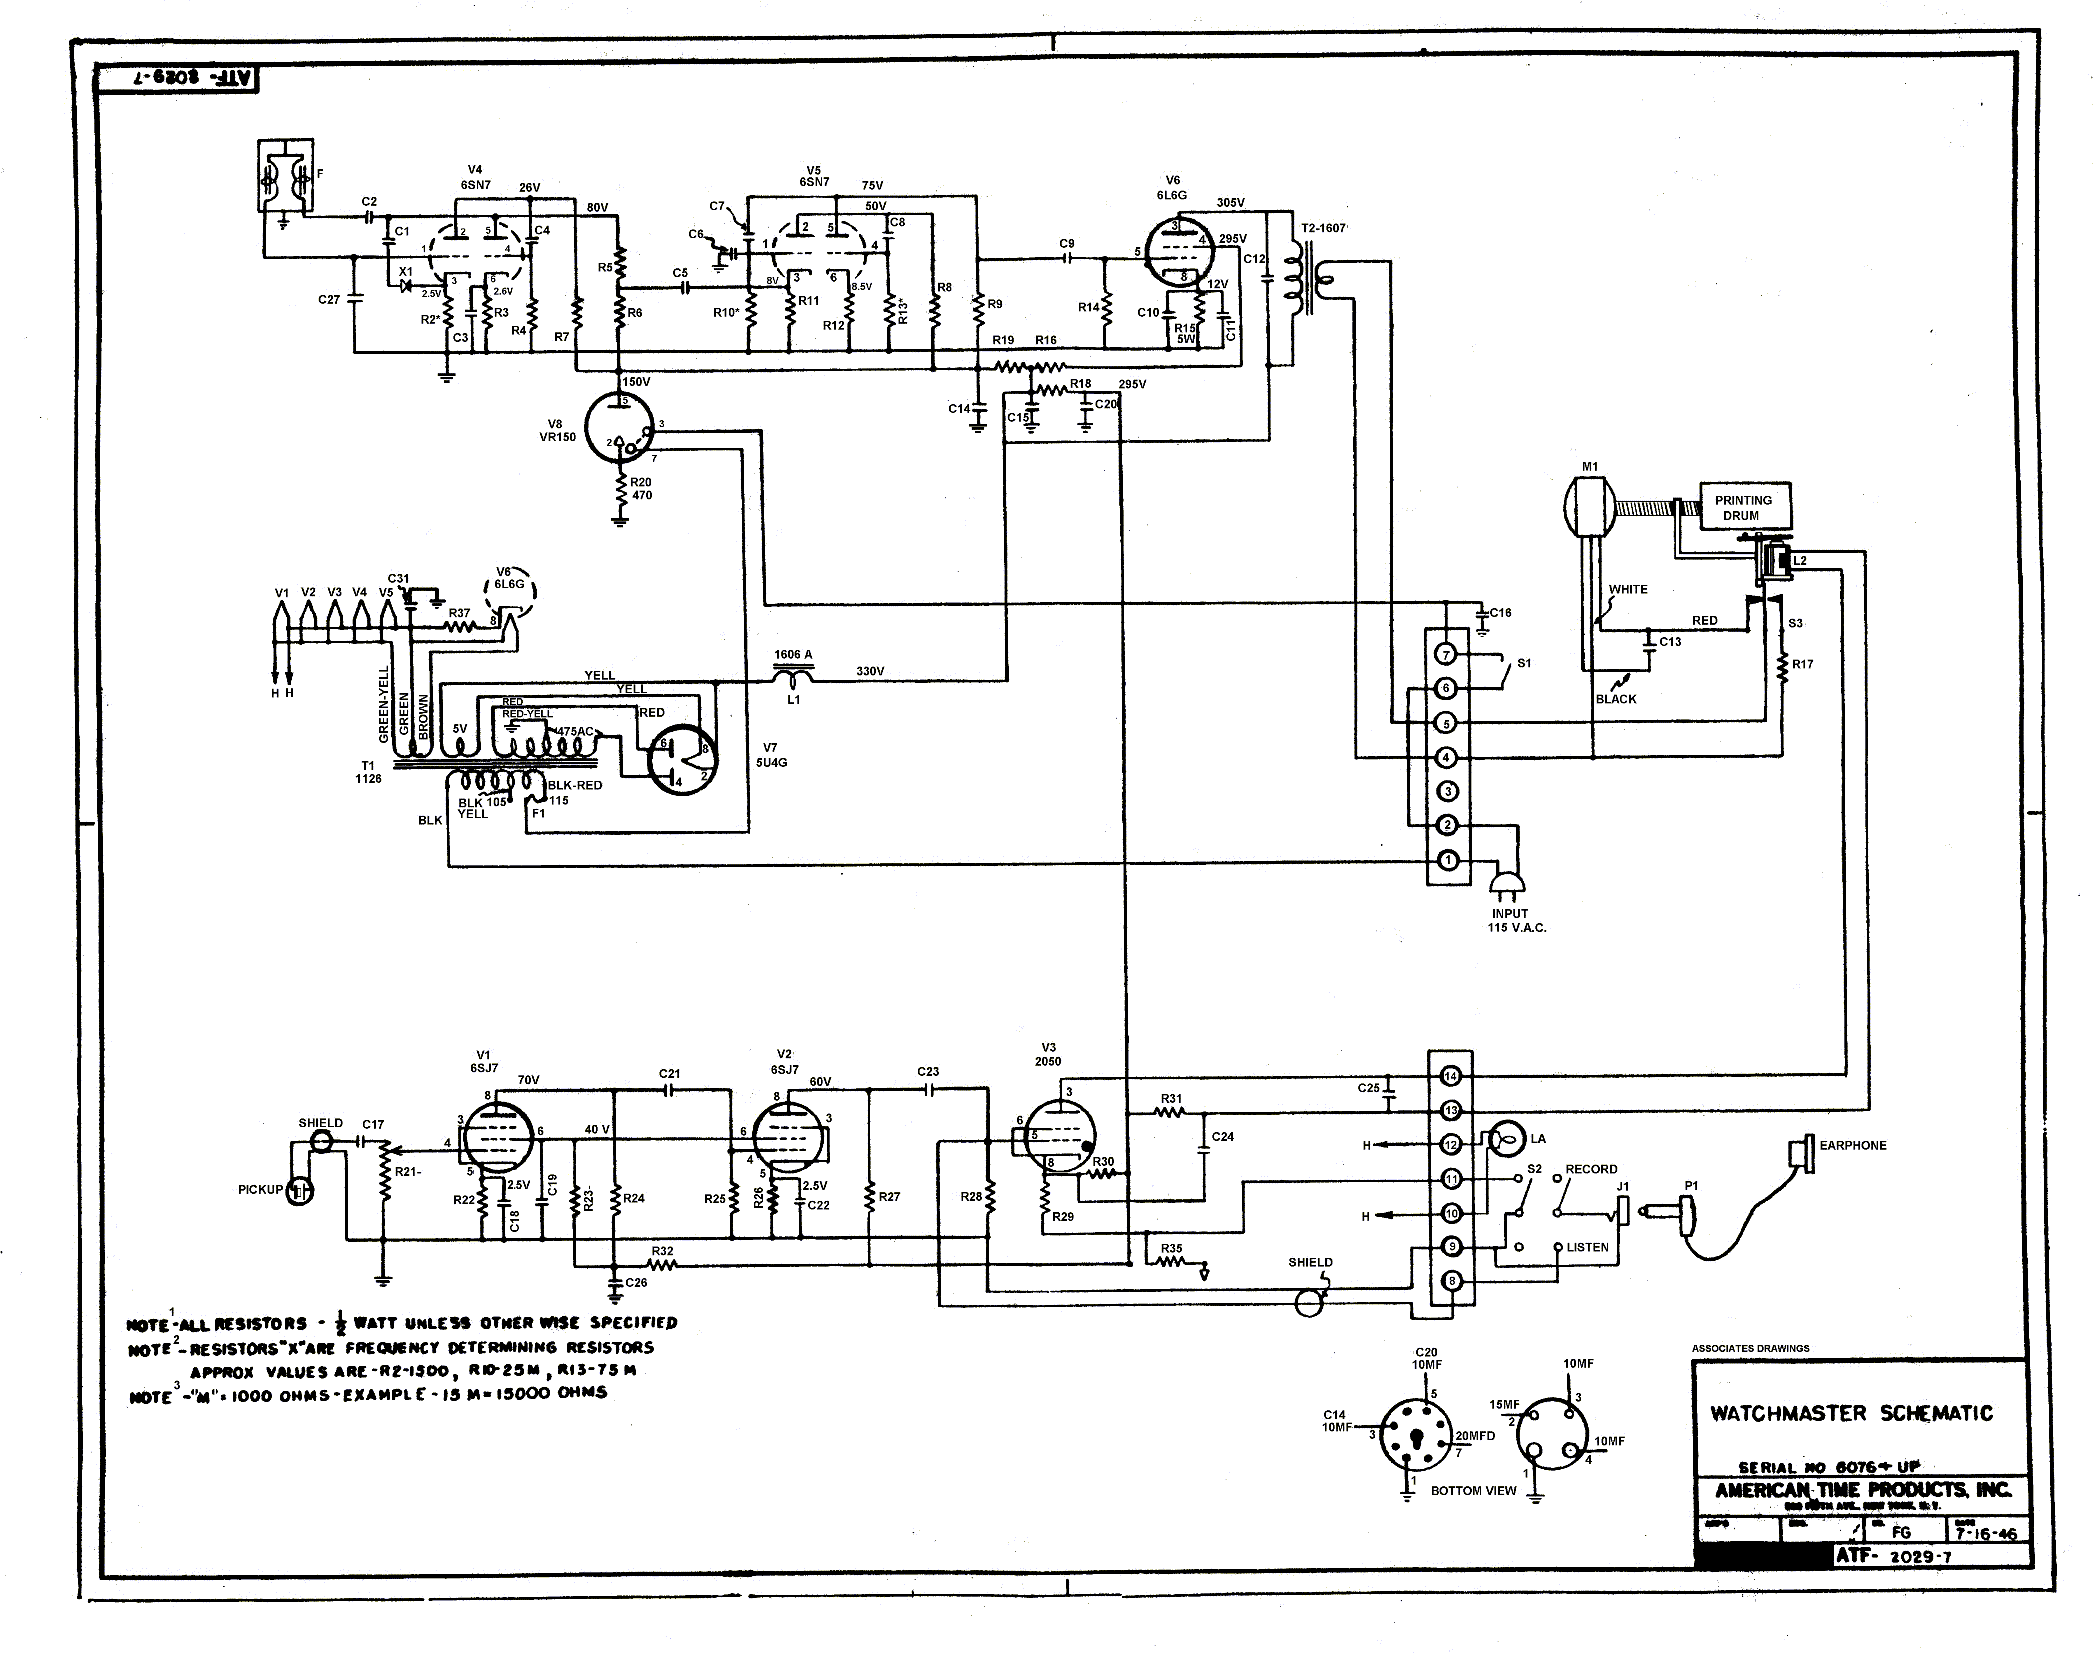
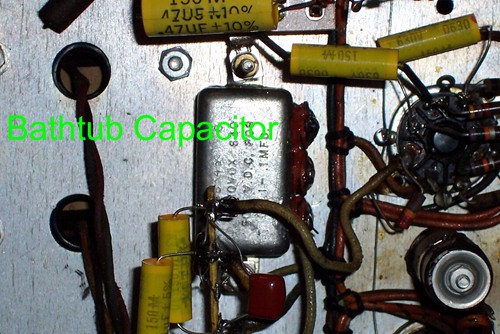
Wax/Paper caps just do not hold up well. They either turn into resistors or shorts. Replace them all and don't look back. The paper dielectric degrades over time.
"BathTub" capacitors are solder sealed
can type paper capacitor modules filled with some kind of oil.
I've heard of people unsoldering the cans and re-stuffing them with modern
capacitors.
I would NOT ATTEMPT this! That oil could be loaded with PCB's (polychlorinated
biphenyls), usage of which is now widely banned. Since I wasn’t sure (and
wasn’t interested), I just removed these and replaced them all with modern film
type capacitors.
Some folks like to re-form electrolytic filter capacitors by applying a slowly ramping and current limited voltage over the course of several hours. This acts to help re-establish the long lost dielectric layer. This sometimes works, but if you plan to use your G7, then replace the electrolytics too. They just aren't that expensive, and it's not worth the risk. I believe that we can readily convince ourselves that the volume of electrolyte in these caps is NOT going to be increasing over time.
Phil's Old Radios has a nice discussion on old capacitors and their replacement. Enjoy http://www.antiqueradio.org/recap.htm
Resistors tend to change as they age as well. Check these with an ohmmeter as you're replacing the caps. Be sure to use the same value and power rating. Be careful about reading the values on the older schematic and parts list. The early convention was to use "M" for the 1000 multiplier. Today we would use "K". For example, 15M ohms would be 15K (15,000) today, not 15 mega-ohms.
Switches and potentiometers may require a sprits of contact cleaner and a few actuations. The 50Kohm audio taper potentiometer should be easy to get from Mouser Electronics. I think Radio Shack carries one as well.
I decided to replace the power cord with a modern 3 prong grounded style.
Tubes: Surprisingly, tubes really don't give much trouble. There are plenty of things higher on the list, but it still requires mentioning. The 5U4G rectifier and 6L6G power tube lead kind of a rough life in this device and may require attention. See the supplier list at the bottom of the page for possible tube vendors. If you Google for "vacuum tube sales" you'll find plenty for sale. Even in my antique radio and TV restorations, the tubes are pretty far down on the list. More often I find missing, incorrect or damaged tubes rather than ones which simply will not perform in the circuit.
Whatever you do, do not disassemble the tuning fork module (item F in schematic ) . Unless you want to end up using mains
frequency or a modern time base-just leave this part alone. It is worth
mentioning that Power Control
Devices INC. is very much in business and has acquired all the
intellectual property of American Time Products. They still produce
tuning fork modules.
Primary Failure Modes--Mechanical
Chances are it will be filthy. I removed the motor carriage assembly, disassembled it and thoroughly cleaned it with brake cleaner. Difficult portions were ultrasonically cleaned.
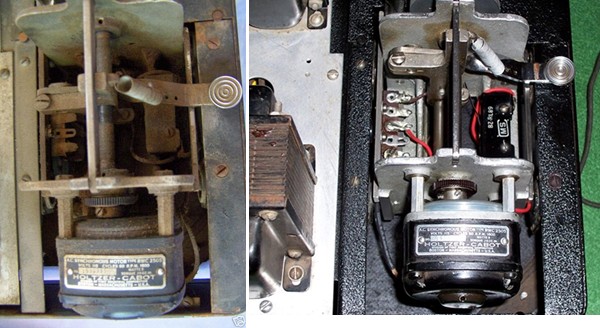
If your machine does not start the drum rotation without help, then there is something wrong in the motor drive circuit or too much physical resistance due to lack of maintenance, filth, etc.
The bronze bushings carrying the lead screw were overly worn on my machine, causing the drum to snag the ribbon. These are off-the-shelf bushings. ID=5/16", OD= 7/16", L=1/2". Press the old ones out, press the new ones in. Lap or ream to a smooth fit and don't forget to drill the oil holes.
Oil with good light machine oil.
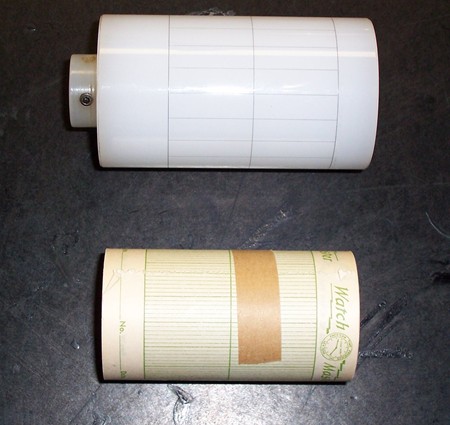
The ribbon will be dried out. I could not locate 2.5" fabric inked transfer ribbon anywhere. I re-inked mine with the following recipe. (Very messy!) --15 parts glycerin (from the drugstore), 15 parts denatured alcohol (from the paint store), 1/4 part black dye (I used TransTint #6023 from http://www.homesteadfinishingproducts.com ).
Update November 2016: Most office supply stores sell stamp pad ink. This would be a better solution. Still messy though.
Remove ribbon from spools, saturate with solution, wipe off excess, allow
solvent to dry, install onto spools.
The Pickup
This component will almost certainly be defective. It is basically just
a microphone. The active element is composed of Rochelle salt.
Unfortunately, this material is hygroscopic. Over time, it absorbs moisture,
crumbles and loses its piezoelectric properties. This same material
was used in countless phonograph cartridges as well. Much time has been
spent on their
reconstruction and repair.
Without a working microphone, your Watch Master is useless. Luckily, we
don't need audiophile sound, just nice crisp tics.
There are probably a couple of solutions here.
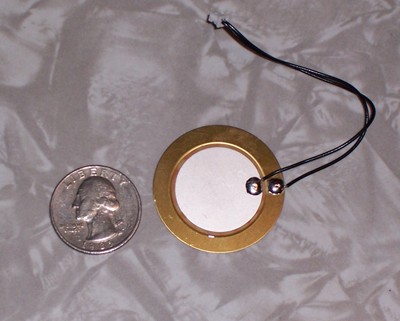
Attempt #1
Use a salvaged 1 3/8" piezo electric beeper element.
These kinds of things are used everywhere and should be available from a number
of sources.
Check the supplier list at the end of the page.
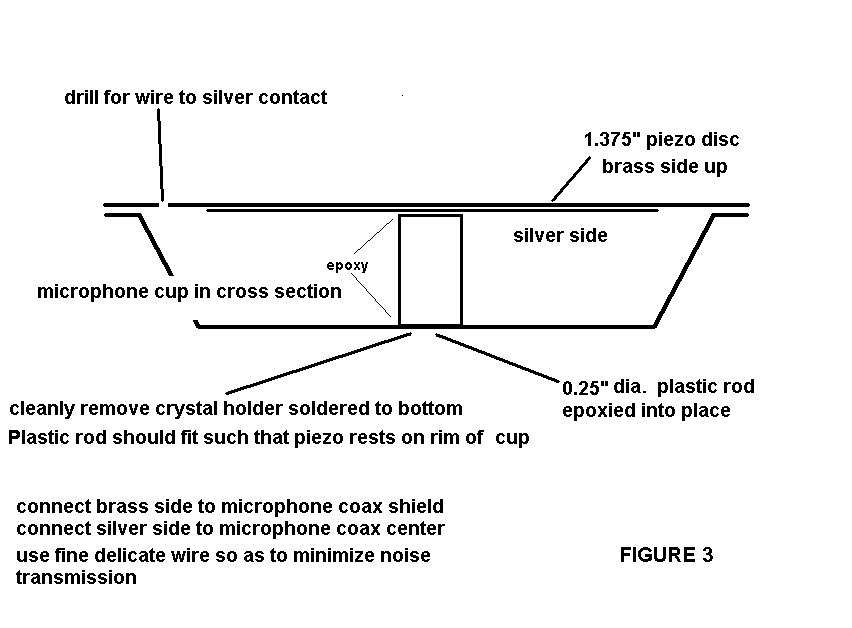
Unscrew the microphone pickup cup from the rotating frame of the Watch
Master. See Figure 2.
Carefully pull away the lower outer housing and unsolder both sides of the coax
leading to the element.
Remove the two top screws and brass stand-offs. The inner chrome
cup, upon which the watch will rest, will fall out.
Remove the old crystal element and its holder which is soldered to the inside
of the cup.
Assemble the piezo element as indicated in Figure 3.
Use a fresh strip of fiberglass perfboard or the original phenolic
retainer over the top of the piezo. Just make sure that there are no
opportunities for short circuits.
Do note that I decided to place the silver side of my element facing down into the pickup cup. This necessitated drilling the hole in the brass disk of the piezo to route the wiring. In retrospect this was likely wasted effort. Just mount the piezo silver side up and run the wires.
This worked very well on my machine, although the voltage output is likely reduced compared to the original Rochelle salt.
Don't neglect to replace any dried or crumbled grommets with fresh ones, as
this helps to isolate stray noise from the pickup.
Attempt #2 Update November
2016.
I mounted a Kobitone crystal microphone element from my parts stash face down in the inner pickup cup of my G7. Epoxy was used to firmly affix it around its periphery. This has worked much better and allows me to time quieter watches.
Crystal microphone elements do show up on eBay. They seem to be targeted to the guitar crowd. I believe that Kobitone no longer makes them. I originally purchased mine from Mouser Electronics.
Option #3
West-Tech Services in
Kent, Ohio specializes in rebuilding all kinds of phonograph pickups,
cartridges and microphones. They may be
able to rebuild a Watch Master pickup. I
have not consulted them.
Conclusions
This was a very amusing project. I have used my G7 now only a couple of times. A friend was quite pleased with the printout I presented to him of the performance of his watch.
The G7 looks nice in my workshop and was a welcome addition.
I'm not really in the business of doing contract restorations of these kinds of items, but I am more than happy to entertain questions or comments and provide assistance where I can. My day job and hobbies keep me busy enough.
You can contact me at dritland (at) frontier dot com. Please put
“watchmaster” in the subject line so you stay out of any filters.
Photo Gallery
Accessory
Paperless Drum-plastic that you can just wipe the trace off of.
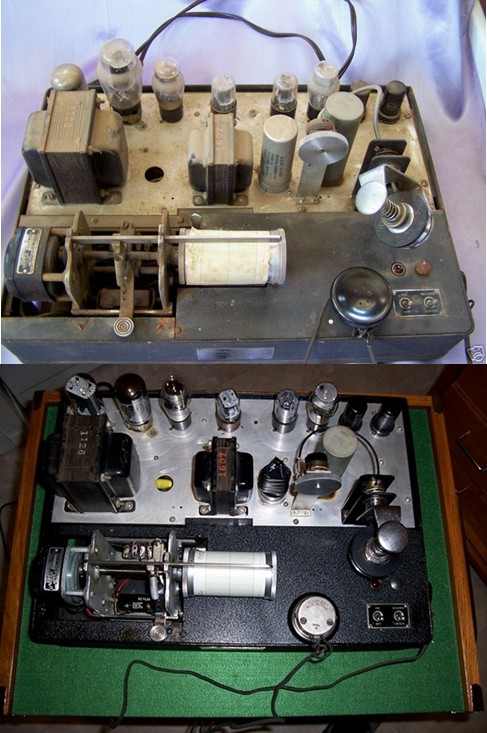
Before and After with the top removed.
New Paper Roll-Ebay is great for these
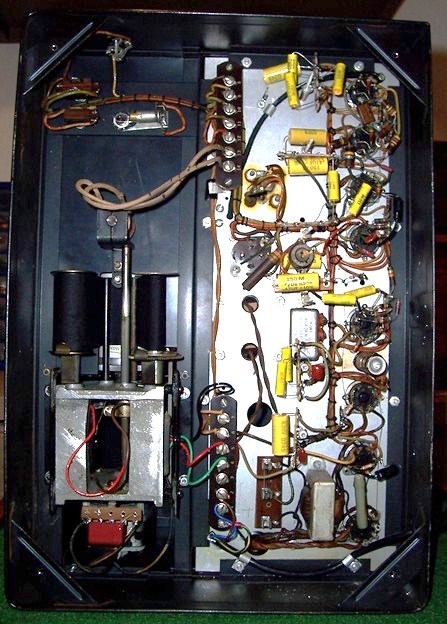
Underside of chassis after re-capping.
Suppliers
Antique Electronic Supply--Tubes,
switches, volume controls, capacitors, resistors
Mouser Electronics-Capacitors, resistors,
crystal microphone elements
RadioDaze-Tubes
McMasterCarr Industrial Supply-bushings,
hardware misc. The best hardware store on-line.
All Electronics-Fun surplus
components. Also has misc. piezo elements.
Downloads
G7 Operating Manual w/Service Data
Lizard Tech DjVu document format
G11 Operating Manual w/Service Data
Lizard Tech DjVu document format
G7 Handbook w/Charts and Descriptions (applies to
G7, G11 and G47) Adobe PDF format
G47 Operating Manual w/Service Data Lizard Tech DjVu document format
You can download a free PlugIn for
Explorer or Mozilla, which will allow you read Lizard Tech DjVu documents
directly from your browser.
Check out http://www.caminova.jp/en/downloads/download.aspx?id=1