Lehigh Valley Double Hopper Gondolas from a Resin Kit
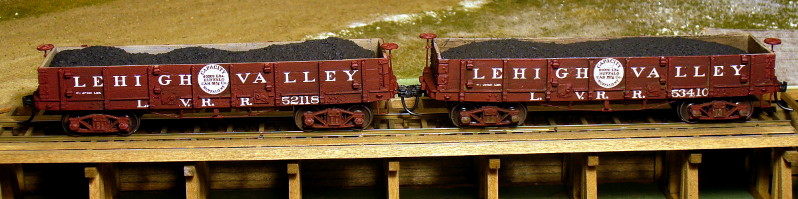
I really must consider myself lucky with the release of a new resin kit last year by the indominatable team of Canfield and McGlone of a Lehigh Valley RR 33 ft gondola kit. Based on drawings in John White's "The American Railroad Freight Car" the car represents a double-hopper car that could haul 30 tons of coal.

Construction
I built four of the kits because these were to be my first accurate models of Lehigh Valley coal cars and I need a bunch. I had a little assembly line going for a while. The instructions are very detailed and I generally followed them except perhaps the sequence in adding some of the details. However, I'll list a few notes I took along the way.
1. Some of the castings had warped a little in transit and one I distorted seriously by carelessly wrapping a rubber band around several castings. The instructions to lay them on a flat surface in an oven heated to about 180 degrees worked like a charm.
2. Castings for some of the ends were a little thick or had a taper, or both. I sanded them down to about the thickness of the sides, which were more accurate. As a consequence I had to shim each end of the frames with a piece of 2 x 8" strip styrene.
3. I scribed boards on the insides of the sides and ends and added some grain with my X-Acto saw.
4. The underframes were not absolutely straight; they humped up a little when set upside-down. Wanting to get the top edges of the sides and ends even with each other, I inverted the car/end assembly on a flat surface, then placed a side up against the underframe. Making sure the sides were placed as perfect as I could achieve end-to-end, I used little dabs of superglue to tack the very ends of the side sills to the ends of the end sills. Once the glue dried and everything checked out as aligned correctly, I set the car back down on the bench upside-down and pushed down slightly on the middle of the underframe while adding superglue along the side sill/underframe joint. That took care of things.
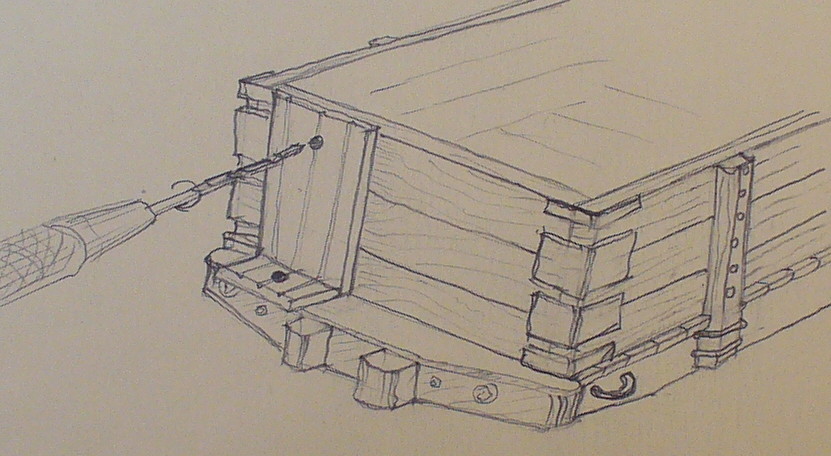
5. There are small horizontal the brake staff supports sticking out from the end boards. To make sure holes for the support and the brake staff lined up I made a small jig from styrene. I used a piece of grooved styrene cut into two pieces and glued at right angles as shown in this sketch. The groove ensured that the holes would line up and the staff would be straight.
Modifications
The only modification I made to the kit was substituting 10" queenposts for the castings supplied to get a car that better matched the prototype drawings.
Paint and Lettering
I used Scalecoat Box Car Red No. 2, which I use on almost all my LVRR rolling stock for no other reason that it sets them off a little on my layout. Lettering was as supplied with the kit. Of course the particular series appropriate to these cars in 1888 was only obtainable by mixing up the numbers supplied.
Kitbashing Potential
Resin kits are generally difficult to modify to match a prototype other than the one for which the kit was designed. Nevertheless, carbuilders manufactured cars for multiple railroads and might have supplied a similar car to other lines. What I Like About This Kit
Because I built four of these kits it's hard for me to judge how quickly they assemble. Certainly they go together much faster than scratchbuilt cars, especially with regard to the sides and underframes. The prototype has a lot of bolts and fittings that as far as I can see were modeled faithfully. The result are very satisfying representaions of an actual prototype.
One nice feature is simply the weight of the completed model, both as a result of the resin itself and also from the two metal castings for the hoppers. Considerable weight is further added by the resin castings for a coal load included in the kit.
The castings were virtually devoid of bubbles and other blemishes. Although I had to sand some of the ends down, this goes very quickly. Occasional warping was easilty worked out by following the instructions although I did have some sides warp after construction. I am not sure if this is a general problem.
In summary, this is a nicely done kit that I enjoyed building.