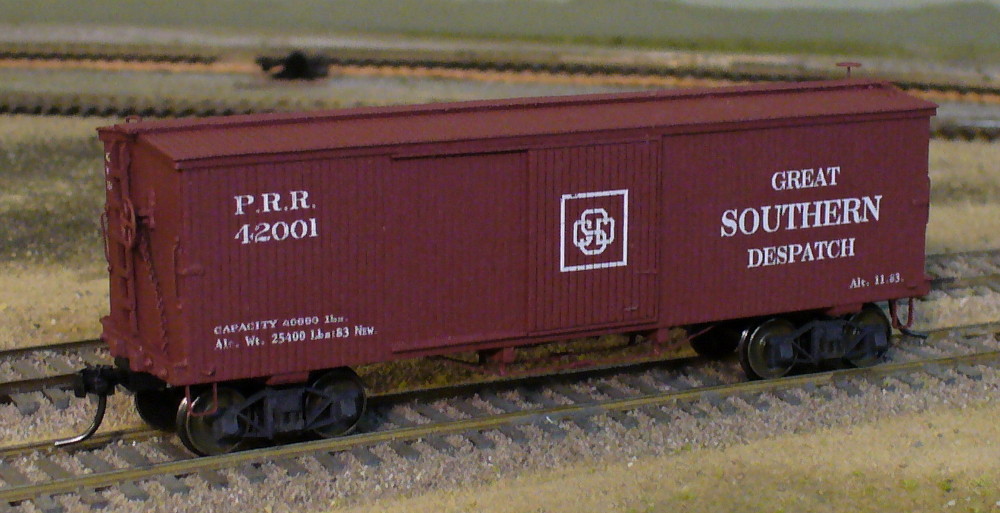
Pennsylvania Railroad Boxcar from an Amesville Shops Kit
The Kit
Craig Bisgeier has offered several kits of rolling stock under the name Amesville Shops, but this is the first laser kit he has released. It can be built into either the XB or XC boxcar, the latter having the door set flush into the sides. I built the XB car.
Pennsylvania Rairoad boxcars of the types one can build from this kit were both numerous and distinctive. To my eye, the PRR was very conservative in its car designs, staying with exposed end sills, wooden ladders, and tunnel brakes long past most railroads. In fact, few railroads installed so-called tunnel brakes in the first place.
In addition, I have the impression that the PRR repaired and updated their cars as needed long after other lines had scrapped most of their cars from the 1880s and 90s. Part of the reason might be that the Pennsy built fairly commodious 34' cars in large numbers before their competitors and so the cars were not made obsolete as early. I don't have the facts to back this up, but that is my suspicion. John White in his book on 19th century freight cars points out the early adoption of larger cars by the PRR. The point of this is that this PRR Xb or Xc boxcar kit can be used on layouts representing the last couple of decades of the nineteenth century and the first one or two decades of the twentieth with appropriate modifications to reflect safety equipment requirements.
Construction
The kit instructions are very detailed and I pretty much stuck to them, although I probably changed the order somewhat, depending in part on what I wanted to do next. I use yellow carpenter's glue for wood-to-wood bonds. It really grabs, so I find little clamping is needed during construction. I diverged from the instructions in a couple of places. For instance, I went ahead and installed the needle beam/queenpost assemblies early in the construction sequence rather than later; I really don't find I have a problem with these breaking or coming loose during subsequent construction steps.
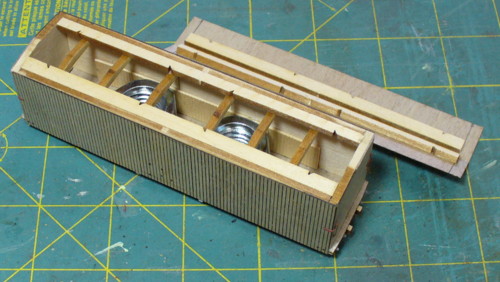
In general, construction was straightforward without major issues. I could see a potential difficulty maintaining a straight roof profile along the ridge and the tops of the walls. Not only did the ends stand a little proud of the sides in two of the four corners, but the transverse roof supports tended to stand a little high as well. The result was a definite upward flare at corners and a sort of waviness along the eaves.
My solution was to first even things up with an enery board on the ends. Then I installed longitudinal supports, flush with the top edges of the ends as seen in the photo. This provides a large surface to glue down the edge of the roof, rather than just the upper knife-edge of the siding and the transverse braces. The transverse roof supports are then used to set the sides the right distance apart. Similar bracing on the roof underside guarantees a atraight ridgeline.
Modifications
The only change I made to the underframe was replacing the needle beams--which I considered too thick--with scale 6" by 8" styrene strip. This alteration meant I could attach the queenposts to the needlebeams with styrene cement for a really good bond.
I replaced the side and end fascia boards with scale 1" by 4" strip; the material supplied looked a little too insubstantial, too narrow.
I altered the ends in a couple of ways. I used nut-bolt-washer castings (GrandtLine 5093) for the turnbuckle ends. These parts seemed closer to the prototype size I have observed in photos and plans. I had some brakewheel-tunnel brake mechanism parts left over from a B.T.S. PRR XA kit that I had modified for another prototype. These look really sharp, so I substituted them for parts supplied in the kit. Finally, I added nut-bolt-washer castings above each grabiron end.
I made two modifications to the roof:
1. Added a grabiron near each end just above the ladder so the brakeman has something to hoist himself up with; this is standard, and since we generally see the roof better than any part of the car, the extra effort pays off.
2. Replaced the roofwalk supplied with the kit with new ones made from scale wood strips of a thickness closer to the prototype, at least to my eye. Realizing that in the real world the roofwalk would not simply balance on a ridge, I glued wood strips the length of the car under each outside edge of the roofwalk assembly, and two transverse pieces of stripwood near each end to hold the three roofwalk boards together. These had to be notched for the ridge. My prototype for doing this is a diagram and materials list for an Xa car in John White's book on the American freight car in the 19th century.
Paint and Lettering
I used Floquil Boxcar Red. I did not use the orangish paint used by the PRR in the twentieth century, opting instead to match the color on PRR Xa cars I built and painted previously. I'm not sure I buy into the notion that freight car colors standard decades after the period I model can be legitimately extended back to the 1880's.
Decals came with the kit and went on without problem. I had ordered the "Great Southern Despatch" lettering because the corresponding number series appears in the 1888 Equipment Register, the year I model.
Kitbashing Potential
As I have written elsewhere on my website, I like to modify kits to build cars of different prototypes as appropriate. After all, how many Pennsylvania Railroad cars does one need? (Some modelers might say as many as possible!) Nevertheless, I would find this car difficult to kitbash because the end sills are actually part of the single piece that makes up the underframe and consequently, the end sheathing does not extend the full height of the car. Few 34' cars had exposed end beams, so there are almost no prototypes that this car matches other than the PRR cars.
What I Like About This Kit
Quite a lot, really, although you might not get that impression from the number of modifications I made.
First, the underframe has little tabs that help greatly in lining up the body bolsters and needlebeams in place. They are not prototypical, but they do make construction easier and more accurate, and who looks under the car? If they truly bother you, cut them off, but be prepared for slightly harder construction.
I liked the idea of using the preformed stirrup steps, cut down and bent, to make the brake platform supports.
The split bolsters make quick work for building these parts and avoid the problem with most kits in trying to get a little rectangular block of wood centered exactly.
This is a well-thought-through kit with few challanges. The only one I spotted is getting the roof lines good and straight.
Summary
This kit builds into a very nice looking car, especially if particular care is taken in construction. Upgrades I made are strictly optional, unnoticable by most people. Although the kit would be hard to accurately kitbash to model a different prototype, because of the numbers built and the conservative construction utilized by the PRR, this model could be used on layouts representing several decades over a large part of the nation.