 involve lots of water, long distances and some scraps of land not
always big enough for substantial military bases.
involve lots of water, long distances and some scraps of land not
always big enough for substantial military bases.Imperial Japanese Navy Seaplane Tender
Building the Kimikawa Maru
Long before it started the war
against the United States, Japan saw that any territorial expansions in the Pacific would involve lots of water, long distances and some scraps of land not
always big enough for substantial military bases.
So recognizing, it started an ambitious program to develop a wide variety of seaplanes, and to construct or convert the tenders needed to service them. The Kimikawa Maru was one such ship. Launched in 1937 as a cargo/refrigerator ship for the Kawasaki Kisen Line, she completed a number of cruises on the New York-Tokyo run before being requisitioned by the Imperial Japanese Navy in July 1941.
In addition to adding eight gun positions, the conversion consisted of adding an aircraft catapult, removing the No. 3 kingposts and cargo derricks and covering the deck aft of the superstructure with a second raised deck that contained a rail track system for moving the seaplanes around. In December 1941, as Japan eyed a northern thrust in addition to the pending Pearl Harbor attack, the now IJN Kimikawa Maru was given a distinctive white over gray camouflage pattern (which I think did nothing to make her blend in). She spent most of the first six months of World War II patrolling the desolate North Pacific, with occasional seaplane reconnaissance flights over Russian or American bases.
All that changed in June 1942. As part of Operation AL, the seizure of two of the US's far western Aleutian Islands in Alaska, the Kimikawa Maru was one of two seaplane tenders given the critical task of getting air power to the new bases quickly. (Those of you who have never heard of Operation AL, or the Aleutians for that matter, may recall the other part of this plan, Operation MI, the planned occupation of Midway Island that ultimately ended up costing Japan the war.)
On June 8, 1942, the day after Japanese troops occupied Kiska Island, the Kimikawa Maru steamed into the harbor and started unloading her cargo of seaplanes, fuel and base construction materials. She was joined by sister ship Kamikawa Maru a week later. Kimikawa Maru spent the next 13 months trying to keep the seaplane bases on Kiska and Attu islands supplied with planes faster than the violent Aleutian weather could smash them or the Americans could bomb them. After Attu was retaken by the US in May 1943 and the Japanese evacuated Kiska in July, the Kimikawa Maru was transferred to the South Pacific. Her luck ran out on Oct. 23, 1944, when she was hit by four torpedoes from the submarine USS Sawfish in the South China Sea and sank in less than 3 minutes.
The Aleutian Campaign has always fascinated me. Two world powers slugged it out for more than a year over a couple of small and strategically worthless islands, in an area where the weather is so awful it cost each side 10 times the number of airplanes that combat did, and in which heroic efforts are required merely to stay alive. And yet ... it was America's first theater-wide victory over Japan. The Battle of Attu, the modern US Army's first amphibious invasion, ended up being the second most costly battle in the entire Pacific theater, in terms of the percentage of forces engaged. It was America's first successful strategic bombing campaign, and had the very last and longest classic daylight naval gunnery duel between capital ships without benefit of aircraft, the Battle of the Komandorski Islands.
The Kimikawa Maru caught
my eye mainly because of her cool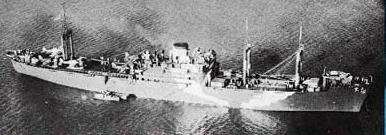 white 'arctic' camouflage scheme. A number of Japanese
warships in the Aleutian campaign got unique treatments with white paint, but I've
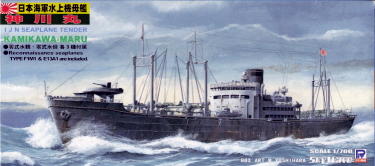
always had a soft spot for the auxiliaries. Skywave has a nice little kit of her, but when the
seaplane tender bug bit me, it was nowhere to be found so I had to make do
with her sister ship, the Kamikawa Maru. Fortunately kit No. W-52 (ordered from Pacific Front Hobbies) had most of
the little bits necessary to turn the Kamikawa into the Kimikawa
(those names get confusing, don't they?) The major difference was the Kimikawa's
slightly larger seaplane deck. I had to add sheet styrene painted the same color as the rest of the deck,
and smaller bits for the seaplane rail system. Clever positioning of some of the
little seaplanes and bits of deck cargo hid most of the differences in the
addition. The kit contained the two box-like things forward of the
superstructure on the main deck, and the extra guns and mounts.
In contrast to my Liberty ship build and its stormy North Atlantic ocean base, I wanted to show the Kimikawa Maru at anchor. I could suggest action by showing a seaplane being swung out on a cargo boom, supplies being lowered to waiting barges, and boats scurrying about. It's up to the viewer to decide how well I succeeded.
Painting
This was my first experience with Tamiya acrylic paints - I've pretty much stuck to enamels, and the few acrylics I've bought have been Testors' Model Master brand. But I wanted to give their Deck Tan No. XF-55 a shot, and it turned out OK. It's thinner than the Model Master, but two coats gave decent coverage, and besides, this was a ship's deck, not a new car, so I wasn't that concerned with a smooth, uniform finish. I varied it further by applying some random streaks and squares of several darker browns as an undercoat. I ended up trying Tamiya Smoke, too, as part of another experiment.
The rest of the ship was brush painted Dark Gull Gray, Model Master No. 1740, as the closest thing I had to IJN Kure Arsenal Gray (I didn't want to buy yet another shade of gray paint; in retrospect Model Master Gunship Gray, No. 1723, would have been a better match). The white 'camouflage' was Model Master Header Flat White, No. 2725, an automotive shade I use because it seems to cover better than Testors flat white.
Ventilators and Other Little Bits
One of the details a lot of model kit makers get wrong is the ventilators, those funnel-looking things that stick up all over the decks and superstructures of most ships. They are shaped that way for a reason - their job is to funnel the cooler ocean air down into the interior of the ship, which otherwise would get no outside air at all. Ventilators, or funnels, have an open face, but most kit makers mold them as a flat surface because that's easier and cheaper.
You can just paint that area flat black to suggest the hollowed-out shape. Quick, easy, a few strokes with a paint brush and you can finish a dozen or more at one sitting. Or ... you can drill out the face of each funnel to give it a more three-dimensional appearance, going the 'pilot hole-bigger drill bit-crap that's not big enough let's try this one' route. Guess which I picked?
To give the model a 'busier' appearance, I also sawed open the No. 1 hatch cover, glued in a sheet styrene deck and bulkheads, and filled it with scratchbuilt crates, pallets of drums and some of those lovely little 1/700 photoetch crewmen. I'm not absolutely sure this is how the Kimikawa Maru's holds were set up, but detailed information of any kind about WWII Japanese merchant ships is extremely hard to find.
Fortunately I had already acquired
Skywave's set E-12, Equipment for Japanese Navy Ships-WW 2. The ship kit has three each of the Mitsubishi F1M2 'Pete' and Aichi E13A1 'Jake' seaplanes,
not nearly enough to cover the decks. The accessory kit gave me two more each of
those, plus a Nakajima E8N1 'Dave' I decided to add moored next to the ship, and
some more ship's boats to further clutter the scene. Records show that the Kimikawa
offloaded eight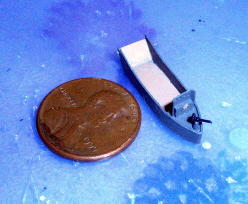 Jakes during her first visit to the Aleutians, but I wanted her
decks to look busy so decided to add five Petes too.
Artistic license, you
know?
There was a little scratchbuilding involved, my first complete 1/700 scale ship in fact. OK, so it's only a daihatsu landing barge! It was kind of fun, actually. Couldn't find any plans of these very common Japanese landing barges on the Internet, so I ended up eyeballing the measurements by comparing bombing raid photos of Kiska that showed daihatsu's together with Jakes. Typical for the military, there seemed to be no one design, so I felt free to add a 25mm anti-aircraft cannon to the rear of mine. A photoetch ship's wheel was the final touch.
The Airplanes
Love 'em or hate 'em, 1/700 scale aircraft can be tiny little gems in their own right, if you take your time and treat them like individual model projects. These were going to be more of a challenge for two reasons: 1) Unlike the planes for my USS Enterprise build, they were molded in gray styrene, so no clear canopies, and 2) Biplanes. Ugh. Trying to get two wings glued together so they were straight, level and even ...
There was also the multiplicity of floats. Each Jake has two large ones, and the Rufes and Dave have one large and two small ones each. I thought gluing ordnance underneath 1/700 jets was tough, but this was a lot harder. Each float had to be put in place with slow-setting super glue, then eyeballed to make sure it was even from front to back and from side to side and from overhead, all the while tweaking it into alignment with a fingertip. The little wingtip floats proved to be extremely easy to break off, even though I added them last.
The Jakes got a coat of Model Master Light Gray, No. 1732, close enough to IJN Gray. The Rufes, though, forced me back to the hobby shop for a bottle of Model Master Imperial Japanese Navy Green, No. 2116, because I had nothing remotely approaching that shade. For good measure, I picked up a bottle of Model Master IJ Army Green, No. 2114, for the green and brown camouflage on the Dave.
Then there was the matter of the canopies - how to make gray plastic look like glass? I dislike the gloss black paint approach; it's fine for 1/700 ship windows but looks hokey on airplanes. Same thing with bright blue, silver or light gray, at least to me. So I experimented. Taking a strip of half round Evergreen styrene plastic, I applied swatches of blacks, grays and metallics in two rows, then overcoated half the swatches with Tamiya Clear Blue, No. X-23, and the rest with Tamiya Smoke, No. X-19. Both paints are tinted acrylic 'overcoats' that let the base color show through. After agonizing over the results, I decided that Smoke over Testors Steel, No. 1180, looked the most like glass without being too garish.
After adding photoetch propellers (the plastic kit ones are wayyyyy too thick), I realized something was missing - the prominent, pointed propeller spinners. First thought was to just lop the blades off the plastic props and glue those spinners on ... but the result stuck out much too far. Trying to trim them down proved impossible for my fumble fingers. So out came a piece of 0.025-inch plastic rod and a sanding stick. At least this way I could cut off exactly the length I wanted after getting the tip sorta-kinda rounded; but after making 10 of them (thankfully the Dave didn't need one) I was about ready for the rubber room. What finally sent me there, though was decaling all the little guys. Some of the red-over-white hinomarus (national insignia) are two decals - a tiny white circle, over which you had to center the just slightly tinier red circle. Not fun.
Detailed Details
Every ship model is an adventure, this one more so because I had to bone up on how the IJN did things, as opposed to the American merchant marine.
One detail that caught my eye was the rail system used to move the seaplanes. The elevated portion over most of the after deck was molded with little indentations to simulate the steel gridwork construction. Why not, I thought, bore those indentations out with a No. 80 drill bit to give them more depth? 321 holes later ...
I splurged and got the photoetch
set that Pit- Road makes for this kit. While it added lots of
good details, the instructions are in Japanese - some parts for
the airplane catapult and a few odds and ends were a complete mystery. Postings
on several hobby websites found a guy who could translate, so I managed to get
that sorted out! Further postings resolved discrepancies in the camouflage
scheme. Photos showed the Kimikawa Maru with a wavy white pattern on only
the forward starboard hull, but the boxtop art indicates white
paint on the aft end too. Turns out Skywave was just trying to save
money by showing both sides of the ship in the same drawing. A
notation in Japanese under the illustration explains that the white paint goes on
the starboard side forward and the port side aft. I'm fairly confident I
got the pattern across the front of the superstructure correct after detailed study of
the few photos available.
This ocean base was the exact opposite of the one for my Liberty ship build - I wanted to depict the (relatively) calm waters of Kiska Harbor as opposed to the stormy North Atlantic. For some odd reason, this proved harder than trying to sculpt giant waves. I managed to find a few color photos of Kiska and environs, and so knew that the water would always be rippled or otherwise disturbed. I'm not entirely happy with my efforts to avoid a monochrome color for the base, but you have to stop at some point and glue the model to it.
But you don't care about that. On to the pictures!
 |
 |
|
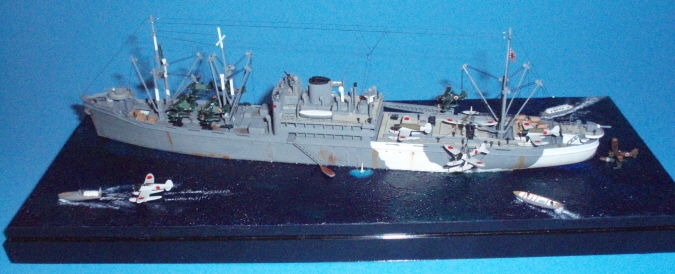
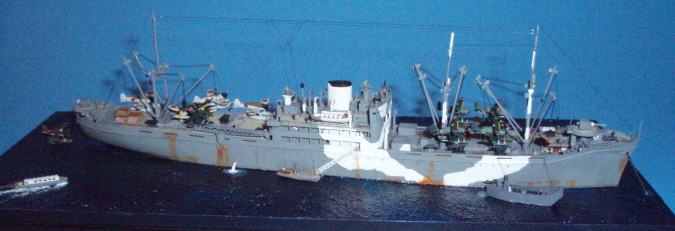
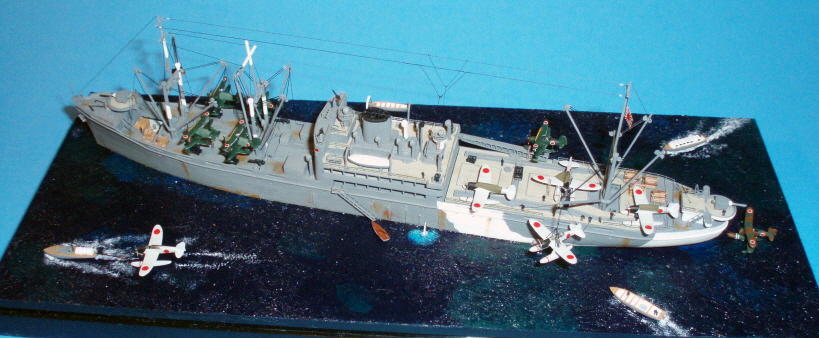
| Left side of the finished model. I set it at an
angle to the base to increase visual interest, then played around with the
little boats until I got a layout was both visually interesting and looked
realistic.
|
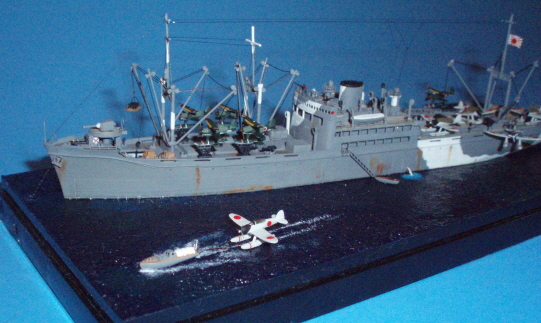
Right side of the finished model. Oddly, the white 'camouflage' was not symmetrical on each side. A starboard-side view of the Kimikawa Maru was the only one I could find of her in her arctic camouflage. | |
 |
 |
|
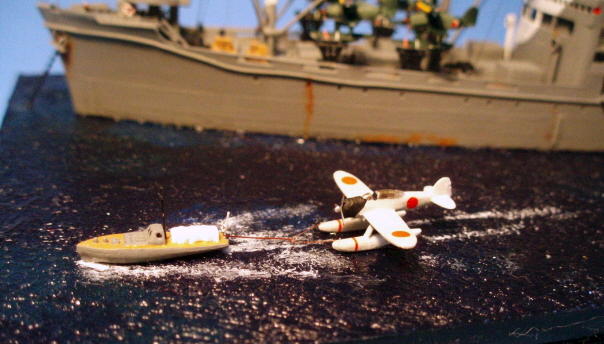
| View of the bow area, showing a Jake getting
towed to the beach after being off loaded. I have no idea if this was how
it was really done, but it seems reasonable and, more importantly, looks
cool. The wakes were made by
drybrushing small amounts of titanium white acrylic paint over the acrylic gel medium ocean
surface.
|
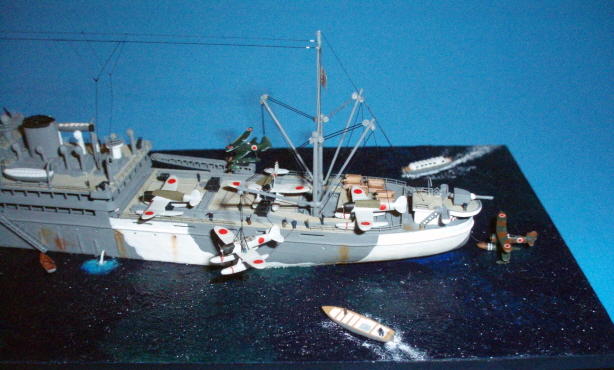
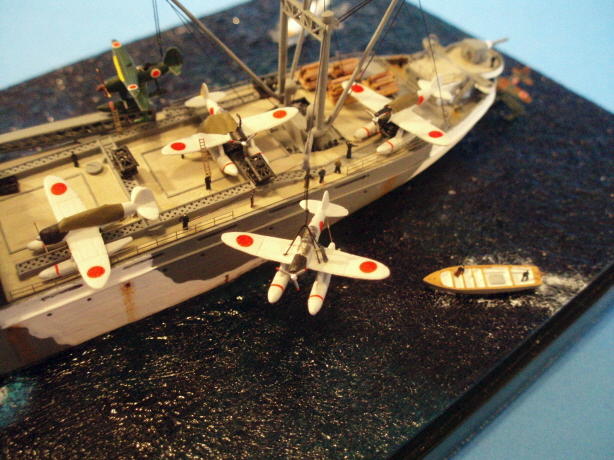
The stern area, where a lot of things are going on - a Jake being hoisted out, a motor launch coming in to tow it, a Dave bobbing around off the stern, and at the accommodation ladder, a little rowboat where crewmen from another ship have come over for a visit. | |
 |
 |
|
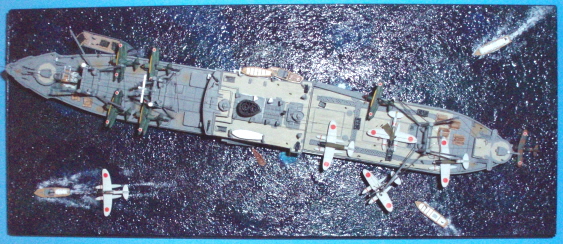
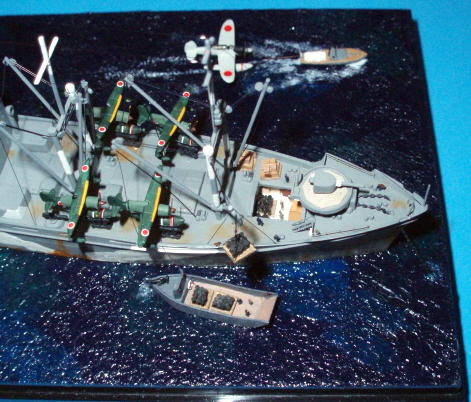
| Overhead view of the completed model, showing all the different elements. I think maybe the bow's a little close to that one edge, but oh well. The 'footprint' of this diorama is limited by the size of the display case base. | View of the No. 1 hold being unloaded, with
another pallet of gasoline drums being hoisted down to the waiting
daihatsu landing barge. Note the 'canvas covers' over the engines and
cockpits of the Pete biplanes. These were made from thin white gift
tissue paper, painted with enamels, cut to fit and attached with thinned white glue. This
matched photos I found.
|
|
 |
 |
|
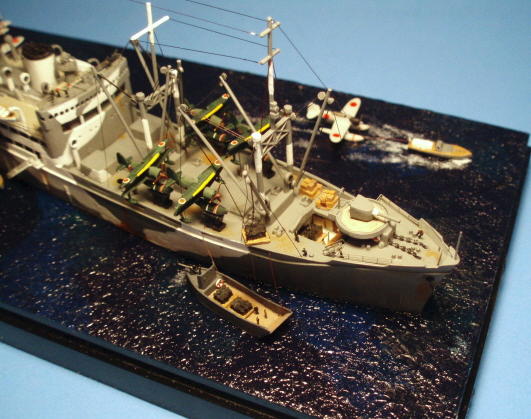
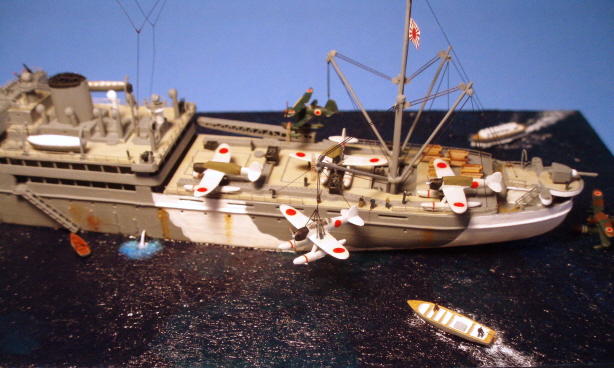
| Another view of the bow area. This one shows the radio aerials and mast rigging a little better, and the white camouflage on the front of the superstructure. | Lots going on here, with one Jake being hoisted
out and another one getting readied. The white stream coming out of the
ship's side simulates a waste discharge pipe. I made it out of stretched
clear sprue with some white acrylic paint dabbed on it, and lightened the
paint around the surface to try and simulate roiled up water.
|
|
 |
 |
|
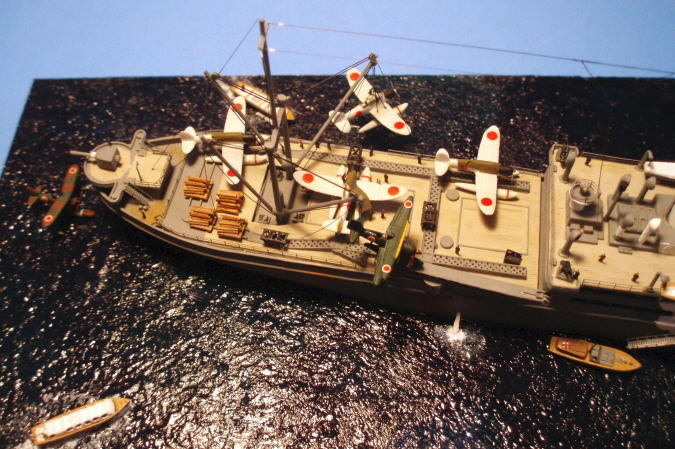
| Overhead shot of seaplane deck, showing some
crewmen removing the painted tissue 'canvas cockpit cover' from one Jake, piles of lumber
on pallets for the seaplane base construction, and a large motor launch
from another ship speeding in for a visit. The Pete on the catapult is not
covered up - I wanted to indicate that it was the 'ready' airplane to be
shot off if any Americans showed up. I added a photoetch machine gun to
the rear cockpit.
|
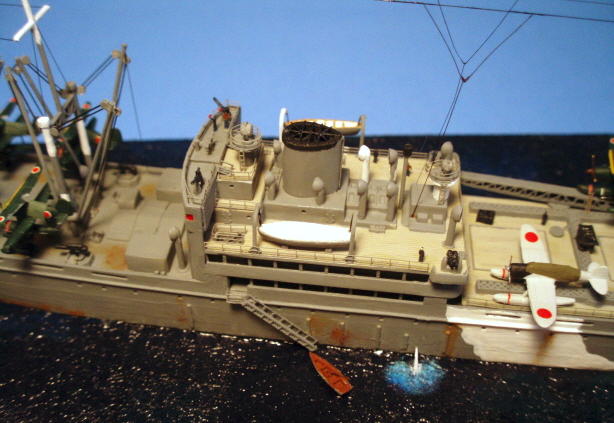
The superstructure was where a lot of the
photoetch went, for the columns between decks, railings, lifeboat
falls and the funnel grille. There are some crewmen up there manning
the 25-mm antiaircraft cannon and a signalman doing his thing. I added stretched sprue radio aerials to match
the Kamikawa Maru boxtop painting, with no clue as to how
accurate that was. But it looks cool. Also added the galley
smokestack between the funnel and the radio aerials going down to the
deck. This was shown on the painting diagram and box art but not included
in the kit for some reason.
|
|
 |
 |
|
| I indicated open cockpit canopies on this Jake
and the one being hoisted out by cutting slits into them with an X-acto
No. 13 saw blade. It was happily just the right width to do this.
|
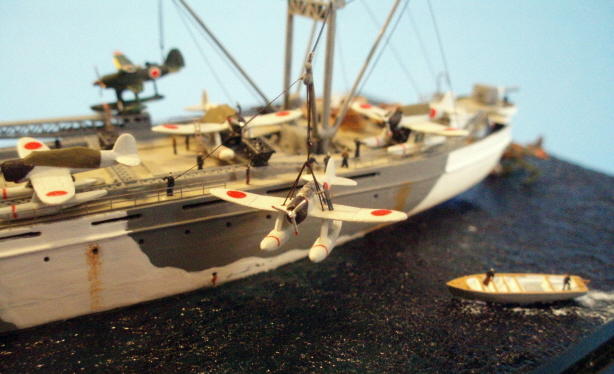
A Jake seaplane being hoisted over the side for its trip to the beach. Note the photoetch ladders propped against the sides of the Jake and Pete on the seaplane deck. Just another little bit of eye candy. | |
 |
 |
|
| Here you can see the crewman riding down with the Jake so he can detach it from the lifting rig once it's in the water. The lifting harness is made from stretched sprue, superglued into No. 80 drill holes in the wings. | Another overall shot. I tried to vary the color of the water by adding random patches of slightly greener or lighter blue water, but am not real happy with the final effect. It just got to the point where I knew I was going to screw things up completely if I kept messing with it. |
Here is a more or less complete list of things added and aftermarket bits used:
Cargo sling pulleys, cargo hooks, lifeboat falls, No. 700-2.
Anchors and chains, No. 700-20, IJN medium anchor on port side, anchor chain on starboard side, forepeak.
Watertight doors and hatches, fire hose racks, life rings, No. 700-22.
3-bar railings, ladders, No. 700-10, and some bits from the spares box.
Large whaleboat tillers and rudders, No. 720-11.
Naval figures, 31 total from No. 700-17. I like these a lot better than some figure sets because they are only joined to the fret at the feet, not the head too. Only half as much to cut free, and you don't end up with flat-headed sailors. Hard to bend those arms and legs, though.
IJN flag, No. 700/350-1D. Now if I could just figure out a way to get rid of the shiny surface ...
Deck cargo of crates (forward) and lumber on pallets (aft), some bits of leftover photoetch.
Skywave kit No. W-52, IJN Kamikawa Maru (also listed as No. SW-2800). I used everything except the miserably thin and impossible to remove cargo booms, substituting 0.025-inch plastic rod, and the parts replaced by the photoetch set listed below.
Pit-Road photoetch set No. PE-109, adds some nice detail to the superstructure (the vertical beams between decks), an aircraft catapult, six of the trolleys the seaplanes were wheeled around on, launching sleds for the Petes and Jakes, propellers, cargo boom pulleys and some vertical and inclined ladders. I didn't use the cargo pulleys because there weren't enough to rig all the booms, and the vertical ladders were to heavy looking.
Stretched sprue from the kit was used for the cargo boom lifts and rigging, radio aerials and mast rigging and ropes that are guiding airplanes or mooring boats.
Radio Shack
22-gauge wire to replace the degaussing cable that runs all the way around the hull, and the ridge around the anchor hawse holes.
Skywave
Set No. E-12, Equipment for Japanese Navy Ships-WW 2, all of the Petes and Jakes, plus one Dave, four aircraft trolleys for the Petes stored forward, and all of the small boats on the diorama base. I added life rings and stretched sprue masts to the two 11-meter motor launches, and some stretched sprue oars to the little rowboat. I tried adding the outer braces between the Pete's wings, but that was too small even for me; did manage to add the rear brace between the float and fuselage, though. Months after I finished the project I found a posting on a Japanese aircraft form about the bright yellow ID stripes on the front of Japanese airplane wings, in my case the Petes - the order implementing them was issued in September 1942, some three months after the Kiska invasion. Oh well ...
Figures in No. 1 hold, some inclined ladders, No. 708.
Some aircraft propellers, machine gun for Pete on catapult, No. 715 .
Ships' wheel for daihatsu barge, No. 736.
Various strip, rod and sheet shapes, Nos. 100, 175, 186, 219, 9002.
Historical Note
American submarines and aircraft exacted a horrific toll on Japanese merchant ships and auxiliaries during World War II, and the sister ships of Kimikawa Maru were no exception. Her Aleutian sister, Kamikawa Maru, was sent to the bottom by a submarine in May 1943. Kunikawa Maru was sunk in a bombing raid in May 1945 after being damaged in earlier submarine and aerial mine attacks. Only Kiyokawa Maru survived the war, after being torpedoed, mined and bombed once each. She was scrapped in 1969.
Addition: This model received a first place trophy in the All Ships/All Scales category at the 2009 KVSM contest.
Return
to the Modeling Index Page
This page was last updated April 28,
2009.