Building the Ghostbusters movie 1959 Cadillac Ambulance, aka ECTO-1
(UNDER CONSTRUCTION)
It was time for a change. My Gato
submarine/Japanese subchaser build was stalled, and I just couldn't muster the
enthusiasm for plunging back into 1/700 scale ships, or even 1/72 scale
aircraft. We were in the checkout line at Michael's craft store one day when my
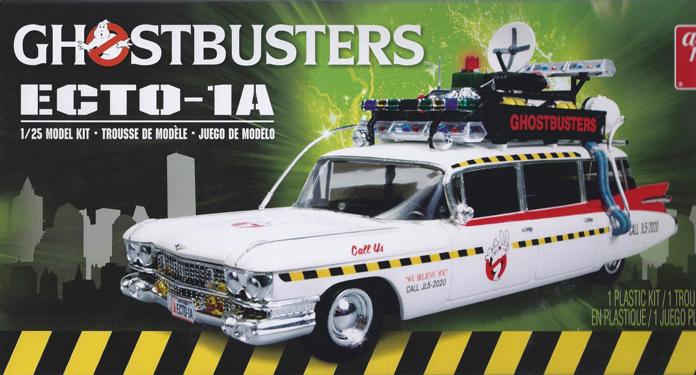
eyes fell upon this in the discount rack: Marked down to $10, the iconic car
from the landmark Ghostbusters movie. It was ... a car (my first) ... it was
(comparatively) big ... it was kind of (well, totally) goofy ... and it looked like it might
actually be ... fun? Ohhhhhhhhhhhh, yeah.
To be specific, ECTO-1 is a
1959
Cadillac Miller-Meteor Futura Duplex
limo-style endloader
combination car (ambulance conversion). Just so
we're all clear on that.
The model itself is a decent overall representation of the
vehicle, and captures the iconic lines of the Cadillac ambulance
fairly well. There are quite a few simplifications and compromises with the
added Ghostbusters gear, however - some induced by trying to make it a composite
Ghostbusters/Ghostbusters 2 vehicle, and some by the limits of plastic injection
model-making. Most of that I fixed with either scratch building or scraping it
off with an X-acto knife. Some things, like the smooth "moon" hubcaps instead of
 the correct fluted Cadillac hubcaps, I decided to live with to keep costs under
control.
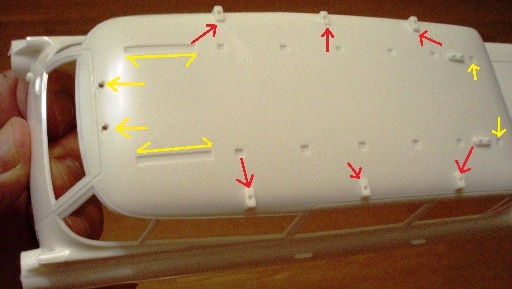
One of the first things I had to tackle
was converting the ECTO-1A back into the pure ECTO-1 from the original movie. In
the photo at left, the red arrows show where I had to shave/sand off the
brackets for the electronic signs on -1A. The short yellow arrows indicate holes
for -1A parts that have to be filled, and the long yellow arrows are notches
where the very large -1A equipment racks went, which also had to be filled and
sanded smooth.
Scratch building
Converting the equipment rack on top of
the car back into something more closely resembling ECTO-1 required a lot of
scratch building - starting with sawing off the molded-on bits that didn't belong
so they could be replaced with homemade (better) bits. It's a good idea when
doing this kind of surgery to make a copy of the instructions and carefully mark
what comes off - and more to the point, what stays on - so you don't end up
creating even more work for yourself. And don't ask me how I know this ...
The large siren on the front of the
equipment rack is another example of a cardinal rule of modeling: NEVER throw
extra parts away. The back half of the siren is the drop tank from a 1/72
scale Japanese Rufe fighter kit, cut to the appropriate length, with a styrene
disc on the front, rounded along the edges. A grid-pattern decal from Archer Dry
Transfers simulates the grille on the front.
The Proton Pack each Ghostbuster lugs
around have that cobbled-together look that the entire movie has, and each
turned into a little model in and of itself. Even though they are going to be
inside the vehicle and not readily visible, I decided to go as all out as I
could in this scale. The 'bits' that went into each Proton Pack:
-
1 small round magnet from the bottom of a
vinyl shower curtain;
-
Various bits of styrene strip, rod, sheet and
tubular stock;
-
Pieces from the red spray straw on a
WD-40 can;
-
Copper wire in six gauges;
-
Solder in two gauges, makes great
flexible hoses;
-
Vinyl wire sheathing, 18 gauge;
-
Lead foil from a wine bottle cork for
the pack straps;
-
Thin piece of holographic Christmas wrapping
ribbon for the one data cable.
Yes, I know I could probably have gotten
the proton packs 3-D printed; heck, someone probably already does. But I'm old
school, and why take the easy way out when you can invest hours of toil and
innumerable amounts of frustration by making it yourself?
Painting was an adventure. Yeah, you're
thinking, "How hard can a white car be?" and the answer is, "Plenty hard, if you
want it to look nice." I only partially succeeded, but consoled myself with the
fact that in some scenes in the movie, ECTO-1 looks kind of grubby.
The windows were tricky. The glass comes
as one single unit that fits up inside the chassis, which is a godsend since
otherwise there would be 12 separate pieces of 'glass' to attach. But ...
studying movie and fan tribute ECTO-1 builds, I noticed that most of the windows
are lightly tinted - except for about a 8-inch wide horizontal band in the
center of each window, wrapping from the driver's side window, down the left side,
around the rear window, back up the other side and ending at the passenger
window. THAT was going to be fun to mask. Which I
proceeded to do, after dipping the entire window assembly in Pledge Floor Gloss
(Future) to make it clearer and stronger.
Then I got out my can of special-order
Testors Gloss Custom Transparent Black to tint said windows, and discovered that
the directions said to "spray on inside of clear model window
parts ..." Sigh. Off came all the laboriously-applied Tamiya tape, and the blue
painter's tape on the large areas. Which left patches of adhesive residue. Which
smeared when I tried to remove it. Which required removing residue with Windex.
Which also removed the Pledge Floor Gloss treatment. Which meant starting over
from ground zero (insert muttered bad words here).
ALL TEXT AND PHOTOS © COPYRIGHT 2021-2022 BY
THE AUTHOR AND RESPECTIVE COPYRIGHT HOLDERS. ALL RIGHTS RESERVED. REPRODUCTION, RETRIEVAL OR STORAGE BY ANY
METHOD FOR ANY COMMERCIAL PURPOSE IS PROHIBITED IF YOU ARE THAT SCUMBAG LAWYER
IN CHARLESTON.
Return
to the Modeling Index Page
This page was last updated
Feb. 17, 2022.
 in the discount rack: Marked down to $10, the iconic car
from the landmark Ghostbusters movie. It was ... a car (my first) ... it was
(comparatively) big ... it was kind of (well, totally) goofy ... and it looked like it might
actually be ... fun? Ohhhhhhhhhhhh, yeah.