Chapter 7
Cutting and assembling herringbone
Page 13
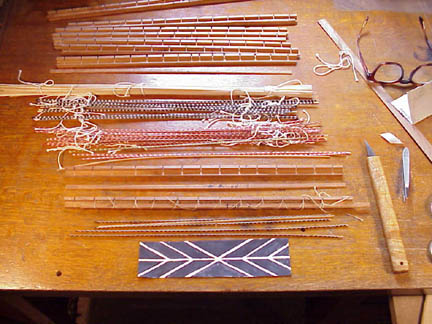
Cutting and assembling herringbone, first you must cut the herringbone tile strips into strips a little thicker than the finished rosette to allow for surfaceing when installed in the guitar top. As you cut each strip you must cut one then the next and gently tie these together with a string ,these are a pair with the laminations close together which will give you a good match.Next cut your white middle strip. Now make a glueing fixtures and strings as in the image wax them heavily to prevent glue from sticking. Antonio Torres cut the herring bone strips and matched them in the center of the total finished lamination creating a pleasant visual effect, see bottom of image, you can vary this joint for other effects. Take a little time to try variations of this joint. Now you are ready to assemble the herringbone. Use hide glue with 10% glycerin, place the strips to be assembled in the proper order to avoid assembling in the wrong direction. Put glue on the first herringbone segment then put on the middle strip, then the next herringbone segments until done takeing care that all joints are tight. Place assembly in fixture,wrap with string, push all into place and you are done.