Chapter 7
Tile making
Page 14
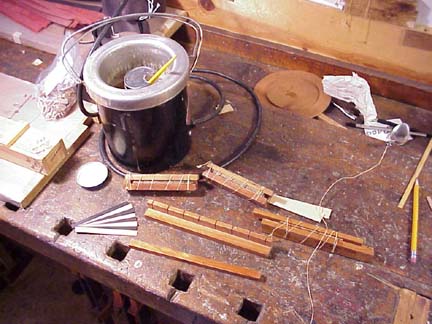
Tile making the tile strips can be cut individually and assembled for a design, but assembly is difficult. A much easier way is to cut strips as in the image and assemble. In the image are black and white strips which will be used to create a simple checkerboard design. This design was used by Torres and is a good starting design for demonstrating the process. The woods used for the checker board tile are ebony for the black. I used trimmings from fingerboards, the black in the herring bone is also ebony. The white wood is Basswood or Linden. Cut the woods with a fine toothed saw blade on a circular saw, band saw or scroll saw to the thickness of the squares in the pattern. You will decide the thickness as you are designing the rosette and are not governed by standard veneer dimensions. Even when using standard veneers it is desirable to change dimensions by pulling the veneers through a strip thinning tool to a different thickness, to break the monotony of standard dimensions and to achieve a unique visual effect. Note in the image that there is a black on top and white on the bottom this is for reversing the pattern to give the checkerboard effect. These strips should be glued in a stack in a fixture that looks like the fixtures in the image and bound with string. Use regular hide glue without the glycerin as these tiles are not required to flex. The glue will be dry in about an hour and a half and you can saw the stack the same thickness as the tile squares. You now have multicolored strips that are to be stacked, reversing each layer to give from the end of the log the appearance of a checkerboard. Glue them up and when dry cut your tiles using the methods described elsewhere in this site. When cutting tiles hold a paint brush over the tile to prevent the tile from flying and becoming lost also use your push sticks with eraser ends to grip the log when it becomes short.This is the principle that you can use to make infinite varieties of tiles the only limit being your imagination. To make different patterns you can layout the design layers and use colored pencil.To make a flower draw the flower divide it into squares, graph paper is handy for this and create your layers in wood. Inlay making is time consuming be patient keep trying and you will master the process. You will be able to say that you made the complete instrument as did Torres and other great makers. On a number of occasions I have been asked where did I buy the pretty decal around the sound hole, which is a bit discouraging but then I realized that many individuals have never seen marquetry and you like I,will have fun explaining the process.