|
Replacing the stock T-bars
When I did this, I also replaced the grips, and replaced the stock rubber lines with braided steel.
However, these steps could be adapted even if you aren't taking these additional steps.
Using Arlen Ness bars
One cool thing about the Mean Streak (as well as other Vulcans) is that the riser mounting holes on the steering
head are 3-1/2" apart. Why is this cool? Because Harley-Davidson mounting holes are the same distance apart
and we all know there are plenty of bars available for the HD bikes.
However, there is a difference. There is a reason these bikes are referred to as "metric" bikes and
HDs are not. The mount holes are 10mm holes rather than the 1/2" on HD. Plus, the stock T-bars that come on the
Streak have a stud on the end of the riser that goes through the mounting hole and has a nut on the end. HD bars use
a bolt passed through the mount hole and into the end of the riser.
Their are three solutions:
- Drill out the mount holes to 1/2". This is probably the easiest method. Plenty of folks have
done this and it works fine. Not much material has to come out between 10mm and 1/2"
- Purchase adapters made just for this purpose. A couple of sources are available (Thunder Mfg is one
of them) and they run about $20.
- Make your own adapters.
I chose door #3. Here's why: First, while drilling out the holes is possible and works I just
didn't want to modify my bike in a way where I could never take it back to stock. Why? Who knows; just didn't.
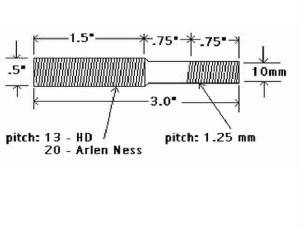
Second, though you can purchase adapters they only come with a 13-pitch thread and some bars (Arlen Ness for one example)
use a 20-pitch thread. So, that left me with only method #3.
Building the Adapters
Here's what I did and it cost me less than $5:
- Developed the design at the right.
- Purchased two, 3" x .5" x 20, grade 8 bolts. (NOTE: Use grade 8 rather than 5. They are just
a few cents more but are way stronger and will be safer for this use.)
- Purchased a 10mm 1.25-pitch die for cutting the threads to match the stock riser nuts.
- Purchased a 10mm nut for use in screwing the adpaters into the new bars.
- Asked a friend in a machine shop to cut off the heads of the bolts right at the top of the shank, turn them
down to 10mm on a lathe, and use the die to cut the 1.25 pitch threads I needed. 'Course, not everyone has a friend
who works in a machine shop -- but I bet you know someone, who knows someone, etc.
This all worked out perfectly!
Longer-length cables
I recommend you purchase extra-length cables of +2" length. This includes the throttle cables, front
brake hose, and clutch hose. I purchased +4" cables but these ended up being longer than I needed. 2" would have
worked fine and I wished I had gone with them. I will at some point but just can't bring myself to do it yet after purchasing
these -- they aren't cheap.
I also recommend using a vaccuum pump for draining the reservoirs. These are inexpensive (about $20)
and make the job much easier.
Some folks don't get new cables and just re-route the stock ones behind the tree. I personally don't
like this idea but to each their own.
Preparation
After that, everything was pretty easy. However, before beginning installation, find a thick towel (or
multiple towels) and cover your tank to eliminate the possibility of the bars or something else dinging your shiny tank.
Also, if you are using the adapters, you'll want to have already screwed them into the new bars beforehand.
Easiest way to do this is to take two 10mm nuts and screw them on to the end of the 10mm part of the adapter. (You can
use one of the stock self-tightening nuts but you'll need at least one normal, non-self-tightening nut to do this.)
The nuts should only be screwed on so that they just clear the end of the 10mm threaded portion of the adpater.
Once in this position, use a couple wrenches to turn them towards each other. Not to tight, just tight enough so that
turning the outter one doesn't let it move down any farther. The result is you can now use a socket or wrench on the
outter nut to screw the adpaters into the risers of the new bars.
Screw each adapter in until the threads just show above the hole. Once in place, use the wrenches to
loosen the two nuts and remove them from the adapter.
Drain the clutch reservoir
Remove the shift lever. Be careful when you do this; the threads of the lock bolt will tend to try and
walk along the teeth of the splined hole. You have to hold the shift lever in place -- don't let it move out
on the shaft while you remove the bolt. This bolt is low grade -- softer than the metal of the shift lever -- and
I ended up destroying mine because of it. On the upside, I replaced it with a better bolt.
Remove the left-side engine cover -- four allen bolts hold it in place. With the cover off, you will
clearly see where the clutch hose connects to the valve and the bleeder valve you'll use to drain the fluid. Remove
the cover from the reservoir.
Place a short piece of hose over the bleeder valve and put the other end into a container to collect the old
fluid. The container should be metal or glass as brake fluid and plastic don't get alone well. Loosen the bleeder
valve to drain the fluid. Once it stops flowing, close the fitting.
Drain the brake reservoir
Remove the cover to the braker fluid reservoir.
The fittings for the front brakes are right on the caliper bodies. Place a short piece of hose over
the fittings and down into the container. Loosen the bleeder valve and drain the fluid. Once it stops flowing,
close the fitting. You'll need to do this to both sides.
Remove the controls
The best way to do this is to have someone else
From the left-side, remove the left-side switch control housing.
Remove the clutch reservoir.
Remove the brake reservoir (right-side).
Remove the right-side switch control housing. As you do this, you will need to carefully take the throttle
grip and remove the throttle cable heads from it.
Remove the nuts from the riser studs and then remove the T-bars.
Mount the new bars
Place the new bars in position using the adapters just like the studs off the stock bars. Screw the
stock nuts onto the adapters and torque them to 25ftlb.
Here's another tricky spot. The stock right hand housing has a small tang that fits into a hole in the
stock bars. This keeps it from moving around from you always twisting the grip. Some folks just file this off
but I chose to drill a hole in the new bars to accomodate the tang. Here's how:
Mount the brake reservoir and right-side control housing on the bars, you won't be able to get it completely
on because of the tang but you can get it enough to keep it in place. You need the reservoir in place to be sure and
get the correct horizontal position for drilling the hole. Rotate the control housing until it is sitting at the correct
position for you. This is somewhat a subjective choice but you want it placed so the face of the controls are flat as
you look at them.
Once positioned, you can the remove the reservoir so you can see the tang and mark the position for drilling
the hole. Check the size of the hole on the stock bars to determine the drill-bit needed.
Remove the control housing, drill the hole, and then place the brake reservoir and control housing back in
place.
Place the clutch reservoir and left-side control housing back in place. This housing doesn't have the
tang (no twisting) but you'll still want to position the housing so the face of it is flat as you look at them.
Filling the reservoirs
Fill the clutch reservoir with fluid. You can get a lot of the bubbles out just by working the lever
and such but the only way to get it completely clear is to apply a mild vaccuum on the bleeder valve, open the valve
just a little -- until bubbles and fluid start appearing -- and then continue to watch until the bubbles stop and only fluid
comes out.
Be sure to watch the level in the reservoir! If you let this run out, you will have to start all over
again! So watch for the bubbles to stop at the bleeder valve and also watch to keep an amount of fluid in the reservoir.
When the bubbles stop, close the bleeder valve and top off the reservoir to the specified level. Secure the cover back
on the reservoir.
Repeat this process with the brake reservoir. You will have to do this on both bleeder valves -- one
on each caliper -- to get all the bubbles from each line.
Finishing up
Replace the left-side engine cover and the shift lever. At this point, you are pretty much done.
You may need some additional adjustments to get your mirrors right or may find your brakes are a little spongy (soft) which
means you didn't get all the air out of the lines. But other than a little maintenance you should be ready for the road.
|