Pattern for Comfort Doll à la ICROSS
This is a pattern Nan came up with for crocheters based on the comfort doll from ICROSS Canada. I appreciate your experimenting to see if this pattern works. Just let Nan know. If you can, send her a photo of the doll.. or just the doll.
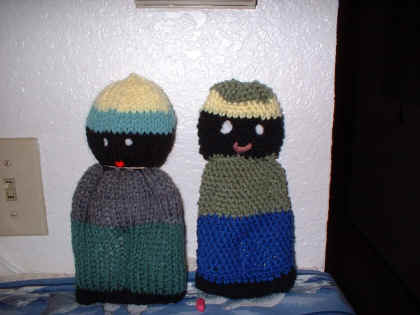
Doll on left is knitted version. Doll on right is crocheted.
Materials/tools:
-
G hook
-
Black, red, white plus at least three other colors of easy care yarn, whatever weight fits gauge
-
Stuffing - I used fiberfill.
-
Yarn needle
Gauge: 1 inch = 7 single crochet (sc) and 7 rows.
Pattern:
With black yarn, chain (ch) 37. Last 2 ch are first stitch (st) in first row. Slip stitch in first st of same row, ch 1 and start next row in a round..
Row 1: Continuing with black, sc in second st from hook and in each of remaining ch (should be 35.) Ch 1 and Slip stitch in first st of same row, ch 1 and start next row in a round..
Rows 2-3: Continuing with black, sc in each st across. Finish off black. This is the "shoes".
Rows 4-14: * With color A, sc in each st across. Slip stitch in first st of same row, ch 1 and start next row in a round.. Continue from * until you have 10 rows of Color A. Finish off Color A. These are the "pants".
Rows 15-25: ** With Color B, sc in each st across. Slip stitch in first st of same row, ch 1 and start next row in a round.. Continue from ** until you have 10 rows of Color B. Finish off Color B. This is the "shirt".
Rows 26-34: *** With black yarn, sc in each st across. Slip stitch in first st of same row, ch 1 and start next row in a round.. Continue from *** until you have 8 rows of black. Finish off black. This is the "head".
Rows 35-42: **** With Color C, sc in each st across. Slip stitch in first st of same row, ch 1 and start next row in a round.. Continue from *** until you have 8 rows of Color C. Finish off Color C. This is the "hat".
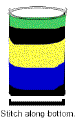
You should have a cylinder 32 rows. (Figure 1.)
Construction:
1. Flatten cylinder lengthwise and slip stitch bottom (original chain) with black yarn to make an "envelope. Weave in ends. (Figure 2.)
2. Stuff lightly with stuffing. Enough stuffing to pad but not stretch the stitches.
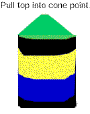
3. At top of "hat" sew same color yarn as the top row through all sc and pull tight to make a point. (Figure 3.)
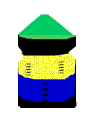
4. Do the same with either color between Color B and the first row of the "head". Pull tight enough to delineate the "neck". (Figure 4.)
5. About 5 rows down from the neck and 3 to 5 sc in from sides on both sides sew with Color B down in a straight line to bottom of "shirt" to simulate arms. (Figure 5.)
6. About 3-4 rows down from the top of Color A sew with same color uarn down to bottom of "pants" to delineate legs. Do the same with black on the "shoes". (Figure 5.)
7. Make "eyes" with French knot embroidery stitch and white yarn. (Figure 6.)
8. Make "mouth" with two stitches in red yarn to make a V shape. (Figure 6.)
NOTE: You can have some fun with this. Make the "shirt" and/or "hat" striped. Add a pompom to the top of the hat. You can use brown for the "head".
The crocheted doll in the photo above is approximately 9" tall and 4" wide at the bottom of the "shoes".
Questions? Email me and I will try to answer them. Also please suggest changes/improvements.
Figures
| 1
|
2
|
3
|
4
|
5
|
6 |


You can find the knitting pattern on the ICROSS web site.
Design by Nan Hawthorne. Feel free to use it for chairty projects.