|
Cool Stuff!
- You can choose whether or not to use the high-beam flashing ability just by choosing whether or not to flick
the high-beam switch. The unit takes care of knowing whether to flash (daytime) or go solid (nightime).
- Hitting the horn not only sends an audible signal but a visible signal for 2 sec -- "Hey! Look over
here! Helllloooo!!" This is available whether the flashing is turned on (high-beam switch is on) or not. When
On, hitting the horn doubles the rate from 4/sec to 8/sec to get their attention. When Off, it just flashes the high-beam
at 4/sec. I use this feature whenever I think that someone isn't looking when they should. Just a quick tap on
the horn is all it takes.
First Steps
Before beginning, take a few moments to plan your install:
- Be sure that both the low- and high-beam of the headlight is working correctly. Doing so could save
you some troubleshooting time later.
- Decide whether you want to use the crimp connectors provided with the kit or use a soldered connection.
I always solder my connections because it makes them trouble-free. If you choose to solder, give serious consideration
to using heat-shrink for insulation rather than electrical tape -- much, much cleaner.
- Next, disconnect the battery's positive terminal just to prevent you from causing yourself additional grief
by accidentally shorting something out.
Remove the headlight
Remove the two headlight trim screws from the right and left of the headlight housing. Gently pull the
bottom of the headlight away from the mount and then slightly pull down to disengage the metal tang from the the top of the
mount. Disconnect the headlight connector from the back of the headlight. Set the headlight off to the side. Look
at the wires going into the headlight connector. There should be a red/black wire (high beam), a red/yellow wire (low
beam) and a black/yellow wire (ground).
Modulator Preparation
Remove about 5" from the red/white, solid red, blue/white, and solid blue wires coming from the modulator.
Run the wires from the modulator through the back opening in the headlight housing and up towards the headlight connector.
High beam Connection
Cut the red/black wire coming from the headlight connector at about 2 " back from the connector.
Connect the red/white wire from the modulator to the half of the red/black wire that goes into the headlight connector.
Connect the solid red wire from the modulator to the half of the red/black wire that goes back towards the bike.
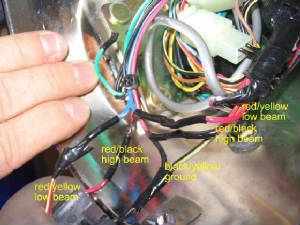
Low beam Connection
Cut the red/yellow wire coming from the headlight connector at about 2 " back from the connector.
Connect the blue/white wire from the modulator to the half of the red/yellow wire that goes into the headlight connector.
Connect the solid blue wire from the modulator to the half of the red/yellow wire that goes back towards the bike.
Ground Connection
You don't have to cut this wire. Simply remove about 1/4" of insulation from the black/yellow wire at
about 2" back from the connector. This takes a bit of finessing but it can be done. Connect the black wire from
the modulator to the exposed portion of the black/yellow wire.
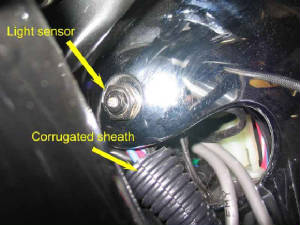
Light Sensor
The unit includes a light sensor so that the modulator can determine if it is day or night and whether to
flash the high beam accordingly. (It is illegal to have your high beam flashing at night.) I mounted the sensor
at the back of the headlight housing. There is a nice, circular flat spot there and this location keeps the sensor from
picking up the light off of your driving lamps, running lights, or turn signals. I found out the hard way where not
to put it.
Drill a 5/16" hole in this location and insert the sensor through the hole. I also chose to put a nut
on the sensor before inserting it through the hole. The sensor is about 1/2" long while the housing is only about 1/8"
thick. The extra nut takes up space so the sensor only protrudes enough for using the provided washer and nut to secure
it in place.
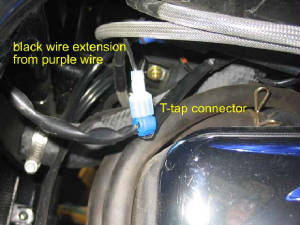
Heads Up Alert Connection
The purple wire from the modulator goes to the "hot" side of your horn. Now, it is long enough
to reach the hot wire on the horn at the back of the horn -- but then you have this ugly purple wire hanging out on the front
of your bike. I chose to cut the purple wire just a few inches from the modulator and add about 18" of black wire to
extend it.
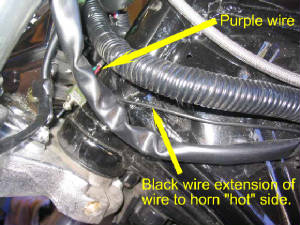
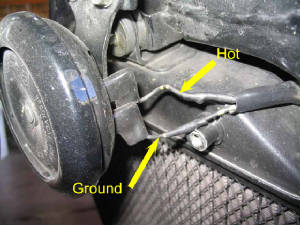
I routed the black wire along the left side of the head with the other cables and then under the tank
and down to the horn cable where it runs near the engine. I cut into the sheath and located the "hot" wire of the
horn. Doing it this way keeps it less visible. Also, this is the one place I chose to use a connector rather than
solder. Doing so, keeps it possible to easily disconnect this wire if and when I need to remove the headlight or other
things that might pull on this wire.
Dressing
I used a short piece of corrugated plastic sheathing to wrap the wires from the modulator up to where they
enter the headlight housing.
Bundle the modulator wires together and use the supplied cable ties to dress up the wiring so they lie together
and you can coil them up along with the existing wires inside the headlight housing. They all end up fitting nicely
within the weather shield (the translucent plastic piece inside the housing).
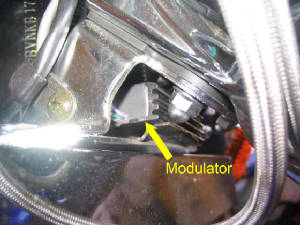
I placed the modulator immediatley under the housing right between the two sides of the housing mounting bracket.
It fits very well here but do a test fit BEFORE you actually mount it. Be sure you know how it will sit before using
the adhesive pad. The pad is incredibly strong and you'll have difficulty moving it once you place it. Don't ask
how I know this.
All Done!
And don't forget to hook up the battery again!
|