Stripped 14" Goodmans LCD TFT Monitor Model GV410
My DIY retro-fit build for overhead projector big screen projection

Is the Sharp QA 2500 the Holy Grail of panels? You might be surprised at the answer!
Click here for a head to head comparison with the Proxima 920/944 

Halloween Rear Projection
Rear projection onto frosted screen in garage for Halloween

My Home Theatre setup
Epson Powerlite Home 20 with Focupix 92" electric screen  and a Vizio 47" Lcd TV
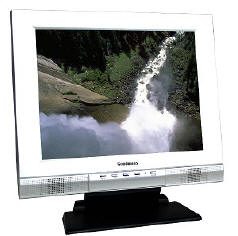
How to strip 14" Goodmans LCD monitor
To use in a DIY overhead projector project

Behr paint vs Sherwin Williams
The silver screen challenge
Sharp
Panel model 1150 1650 1800 2500

3M
Panel model 6000 Series

Proxima Ovation
Panel model 810 820 822 842 846 920 944
Infocus Powerview
Panel model 820 950
Da-lite projection screen sample test
15 samples compared to Blackout cloth
 

Our DIY  Backyard Zip lines

Check out our other  websites:

paranormalwv.com  www.wvnaturalgas.com

Downspout Rain Water Barrel Collection System
Outdoor cat walkways and catscapes for indoor cats
Cat enclosed walkway

DIY build a White Dalek Halloween costume for adult or child
 

Home    Power cord / ac adapter    Cables   Specifications  Pictures
 
14" Goodmans TFT LCD Monitor ModelGV10

300:1 Contrast ratio
20ms response time
1024 x 768 @ 75 Hz maximum resolution
80-degree horizontal viewing angle
60-degree vertical viewing angle
Built-in 15-pin VGA connector 
stripped LCD size 11 3/8"x 8 3/4

I figured it was time to upgrade my panel from the Proxima 944 that I was using on my OHP made by Dalite, 5000 lumens. The stage on the Overhead projector is 10.5" so, I was looking for a LCD to strip that wouldn't have to much overhang. That is why I 
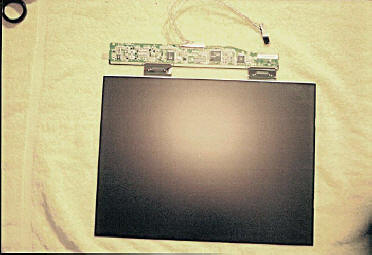
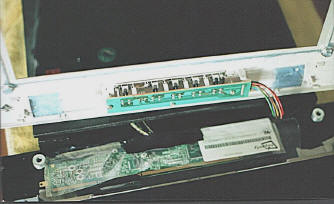
chose a 14" diagonal monitor. As I was stripping the panel I wondered if I could 
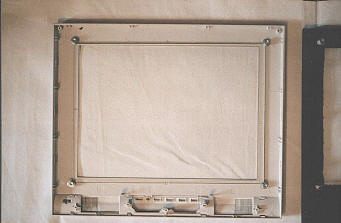
customize the original monitor frame to accept the stripped panel and it's components. I was wanting a sleeker more finished look since my projection system is in my living room. Below is my retro fit of the stripped monitor into a modern projection panel. Considering that I have never done this before ,the 
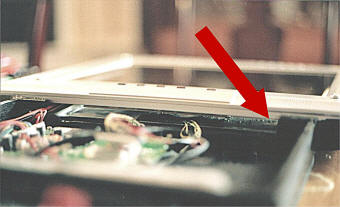
panel was pretty easy to strip. There were no ffc issues. There are some very, very tiny screws in the frame surrounding the panel and the backlight. I would suggest buying a set of tiny jewelers screw drivers at Radio Shack
( $6.00). This will save you a lot of time. Take your time, go slow and treat all the components with care when handled. After stripping, unplug the backlight control board from the monitor circuit board and put away. You do not need to save the backlight control board.
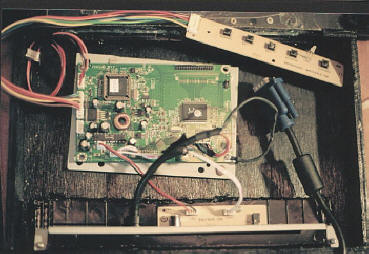
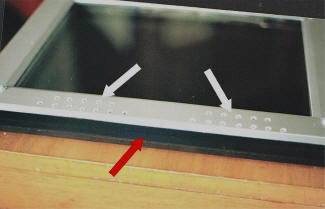
After stripping, all the circuit boards and connections will be at the top of the LCD. I wanted to use the original menu buttons on the Frame so the monitor frame will  be turned so the bottom will now be the top.


Goodmans monitor before Stripping


Lcd with backlight and frame removed.
Save the plastic backlight frame and metal frame surrounding this panel. You will need them later


Control board ,buttons and connectors. The are laying in a box that will be attached to the frame. I constructed the box out of 1/4" plywood ,painted black.


Top and bottom of original frame after
removal of all parts. I then held the top against the back of the bottom and using it as a template I drew a line around the opening for the panel . This gave me a  a precise guide for cutting the bottom opening


I cut out the bottom with a jig saw using a fine blade made for cutting metal. The size of the opening is the size of the lcd panel. After cleaning up the edges with a file and sandpaper, I cut a piece of glass 1/4 " wider than the opening and drilled 4 holes at the corner of the glass. Using bolts and washers to hold the glass. (White arrow)
I also cut out a notch in the lip of the frame to create an opening for the wires and connectors to run thru( Red arrow)


I then cut another piece of glass and installed it on the top frame in the same way as the bottom. Bolts and washers. Keep in mind that the LCD panel will be installed using the original bottom of the frame as the top of the finished panel.
I sealed around the glass on the top and bottom frame panels with RTV silicone


I installed the LCD back into its plastic and metal frame and fastened it to the original brackets using the original holes and original screws. Remember, the LCD top is now facing the original monitor frame bottom.
I cut off 3/8" of the top of the original metal "L" brackets (red arrow) and drilled new holes to mount the LCD to the bracket. This lowered the position of the LCD and created approx. 1/2" gap between the LCD and the glass that was installed to the top frame.


Remember that all components are now turned in the monitor frame. The box I built is attached to the monitor frame and now has all components installed. The top of the wood box you can see to the left with a computer fan installed using a separate 12v dc adapter. The menu button control board is on the right.


I now re-attached the control board for the buttons


Here you can see the notch that was cut out of the bottom earlier to run the connectors from the LCD and the menu buttons to the wood box and to create a wind tunnel for air to blow from the fan across the panel.


After doing a test fit there wasn't enough clearance between the button control board and the circuit board fastened to the LCD. So, I glued washers (white arrow)
to the four hole that connect the top and bottom of the monitor together raising the top up enough for the clearance between the circuit boards. The 1/4 inch gap around the outside of the monitor frame was sealed with a neat covering of electrical tape
.


I now drilled air holes in the panel so the air from the fan that was installed in the wood box would flow across the LCD and exit thru the holes. (white arrows). You can see the black electricians tape I used to seal the gap around the frame that was created when I had to add washers to create more space between the case
( red arrow)


Panel is finished and ready for a test run. Notice that the word "Goodmans" and the control buttons are now upside down
(red arrow) . since everything installed inside had to be turned because all the connectors and circuit boards are now at the top of the LCD


The panel on top of the overhead projector. The picture got cut off


Panel and overhead OHP set up


Projection screen 70" diagonal
Natural light coming in from the other room to the right.
I use triple pass blackout cloth


Movie Underworld- Evolution 70" diagonal


70" diagonal


Movie Underworld- Evolution 70" diagonal


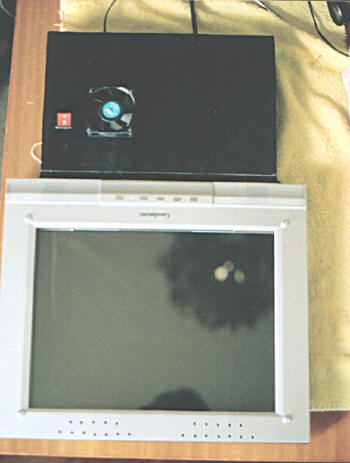
I am very pleased with the results. I have watched two full movies one after another and the panel has been excellent. The panel stays fairly cool , about 74 degrees and the picture is awesome.
All glass, screw and bolt holes and and inside of the wood box was sealed with RTV silicone. I wanted all air from the fan to go thru the cutout area between the box and the assembled panel , maximizing the air directed over the LCD panel.
I didn't take any pictures of the backlight but, once stripped remove the tiny cathode tubes from the plastic frame and trim any extra plastic so, you end up with just the plastic frame for the metal LCD frame to slip over.