The project includes just three hardware components: an Nvidia Jetson TX1 board, a Foscam FI9800P IP camera, and a Particle Photon attached to a relay The camera is mounted on the side of the house aimed at the front yard. It communicates with a WIFI Access Point maintained by the Jetson sitting in the den near the front yard. The Photon and relay are mounted in the control box for my sprinkler system and are connected to a WIFI access point in the kitchen.
In operation, the camera is configured to watch for changes in the yard. When something changes, the camera FTPs a set of 7 images, one per second, to the Jetson. A service running on the Jetson watches for inbound images, passing them to the Caffe deep learning neural network. If a cat is detected by the network, the Jetson signals the Photon's server in the cloud, which sends a message to the Photon. The Photon responds by turning on the sprinklers for two minutes.
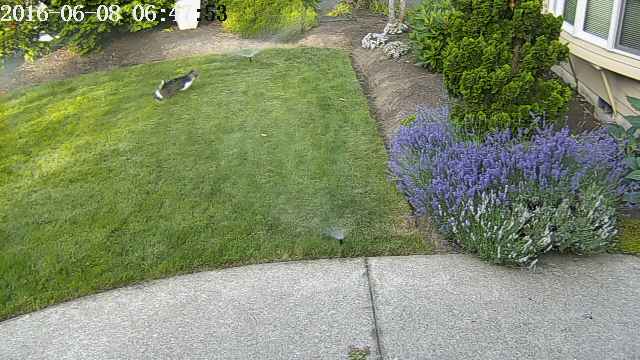
Here, a cat wandered into the frame triggering the camera:

The cat made it out to the middle of the yard a few seconds later, triggering the camera again, just as the sprinklers popped up:


Follow the directions from Foscam to associate it with the Jetson's AP (see below). In my setup the Jetson is at 10.42.0.1. I gave the camera a fixed IP address, 10.42.0.11, to make it easy to find. Once that is done, connect your Windows laptop to the camera and configure the "Alert" setting to trigger on a change. Set the system up to FTP 7 images on an alert. Then give it a user ID and password on the Jetson. My camera sends 640x360 images, FTPing them to its home directory.
Here are some selected configuration parameters for the camera:
| Section | Parameter | Value |
| Network: IP Configuration | ||
| Obtain IP from DHCP | Not checked | |
| IP Address | 10.42.0.11 | |
| Gateway | 10.42.0.1 | |
| Network: FTP Settings | ||
| FTP Server | ftp://10.42.0.1/ | |
| Port | 21 | |
| Username | Jetson_login_name_for_camera | |
| Password | Jetson_login_password_for_camera | |
| Video Snapshot Settings | ||
| Pictures Save To | FTP | |
| Enable timing to capture | Not checked | |
| Enable Set Filename | Not checked | |
| Detector Motion Detection | ||
| Trigger Interval | 7s | |
| Take Snapshot | Checked | |
| Timer Interval | 1s |

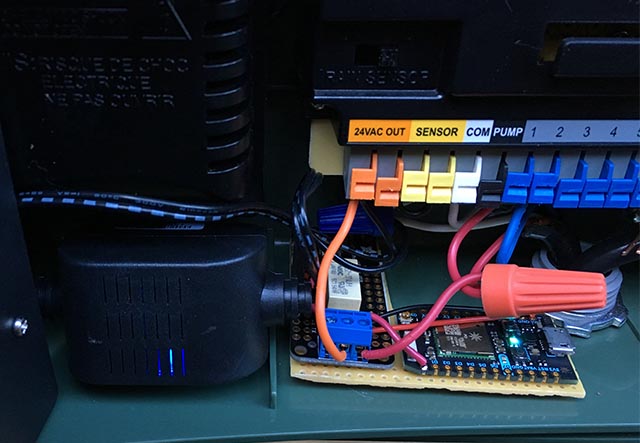
The black box on the left with the blue LED is a 24VAC to 5VDC converter from EBay. You can see the white relay on the relay board and the blue connector on the front. The Photon board is on the right. Both are taped to a piece of perfboard to hold them together.
The converter's 5V output is connected to the Photon's VIN pin. The relay board is basically analog: it has an open-collector NPN transistor with a nominal 3.3V input to the transistor's base and a 3V relay. The Photon's regulator could not supply enough current to drive the relay so I connected the collector of the input transistor to 5V through a 15 ohm 1/2 watt current limiting resistor. The relay contacts are connected to the water valve in parallel with the normal control circuit.
Here's the way it is wired:
| 24VAC converter 24VAC | <---> | Control box 24VAC OUT |
| 24VAC converter +5V | <---> | Photon VIN, resistor to relay board +3.3V |
| 24VAC converter GND | <---> | Photon GND, Relay GND |
| Photon D0 | <---> | Relay board signal input |
| Relay COM | <---> | Control box 24VAC OUT |
| Relay NO | <---> | Front yard water valve |

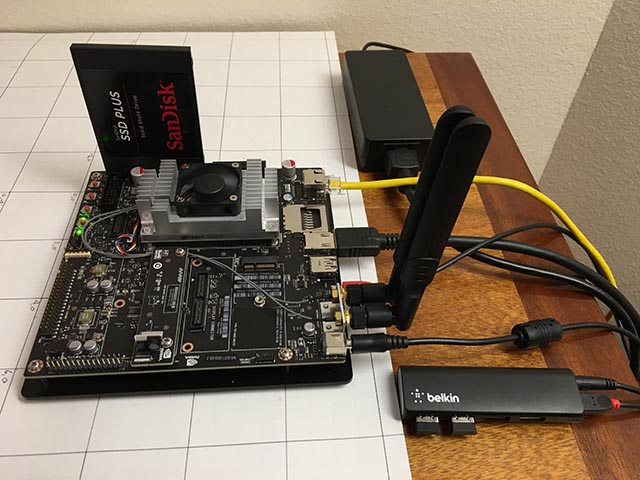
The only hardware bits added to the Jetson are a SATA SSD drive and a small Belkin USB hub. The hub has two wireless dongles that talk to the keyboard and mouse.
The SSD came up with no problem. I reformatted it as EXT4 and mounted it as /caffe. I strongly recommend moving all of your project code, git repos and application data off of the Jetson's internal SD card because it is often easiest to wipe the system during Jetpack upgrades.
The Wireless Access Point setup was pretty easy (really!) if you follow this guide. Just use the Ubuntu menus as directed and make sure you add this config setting.
I installed vsftpd as the FTP server. The configuration is pretty much stock. I did not enable anonymous FTP. I gave the camera a login name and password that is not used for anything else.
I installed Caffe using the JetsonHacks recipe. I believe current releases no longer have the LMDB_MAP_SIZE issue so try building it before you make the change. You should be able to run the tests and the timing demo mentioned in the JetsonHacks installation shell script. I'm currently using Cuda 7.0 but I'm not sure that it matters much at this stage. Do use CDNN, it saves a substantial amount of memory on these small systems. Once it is built add the build directory to your PATH variable so the scripts can find Caffe. Also add the Caffe Python lib directory to your PYTHONPATH.
~ $ echo $PATH
/home/rgb/bin:/caffe/drive_rc/src:/caffe/drive_rc/std_caffe/caffe/build/tools:/usr/local/cuda-7.0/bin:/usr/local/sbin:/usr/local/bin:/usr/sbin:/usr/bin:/sbin:/bin
~ $ echo $PYTHONPATH
/caffe/drive_rc/std_caffe/caffe/python:
~ $ echo $LD_LIBRARY_PATH
/usr/local/cuda-7.0/lib:/usr/local/lib
I'm running a variant of the Fully Convolutional Network for Semantic Segmentation (FCN). See the Berkeley Model Zoo, github.
I tried several other networks and finally ended up with FCN. More on on the selection process in a future article. Fcn32s runs well on the TX1 - it takes a bit more than 1GB of memory, starts up in about 10 seconds, and segments a 640x360 image in about a third of a second. The current github repo has a nice set of scripts, and the setup is agnostic about the image size - it resizes the net to match whatever you throw at it.
To give it a try, you will need to pull down a pre-trained Caffe models. This will take a few minutes: fcn32s-heavy-pascal.caffemodel is over 500MB.
    $ cd voc-fcn32s
    $ wget `cat caffemodel-url`
Edit infer.py, changing the path in the Image.open() command to a valid .jpg. Change the "net" line to point to the model you just downloaded:
    -net = caffe.Net('fcn8s/deploy.prototxt', 'fcn8s/fcn8s-heavy-40k.caffemodel', caffe.TEST)
    +net = caffe.Net('voc-fcn32s/deploy.prototxt', 'voc-fcn32s/fcn32s-heavy-pascal.caffemodel', caffe.TEST)
You will need the file voc-fcn32s/deploy.prototxt. It is easily generated from voc-fcn32s/train.prototxt. Look at the changes between voc-fcn8s/train.prototxt and voc-fcn8s/deploy.prototxt to see how to do it, or you can get it from my chasing-cats github repo. You should now be able to run
$ python infer.py
My repo includes several versions of infer.py, a few Python utilities that know about segmented files, the Photon code and control scripts and the operational scripts I use to run and monitor the system. More on software in the next post, Network Selection and Training.
Contact me at r.bond@frontier.com for questions or comments.