Getting Started:

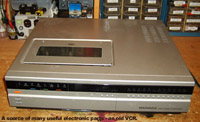
An old VCR, a source of parts
The purpose of this web site is to provide instructions for electronic projects that are not only easy to build but are geared to keep the expense to a minimum. Most of the parts may be obtained from discarded electronic equipment obtained at garage sales and junk yards. Old VCRs, TVs, radios, clocks, toys, cordless phones, computers, and microwave ovens are a good source of parts.

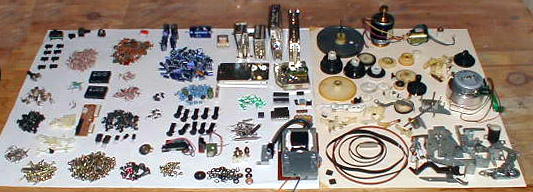
Parts obtained from the old VCR
Click on the image for details
Literally hundreds of parts were obtained from the old VCR shown above. Dozens of resistors, capacitors, coils,
transistors, switches, connectors, and hardware. A particularly nice find was a motor controller IC.

Tools of the trade
Don't go trudging off to the local hardware store or Radio Shack to purchase these tools. Most of the tools shown in the picture were bought at yard sales.
- Various sizes of regular and Phillips type screw drivers.
- Needle nose and side cutting pliers, about 5 in. length. Pliers with non-conductive plastic grips on the handles are ideal.
- Small sized flat, round and triangular files.
- Small hammer.
- Drill and drill bits. Start off with a hand drill, later you may want to get a small cordless powered drill.
- Crescent wrench, about 6 inches in length.
- Channel lock vise, about 6 inches in length, with plastic grips.
- Wire wrapping tool. I find the hand type sufficient although there are powered ones on the market.
- Hobby knife.
- Pocket knife.
- Electronic grade rosin core solder, acid free, non-lead based.
- Solder paste or flux, acid free, electronic grade. You won't use much so a small container will last for years.
- Vinyl electrical tape, 3/4 inch wide.
- For soldering, start with a pencil type 40 watt soldering iron. Eventually you'll want to get a soldering station which has a temperature controller -- great for small component work. Also, at some point you may want to get a soldering gun. The gun has the advantage that they get hot fast and are only ON when you need it.
- In order to unsolder parts, a spool of copper braid solder wick is used. These wicks are considerably cheaper than a "solder sucker" but not nearly as easy to use. I recommend getting a solder sucker at some point in time. They use vacuum pressure to clean the joint and really do a fine job.
- Not shown in the picture is a small sponge, about 3 inches square, which when wetted with water is used to get the crud off your soldering tip. A small square of emery cloth is also useful for cleaning the tip and for preparing a surface for soldering.
- I was lucky to find the Volt-ohm meter at a yard sale. Also called a VOM, it is one piece of test equipment that you must have. The one shown in the picture is an analog type (moving needle on a scale.) Digital types are great and have a numerical read-out. You will need the following scales as a minimum: AC and DC 10, 50, and 250 volts; Resistance X1, X100, X10K ohms; DC 10, 50, 250 ma current. Eventually you'll want to upgrade to a meter with all these scales plus many more, including continuity, capacitance, inductance, transistor gain, and decibels.
- Quite often, you can find calculators at yard sales. Try to get one with trig functions if you can.
- I use a discarded tooth brush for cleaning old electronic equipment and parts. A good cleaning agent is known as CRC and comes in a spray can.
- A pen light is very useful when inspecting old boards for parts. The one above uses two AAA cells. Also, you'll want a small magnifying glass (not shown) for reading the small print on certain components such as transistors or ICs.
- A label maker is used to label your boxes or drawers of parts and for putting labels on your projects. Shown in the picture is the type that uses a small reel of self-adhesive tape of various colors. More expensive ones are available that actually print out fancy labels in different sizes and fonts. Of course, for the budget minded, you can print labels with your computer and printer, cut them out, and glue them on. If you have good penmanship, then you can write out the descriptions and use stick on labels cut to whatever size you need.
- A Small vise is used for holding PC boards for soldering or desoldering the parts. The two "C" clamps in the picture are used to clamp the vise down at various places on my bench as opposed to permanently screwing it down.

 Contact me