The starting point: The hull and hatch

Quote from Robert A. Heinlein

You will find a few videos of the build along with, eventually, running videos of this project boat here. For many more videos, check out our YouTube channel: Handful Of Hobbies (formerly Generation of Gaming) (also linked above)
I found this 'new-in-the-box' old stock hull with hatch on eBay. It is 950mm x 255mm (37in x 10in) and weighs 950g / 2 Lbs.
It's a relatively shallow-V hull with a deadrise at the stern of only 17 degrees. In comparison, the Stealthwake is 20 degrees. The larger the deadrise angle (aka. the deeper the "V"), the better the hull will handle in rough water.
The deadrise amidships (middle from front-to-back) is 26 degrees. Like many full size boats, the hull shape and changing deadrise is a compromise to give it some decent rough water handling with the "deeper V" at the bow and amidships, while allowing higher speeds on flat water with the "shallow V" at the stern. Thus, this boat should fly on flat to mild-chop water but still handle rough water pretty well.
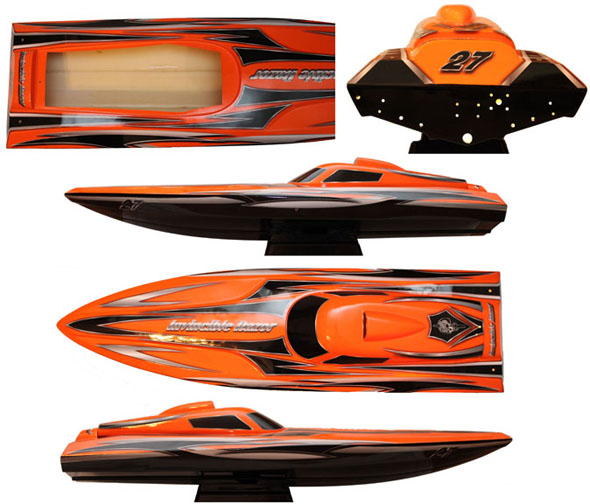
This is a bare, empty fiberglass hull with all of the hardware mounting holes, water lines and other accessory holes drilled. You can see them, especially in the stern view image where I put a flashlight inside so you can see all the mounting holes on the transom. The hatch is very rigid but the hull has a good amount of flex. I might have to add more fiberglass to certain areas before going too far. I'll also have to add plywood or other material to create mounting points for the motor, R/C gear, servo and battery trays.
The best I can tell, Joysway Hobby had this for sale around 2012. As of 2020, this boat is no longer available but an ABS plastic hull boat of almost the same size and specification is for sale. That boat is called the Joysway Alpha Super 1000. The HobbyKing HydroPro Inception, currently on sale in the U.S. for $350 USD, is, from what I have seen, a re-branded Alpha Super 1000.
So I am taking a boat that originally, stock, was probably around $350 to $400 USD without batteries and building it, presumably better than stock, for about $500 with batteries.
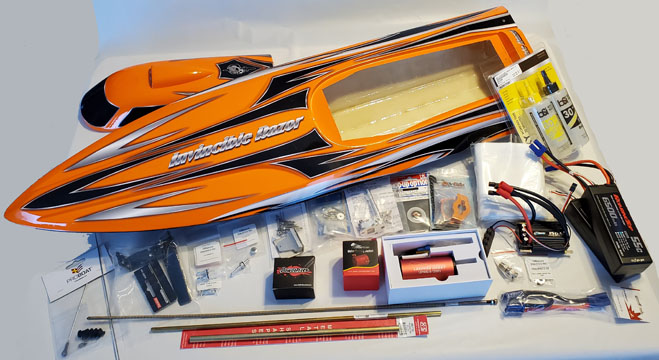
Between Sept. and Dec. 2020 I slowly planned out the power system and all of the parts I needed from information I found on the Offshore Electrics (OSE) Forum plus direct help from Steven V., the owner of OSE. I received some parts from my wife and kids for Christmas and in early Jan. 2021 I ordered the rest of the parts I needed to assemble this boat. I now have everything to complete this build. Originally I assumed it would take longer to get all of the parts, but I was fortunate enough to be able to get them all around the same time!
The other thing I did was fiberglass the inside of the hull. I used the Hobbico Fiberglass Cloth, 5oz, 1 Square Yard that I bought from my local HobbyTown store along with a LOT of 30 minute epoxy. I 'glassed' the entire hull in sections with a single layer of cloth. I also 'glassed' the transom twice to give it extra rigidity. I was going to glue in a plywood support then fiberglass over it but the existing fiberglass was really rough and the plywood piece would not fit very well. So I figured 2 layers of fiberglass should work fine. As mentioned in my "Stage 1" comments, this boat was sold ready-to-run and it worked fine with the hull as I originally received it, so anything I do should be an improvement. The weight of just the hull went from 747g to 1,183g (1 lb 10-3/8 oz to 2 lbs 9-3/4 oz) when I added the fiberglass reinforcement.
The next thing is to add floatation to the bow, put the hardware on the stern and figure out where the motor, ESC and batteries should go in order to have a center-of-gravity (CoG) at 27% to 30% the length of the hull when measured from the stern. In this case, that puts the CoG around 10-3/8" [263mm] measured stern to bow since the hull is 37" [950mm].
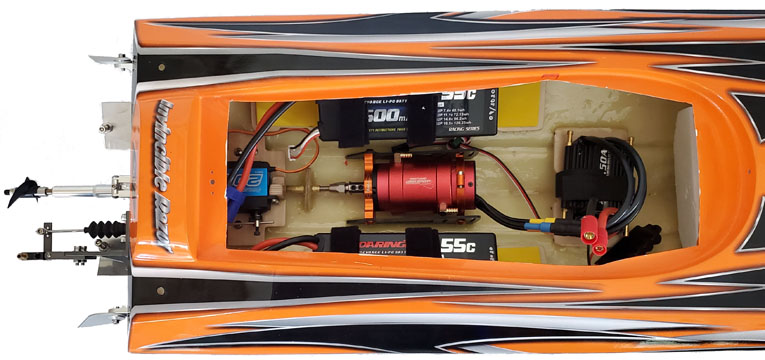
It's early February 2021 and the components are in place as you can see in the above image. Missing still are the receiver, water cooling lines and some other minor hardware. The ESC and battery tray mounts are epoxied into place along with the steering servo tray mounts. These were all made from 3/32" model aircraft birch plywood. I cut them to shape and applied 4 coats of Spar Varnish to make them essentially waterproof.
The steering servo sits on a wood tray, also made from 3/32" plywood with Spar Varnish on it, which I can remove as needed. The 3 screws hold the servo tray to the mounts. This makes it easier to service or replace the servo and also gives me access to the entire stuffing tube if needed.
The range of where the Center-of-Gravity should be located is between 25% and 30%. In the setup above as shown, the CoG is right about 28%. Moving the batteries fore or aft gives me a range of about 26% to 29%.
I used double-sided Velcro brand "ONE-WRAP Roll, Cut-to-Length Bundling Strap" to create the battery straps and ESC strap. The battery trays are long enough to allow me to move the batteries fore and aft to move the CoG as needed. The trays have cutouts so I can move the battery straps as needed as well. I plan to double-stick-tape the ESC into place so I may not use the Velcro strap.
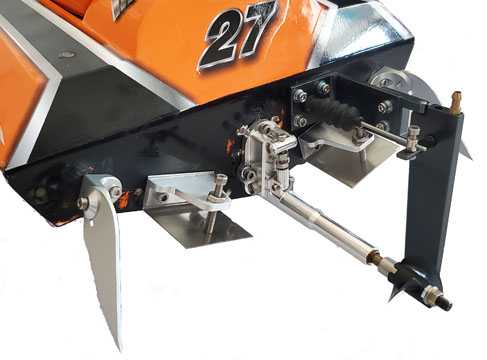

It's early March 2021 and I have finished the final assembly of the boat. I would have been done sooner but the painting took longer than planned. Part of it was the fact that I have to paint in the garage and we had a few weeks of sub-freezing temperatures so it was way too cold to paint. Then, when I was able to paint, the clear coat "melted" a section on the bow so that had to be redone. It was a mess! Lesson learned, don't try to paint just a section, paint the whole boat and be done with it! The bow section I "fixed" still orange-peeled but I gave up trying to fix it a 3rd time, so it will stay that way until I paint the entire boat one day in the color scheme I like.
After floating the boat in the tub I do have some water seeping in around a few of the hardware bolts. It's minor but once I get the boat tuned and running the way it should, I'll caulk the bolt holes to stop all water leaks.
The hatch tie-down was an interesting challenge but I was able to make it work by with some bolts, left-over aircraft plywood from the battery trays and a lot of epoxy!
Total weight of the finished boat with two 3-cell LiPo batteries = 7lb, 12oz [3,508g / 3.51kg]
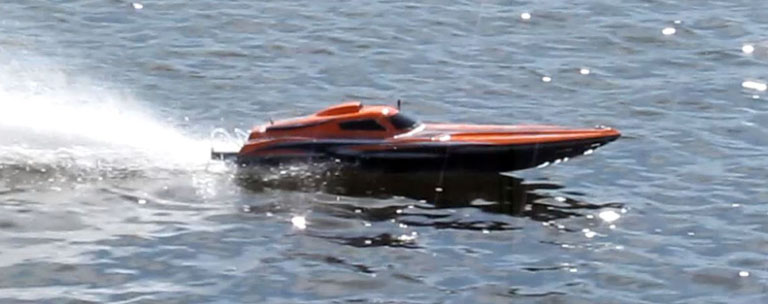
A week of warm weather in March before it snowed again brought us open water on our local pond. We took advantage of the time to run some boats and do the "Sea Trials" (1st runs) of the custom built Joysway Invincible Razor! The boat ran well and looked good on the water. We ran two trials, only a few minutes each with different size props. In both tests the batteries were placed so the Center-of-Gravity (CoG) was at 28%. Also, in both tests, the temperatures of the motor, ESC and batteries stayed cool (of course it was also only about 50 degrees Fahrenheit outside and the water temperature was probably around 40F and the runs were about 2 minutes).
AMP draw with the 1.4 pitch x 42mm diameter prop maxed out at 83A but stayed under between 75A and 80A most of the time. Wattage maxed at 1,833W and the max RPM was 28,020.
For the testing with the 1.4 x 45mm prop AMP draw maxed at 120A but mostly stayed around 100A. However, during this run, the motor mount tore loose, spun the motor around and wrapped the silicone water cooling tubing around the prop shaft. So the amp draw was very likely negatively impacted. Plus, the inside of the hull was flooded after the short run because the water pickup was still working but the tube was cut from being wrapped around the prop shaft so the water just poured into the hull.
Next steps are to get the motor mount and stuffing tube mount reattached using West System G/flex epoxy [this is highly recommended by other R/C boaters so that's why I'm trying it] and then continue testing with different size props, different battery placement (to move the CoG) and different water and weather conditions.
After I fixed the motor mount and stuffing tube mount, we were able to run the following weekend and test several props (see the chart below). We also got to run it in high winds and "rough seas" the same weekend. As you will see in the second video below, when it wiped out in the high winds from the bad driving (waves + wind + turning into the wind while accelerating = flip-and-roll), the ESC mount came off. But the motor mount stayed in place! LESSON LEARNED: Surface prep is key (sand the 2 surfaces to be bonded with 80 grit sandpaper to give the epoxy something to physically grab onto). Plus, really good epoxy certainly helps! Now to see if the battery trays and servo tray mounts will eventually fail. I tried to pry them off but they wouldn't give, so maybe they'll stay in place.
This second video is testing different props to find the best one for this boat:
More prop testing in calm water and a pretty impressive wipeout!

After the "sea trials" and prop tests were completed, and primarily after selecting a final prop, there were some handling issues. Initially the boat was running "wet" where there was a lot of hull in the water. At full throttle on calm water, the water was breaking off the hull at about the mid-point instead of near the stern. After playing with strut/stinger angles and trim tab adjustments, I finally had to modify the trim tabs to get them further up the transom. I can now move the trim tabs from flush with the bottom of the keel/hull up to about 3mm above flush. That helped dramatically and I saw performance improvements.
With the boat running drier I had more near-flips and a few actual flips where the boat went airborne and cartwheeled. One of those times the hatch broke which, thankfully being fiberglass, I was able to reconstruct the broken section. After a few too many near-flips and having to drive conservatively to keep it on the water, I made some modifications internally so the Center of Gravity (CG) was further forward. This kept the bow down and allowed more aggressive driving, even in windy conditions!
Step 2: Modify the CG to keep the bow down without adding weights or creating drag with trim tabs or stinger angle adjustments:
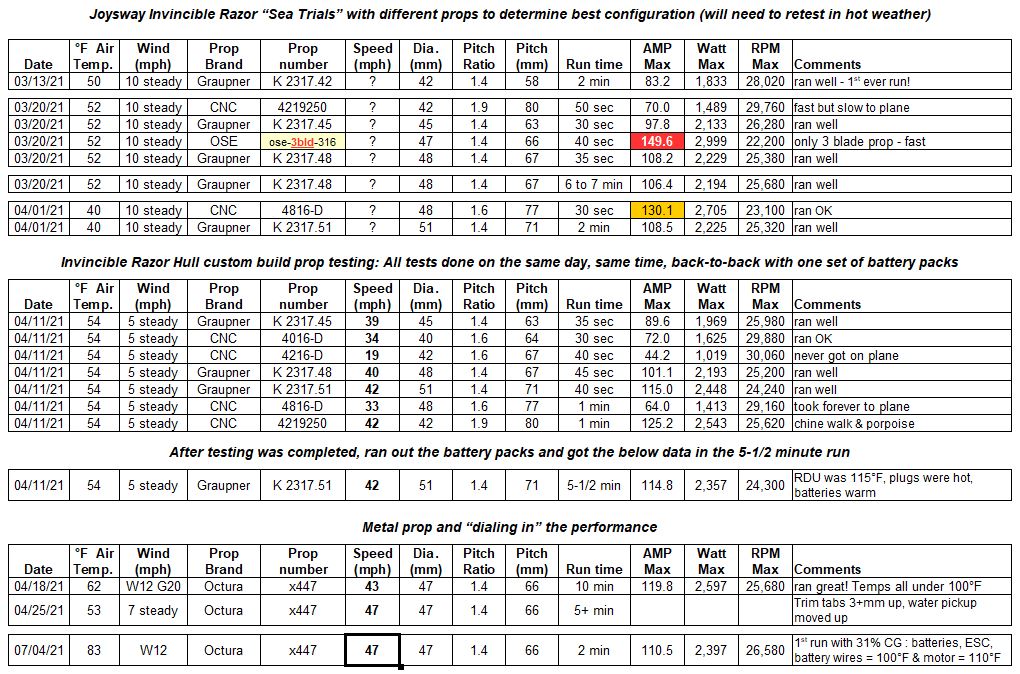
The Graupner 1.4x45 and 1.4x48 props ran well and achieved similar speeds and good numbers. This indicated that a 1.4x47 metal prop should work great. I selected an Octura x447 that was sharpened and balanced.
This is it for the build updates. Be sure to see below for details of the components used and be sure to subscribe to our YouTube Channel [link at the top of the page] so you get updates when we post new videos. I expect to have lots of videos of this boat along with our other boats as well of course!
Thank you for following along on this build, the first true "speed boat" I have built!
Updated: September 2021
Of course, if you want more information on any of my boats,
you can email me at:
sv_design@frontier.com