
|
|
= The Console = |
||||||||||||||||
|
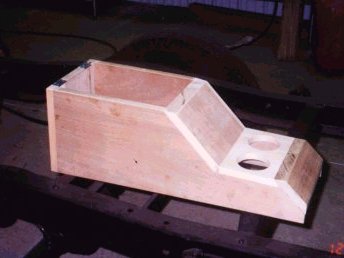
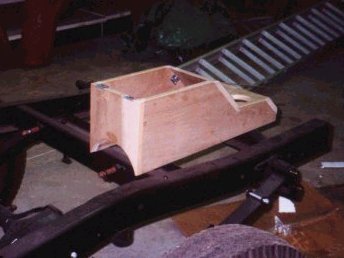
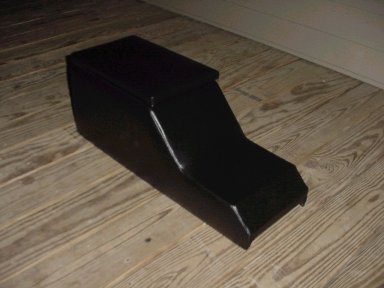
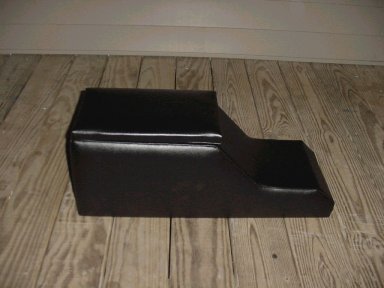
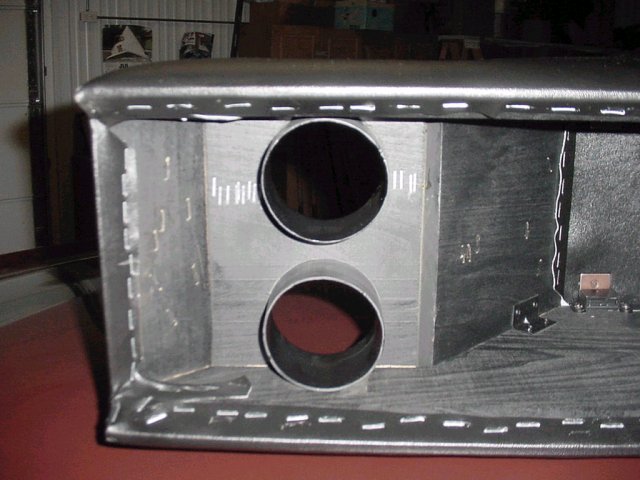
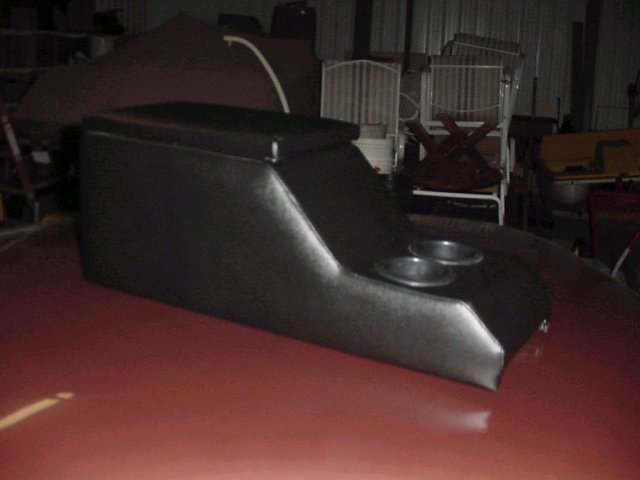
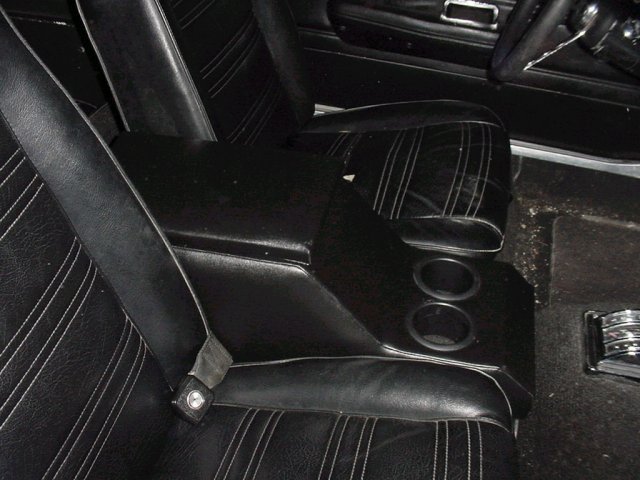
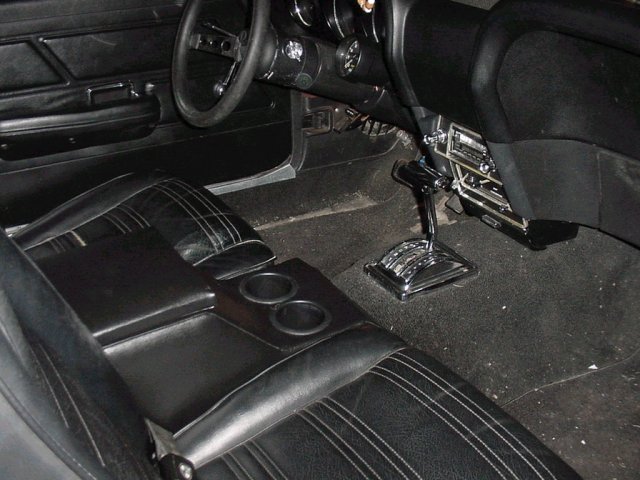
My original plans for a custom center console to fit the Hurst Shifter attached to my Toploader. They are crude, but you get a general idea of how it will work. So far I have sketched it out, and made a mock-up from foam board (some fairly sturdy stuff I found at Office Depot). It looks pretty good. I wanted the cupholders side-by-side, and I think I can accomplish it, but they will be pretty close. I plan to use the armrest compartment to house CD changer, but as with all plans, that may change. Check it out, but liek I said, they are rough designs. I plan to build ths console from 1/2" wood (high quality plywood) and then cover it with vinyl. I hope to match the texture of the dash as best as I can. I will be padding the whole console to help me hide joints in the wood, but the main padding will be on the armrest. I am going to hinge the armrest door to open towards the passenger seat. I plan to add other features to this console, but for the time being, it will just have the cupholders and the armrest compartment. 28 November 2001 - I (with help from my grandpa, cousin, and grandpa's tools) built my console. My cousin and I went to the local lumber yard, and snagged a 96" x18" piece of 3/4" poplar wood. This would be a soft enough wood to work with, but still last a LONG time. I decided that I did not like a full length console (under the shifter) so I modified the design. Oh, and it became too much of a pain in the butt to fit that portion to the car, so I just eliminated it. It served no real purpose, and seemed silly. I narrowed it by 1/2", so I had to twist the cupholders. I will post pictures as soon as I get them. It turned out VERY nicely... and for all of $41! It fits like a glove. Grandpa was able to bevel the edges on the bottom to fit on the tunnel better. This thing is made from solid poplar wood... I wont have to fasten it down... it is heavy enuf to stay in place itself. I MIGHT use a piece of velcro or two, but not unless I really need it. 29 November 2001 - I obtained the PERFECT vinyl.... camera case finish and semi-gloss. I cut it into 3 sections. One for each side, and one that covers the top. I am going to redo the cup holders, as I messed up the locations. I put them way too close together when I could have spread them about another inch. I also learned to sew! I figured out how to make corners that look good... this is really gonna look sweet when it is done. The vinyl cost me all of $7 for 1.5 square yards (54" by 36"). This thing is turning out to be not only good looking but very cost effective compared to aftermarket hump huggers. 30 November 2001 - After a LONG day of counting inventory, I came home and started sewing the console. The vinyl is in 3 pieces, 1 for each side, and one that runs along the top and back. The only seams are going to be at the edges (red in the picture). So far, it fits perfectly, and will be even better when it has some padding putting some stretch in it. 01 December 2001 - Finished sewing the vinyl, and it fits perfect (with a small amount of stretching). I also glued 1/2" foam onto the outside of the console, and fitted the vinyl to the console. I will borrow the parents staple gun tomorow to affix the vinyl. I will also need a retaining chain, and a latching mechanism of some type. I think I will use magnetic cabinet latches. Home Depot is 1 block away, no big deal. 02 December 2001 - Today, I finished it (except for the cupholders)!! My wife's parents came over to visit, and while my wife and her mother worked on a Christmas project, her dad helped me out by stapling hte vinyl while I stretched it into place. It turned out nearly flawless! It is a bit puffier than I expected, but I can cope. I also cut a hole in the vinyl for the compartment. I stapled that in along the top edge. I covered the lid with foam and vinyl, and then made a trip to Home Depot to get my hinges, magnetic latches, retaining chain, and eyelets. I made a cover for the chain out of vinyl. The latches I wanted were tan, so I sanded them a bit and painted them. I then installed both items with ease... not much to tell about that. I also painted the hinges, but that paint is rubbing off already, so I will not bother with that. All in all, it turned out better than I could have imagined when I set out on this project. 03 December 2001 - I took pictures today. I am sorely disappointed in the quality of the pictures. I will be investing in a digital camera withing hte next... oh... 48 hours. I also cropped by the shop to test fit it... can you say, "Like a glove?" Please excuse hte poor quiality pics... it really does look better than this in real life. 04 December 2001 - I borrowed the company digicam today. I took better pics of the console in its current condition. It does not look nearly as bloated as before. 07 December 2001 - I bought a set of subsoofer ports today to use as cup holders. I cut about 2.5" off the bottom. I shaved off the ribs on the first one, and inserted it... tight, but a perfect fit. To get it all the way in required me to push it in with my foot. On the second one, I forgot to shave off the ribs, and I split the board. I now have the board glued, clamped, and stapled. It SHOULD be okay. I also shaved off the ribs and thinned the second cup holder. No harm no foul. I will get pics of hte final product soon. 08 December 2001 - I shaved down the second cupholder. The glue and staple thing worked perfectly. I finished the assembly, and it looks great. Pictures should be up soon! 14 December 2001 - I got some pictures for ya!
|
||||||||||||||||