Helpful Hobby Information

Home
Ice Stoves
Pentax Optio WP30
SPOT information
Swedish Military burner
Sterno stove with Trangia burner
Fishing line as general-purpose cordage
Poor Mans Trangia 27
Best of Breed - Alcohol Stove setup
Contact Me

Best of Breed - Alcohol Stove setup

Information on a backpacking alcohol stove setup consisting of Trangia burner, burner stand, wire pot stand and windscreen.

small2.jpg
General concept, without windscreen

Fairly simple setup. Doesn't weigh much. Very strong. Shown with Primus Litech tea kettle. The silvery thing in the background is an aluminium clad bubble wrap cozy. I like to freezer bag cook. Note that burner is placed in the center of the base triangle.

small1.jpg
Individual components

Trangia burner is supported and cooled by a cut out tuna can (biggest problem is too much heat when used on a warm day on insulative surfaces). Wire folding pot stand is separate from burner allowing  (a) pot to burner height adjustment, (b) a little better stability on weird ground and (c) isolates the burner from the heat conducted through the pot stand.

small3.jpg
Assembed windscreen

Windscreen is made from aluminium roof flashing. Stores rolled up in a cut off plastic drink bottle. End of windscreen held together with brass paper brads. Holes made with cheap paper punch. Holes clustered together on one side so that you can turn it away from the wind. Windscreen is just tall enough to protect the flame  for the initial 1/2'' of pot bottom and no more. Make you windscreen wide enough to encompass your widest pot with at least a 1/2" air gap.

small4.jpg
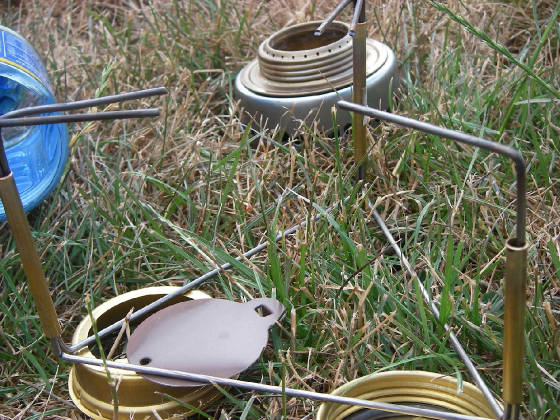
Piano wire pot stand

Wire pot stand is constructed from 3/32" piano wire and 3/16" brass tubing. It has three sides, each 6" base, 3.5" high, with 2" support overhang. One side has a short leg without an overhang, that slides into a shorter section of brass tube. It stores folded nearly flat. The assembled triangle is very strong. 2" length of tubing on 2 sides, 1.5" length on the connection side.
 
Materials purchased at ACE hardware for $5. I build mine with a tubing cutter, standard pliers, a cheap bolt cutter, and my hands.
 
Measure 2", mark, 90* bend, add tubing, measure 3.5", mark, 90* bend, mesure 6", mark, 90* bend, add tubing, measure 3.5", mark, 90" bend, measure 2", cut. Best if you measure and bend in series so as to negate cumulative error. Think through how the three section interconnect via the brass tubing so that you don't make a bend and then realize that you can't slide into the previous section's tube.
 
The tuna can was opened, contents munched. The bottom was scribed, then a hole poked in the center and the unwanted cut out with kitchen shears. The vent holes were made with cheap paper punch. The burner is inverted and placed in the can for storage. The can offers a little protection - although the Trangia is hardly fragile.


You tube video of the stove setup