Digitizing Video
An Introductory Course by Kirk Pearson
Back to Video Course Home Page
Unit
One:
Introduction to Digital Video
Unit
Three:
Computer Readiness
Unit
Five:
Video Capture & Editing
Input/Capture
Part of the reason many of the current software packages catering to digitizing video specify Windows XP as their minimum requirement is due to its unprecedented level of focus on the multimedia realm of computer technology. This includes how Windows XP itself functions, hardware drivers (programs Windows needs to use and manage hardware components) that are available or allowed, and how well XP 'plays with others' (other software that is).
Microsoft makes available through Windows XP a program called Movie Maker. And the chances are if your computer came with (or is even capable of running) XP, you probably have at least one Firewire port. With these two things you are already good-to-go with respect to inputting video footage if you are starting with a DV camcorder.
![]()
An issue that should also be raised at this point regarding Windows is hard disk formats. The two predominate formats with respect to your computer's hard drive are known as FAT (File Allocation Table - there are a few variants) and NTFS (Windows NT File System). The latter became available to consumers with the Windows 2000 operating system and continues with XP. These formats determine how large files may be that are created and saved to the disk. Due to Windows limitations, FAT formats may limit file sizes to 4GB or about 19 minutes of DV video. Some video editing software works around this by automatically creating additional files if captured video exceeds the limitation, while some won't. NTFS format allows files as large as the disk itself and consequently are not a concern. If you know you have a FAT file system (FAT32 was the highest variant), you will want to check the editor to see how it handles this. And if you anticipate working with large video files, this will become an important metric to compare editors by, and/or an excuse to upgrade to an operating system that is NTFS-capable. For more information about FAT and NTFS, see 'Choosing FAT or NTFS' and 'Overview of FAT, HPFS, and NTFS File Systems.'
A/D converters and DV capture cards (discussed in the Hardware unit) often come bundled with software that not only allows for video capture but editing and DVD burning/authoring as well. Bundles such as these vary widely and require you to determine if what the manufacturers pair up is what you would've paired up had you bought separately. Items available are constantly changing and one advantage of this arrangement is that you can usually rest assured that there won't be any compatibility issues, at least between these two elements of your digitizing system.
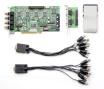
(Capture card example with adapter cables)
Regardless of what software you obtain there are a number of things to consider in making a selection. As has been discussed previously, compatibility with your system (hardware, OS, etc.) is paramount. There are subjective issues such as ease of operation and layout. And the type and degree of support and documentation provided can have a significant impact on you and your project's success.
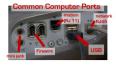
In the area of footage capture, you'll want to consider the software's input device support. Look at what types of cards, adapters, and ports/connectors are supported. Firewire and USB should be obvious, but there are different flavors or versions of even these and backward/forward compatibility can be important issues. There are a number of different specialty variations that wouldn't be practical to cover comprehensively in a course such as this (e.g., Sony Microm, or VFW/WDM analog camcorders), but if your research show that they are relevant to your situation, then they should be relevant to your software selection.
You should also examine what types of file formats (codecs) are supported. In the Hardware unit we looked at CCDs and how important they are to providing a good foundation to start with by acquiring quality footage however it might be stored. Similarly, during the capture phase, what codec is used will have a bearing upon all work thereafter. (This applies to analog input; DV capture is more like a file transfer because it doesn't require conversion to digital format. This has already happened as the video was initially taken and stored in the digital camcorder). Recall that codecs represent the type and degree to which the data is compressed as it is created. Regardless of the quality of footage contained in your input device (camcorder, VCR, etc.), when it is captured and compressed, there will be some amount of data loss. What you want is the ability to capture in the highest quality (least amount of compression) possible to retain as much of the original data as possible. Then later you can render/author to a lower quality (more compression) if necessary to achieve a lower data rate for viewing.
For more information on Microsoft codecs see 'Codecs 101', a few more can be found at GNRT Codecs and 'File Types and Encoding', and a considerable amount of information on AVI (Audio Video Interleave) and its relationship to codecs and the Windows operating system can be found in this article by John McGowan.

Editing
The basic function of the software that you buy will be editing. Most packages will provide for capture, editing, and authoring but will devote most of their horsepower to the editing tasks. Along with external input/capture, you will want to be sure that your package allows the import of previously captured files into the editing environment. In addition to video, these might include photos or other images (be they from a digital camera or scanner) and audio.
Editing generally refers to the tasks of developing your inputs into what you want the final product to be. Most video editors are divided into four separate areas to accomplish these tasks. The 'tools' area provides access to the functions or jobs that you can perform with the editor on your files. The 'library' area pictorially displays your captured clips and sometimes the various effects that can be applied to your project. There is also what I'll call a 'workbench' area where you put together your video clips and effects in assembling your project. Most programs call this either a 'storyboard' (which simply shows each asset in sequence), or a 'timeline' (which also shows assets in sequence but breaks each down into separate tracks). In the timeline mode, there is usually a separate track for the video, transitions, audio (original with video), audio (additional such as background music or narration), and title/overlays. And the fourth area of the editor is the 'preview window' which allows you to test ideas and see how things look without having to save/burn it to disc.
Programs differ in a number of ways, how the working areas are displayed and the capability of them is a major one. For example, preview windows can vary in size and configuration. Some programs may have additional tracks available in the timeline mode, and others, more special effects to choose from. Most will perform many of the basic operations that are also applied to still photographs such as cropping or trimming, and others include special operations such as color and redeye correction. Once again, you have to do some shopping, decide what you need to accomplish, and go vote with your wallet.
Programs also differ in the level and sophistication of project automation available. You can think of this as analogous to the automobile 'idiot light' since basically we're talking about how little work is required on your end to process video footage into a finished product complete with some level of frills. This may be an important consideration to you depending upon how much time you want to spend learning the software, as well as how flashy you want the end product to be.
It is generally thought, as in most areas of life, that the best approach is to just get the minimum that you need. Along with more features comes more expense, but also the more features the more complex the program. This taxes your computer more, not to mention your brain. And too much on either can result in a shutdown.
Movie Maker was mentioned earlier in this unit, primarily as a freebie that is available to you if you have Windows XP. If this isn't an option, or you want more features than it offers, other programs to give consideration to are VideoStudio (version 9 at this writing) by Ulead, and Studio or Studio Plus (version 9 at this writing) by Pinnacle Systems, and Premier Elements by Adobe (requires Windows XP). All are considered robust consumer-level editors and should be purchasable for less than $100 (especially on sale). If you're shopping I'd begin by comparing these candidates, pick you favorite, and compare anything else to it. You'll probably find that there are considerable similarities between the programs with some offering more editing features (breadth), while others offer more options for being creative within fewer features (depth).
You'll also find, like with hardware shopping, the Internet shines as a resource to help you make these kinds of decisions. You can conduct searches on video editors, specific brands or titles, expert (or at least enthusiast) reviews/comparisons, and even prices. Here's a tip if you didn't know it already: using Google, type in the name of a specific brand and model of hardware or software followed by a dollar sign/price, 2 periods, and a higher price (e.g., Pinnacle Studio 9 $10..80). In this case, any page with Pinnacle Studio 9 and a dollar figure between $10-80 would be returned. Then, it isn't too much effort to screen through a few results finding those that are actually reporting a sale price for your search item.

Special Effects
Perhaps you've seen lots of videos and didn't really give a lot of thought to how they were put together. Once you know what you're looking for, it's kind of fun to imagine creating a similar effect on your own project. Part of the editing process involves exactly this; how to make your video something really worth watching. How does one scene transition to another (required every time the camcorder went off or you insert the next clip in the editor)? How are different scenes marked or titled and made available on the disc? No more fast forwarding the VHS tape guessing at the right spot. (Some sources also consider color and brightness correction special effects rather than basic editing.)
The primary feature that prompted me to mention Studio+ in the last section is that it provides for two video tracks which allows for picture-in-picture effects (sort of like when the newsman has a video going on over his shoulder while he's talking). This is another example of the type of special effects possible with even consumer-level software packages.
Special effects vary between packages and may be one metric you'll want to compare them by if you see yourself doing some of this in your work. Some programs offer 3D or motion effects, others black and white conversion, some a variety of 'painting' effects such as charcoal or texturing. This whole area is one in which higher end programs are capable of doing higher-end effects but you may find that the typical consumer-level programs are perfectly adequate for your needs.
Rendering
I should at least mention the process of rendering here which is a term that refers to the production of the initial output file (it will be covered more in the Production and Distribution unit). Once all your editing work is done you will need to render the project so that it is in the form of a savable, archivable file. Then it will be ready to output whether online or on disc. It deserves mention here since, next to your editing work, it represents the longest time the computer will be grinding away to arrive at some finality or conclusion. This is another potential bottleneck in the whole process where computer hangs and other problems can occur due to the processor-intensive nature of the actions performed. This is one of the reasons time spent in making sure that your overall system of hardware and software are sensibly matched is time well spent.
And you should know that some programs are more forgiving of small changes after rendering and will subsequently re-render a project in just a few minutes. On the other hand, others are not so forgiving and basically start all over again. This can be a significant issue when you consider that in some product comparisons, working on a Pentium 4 2.4 GHz machine, rendering times on just a 12-13 minute project ranged from about one-half hour to one and one-half hours. I'll let you do the math if you're planning on filling a two-hour DVD with one of your projects.

DVD Authoring
Speaking of filling a DVD, that would be better known as burning, or authoring a DVD. Most editing software packages include an output module that provides the ability to do this. Again, this will be covered more in the Production and Distribution unit but I wanted to mention it here as a software consideration. I do this primarily because you should be aware that there are programs available that are concentrated more on the task of DVD authoring and are designed for use with a separate video editing program.
It can be confusing when looking at software in the store and frankly, most editing packages offer adequate authoring capability for the average consumer. Even features such as menu enhancements are generally available, for example, video menus (a menu with a video playing behind it), video buttons (buttons/links that are playing/showing short clips from the selected videos), or audio buttons (which play sound files while the menu displays).
Since most DVD authoring packages are designed to work with a separate editing package, you would need to get one anyway to produce the project. Therefore, as alluded to earlier, unless your needs cannot be met with the basic editing package's authoring tools, you probably don't need to look at the specialized authoring packages.
(Image sources: BestAnimations.com, AnimationsLibrary.com, and Images.Google.com)