Everything Else R/C Related
I get asked frequently about the other “stuff” we have and use with our Radio Control vehicles. This page covers all that other stuff, broken into categories. Click a section title to jump directly to it.
Our all‑other‑R/C‑stuff information is broken down by:
| Batteries and Chargers | Tools | Data Logging | Random R/C Thoughts |
Miscellaneous R/C Boat Related
Batteries and Chargers
Our Lithium Polymer (Li‑Po) batteries
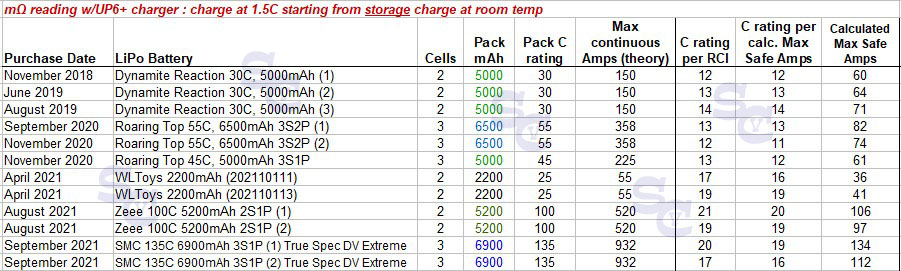
In the chart below I list the Li-Po batteries we have along with the date we bought them, the pack specs and the actual calculated C ratings and maximum safe amp draw calculations. All calculations were done in Sept. 2021. There is no regulation on C ratings so manufacturers can put anything they want for the C rating. The C rating is the discharge rate. In the chart you can see what each pack's C rating is per the manufacturer ("Pack C rating" column). The next column takes that [manufacturer stated] C rating and calculates the continuous maximum amperage the pack can output ... on paper anyway ... based on the unrealistic C rating. So DO NOT fall into the marketing hype of C ratings! The best advice is to see what other people are using for batteries in an applicaton similar to what you have. That will give you an idea of how the battery works in the real world. You can also check out the RC Groups forum dedicated to battery testing. They have an extensive list of real-life and laboratory testing results on LOTS of batteries. Check it out here: LiPo Battery Testing Comparisons
One reason you want to see the actual calculated C rating is to monitor your battery packs over time. Ideally, you get your reading as soon as you buy the batteries and then check it over the season and years to make sure your pack hasn't degraded. C rating is calculated from each cell's milliohm value and being able to see that, is how you know if you have a bad cell in your pack if you see a drop in C rating. With the right charger, record the calculated C rating and the milliohm value for each cell of each battery pack.
In the case of our batteries, only the WLToys, Zee and SMC batteries have a good "initial" reading. All the other batteries are older so I have no idea what they were when new.
The C ratings calculations come from Radio Control Info and from one of the forums on RC Groups (click on the links to go directly to the different calculators, they will open in a new tab or window). As you can see, the calculated C rating is very similar between the two different calculators. You will also see that there is a huge difference between what the manufacturer says the battery can safely output versus reality!
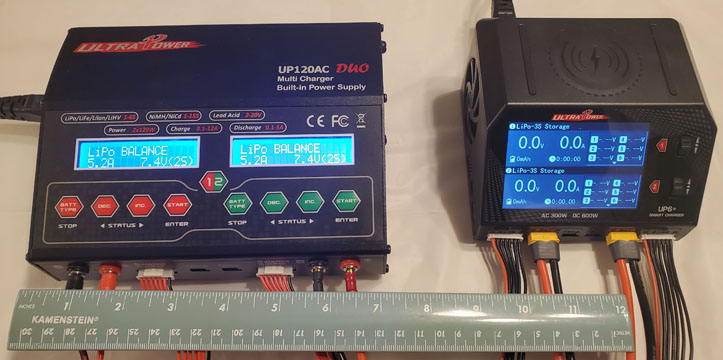
Our Battery Chargers
We have 2 chargers, a simple, basic charger and an intelligent charger. A few differences why the UP6+ smart charger is better in my opinion: It is smaller and more powerful; it can monitor individual cell milliohm values (useful for monitoring battery health); and it's easier to use and program. We have several vehicles and lots of batteries, so having the ability to charge 4 batteries at the same time, whether they are the LiPos or the NiMh batteries we have, it helps!
If I had it to do over, I would have only purchased the UP6+ smart charger. I didn't know any better when I first purchased an upgraded charger from what came with the R/C cars and boats.
The first charger, the Ultra Power UP120AC DUO we acquired in 2019 and still use it today. It can charge LiPo/LiHV/LiFe/LiIon (1 -6S); NiMH/NiCd (1-15 cells) and Lead Acid 2V-20V (1-10 cells). It has the ability to charge 2 batteries at the same time. The Charge Current is 0.1-12.0A. The Charge Power is 120W each channel.
In Sept. 2021 we purchased a "better" charger, for about the same price as the basic charger. This is the Ultra Power UP6+ Dual Channel AC/DC Smart Balance Charger. It can charge LiPo/LiHV/LiFe/LiIon (1 -6S); NiMH/NiCd (1-16S) and Lead Acid 2V-24V (1-12S). It has the ability to charge 2 batteries at the same time. The Output Voltage is 0.1V-30.0V. The Charge Current is 0.1-16.0A x 2. The Charge Power is: on DC Input it is 300w on both channels and on AC Input it is a max. of 300w split between the 2 channels (for example 150w & 150w or 200w & 100w). It has a split 3.5in color LCD screen. It also has a 10w Wireless Charger for your phone.
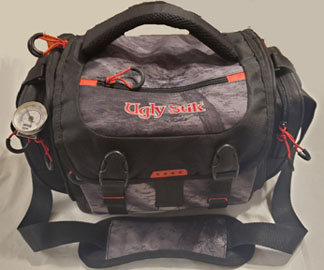
Field Box and Tools
This is the tackle box / tool box we take into the field whenever we are out running any of the R/C vehicles, especially the boats. The "UglyStik" brand tackle box is a soft sided case with a hard bottom that holds 4 trays. I use each of the trays for different tools and things used to repair and keep the vehicles running.
In the picture of the tool trays below, on the right side is the Emeter data logging tool and all of the components. Below that is the GPS bicycle computer for speed. Next to that is the infrared temperature sensor and a thermometer for measuring water temperature. Continuing along the bottom is a case with spare batteries for transmitters and a rag/cloth.
On the left side are 2 trays of boat props, both plastic and metal. I also have extra drive dogs and prop nuts in the box. I normally do not swap props during runs once I find the prop that works the best in a particular boat. But it's always nice to have the option to change props.
The most important tray is the one with the tools! In there I have small flat head and phillips head screw drivers. I have a tire wrench for the cars. I have every allen key wrench that works on any of the R/C vehicles. I also have an adjustable wrench and box wrenches to cover any other needs including R/C boat prop shaft couplers. There are also some wire/zip ties, Velcro brand straps, rubber bands, receiver binding plug, extra nuts and bolts, electrical tape and some other spare parts.

Data Logging Tools
For speed readings, we use 1 or both of the following tools:
- SkyRC GNSS Performance Analyzer - this is our current go-to
- Old smartphone with the app "Speedometer" on Android
- The Meilan M3 Mini GPS Bike Computer
- The issue with the Meilan M3 is that it is slow to register. I found it takes several seconds to register the speed. When running 50+ mph in a small lake, you're never at full throttle long enough for the M3 to register that top speed. So it's only good for slower R/C boats and cars where you can run full throttle for 10+ seconds. It works great on our 35 mph R/C cars!
Our data logger for recording info on the performance of the electronics, we use the Hyperion Emeter v2 and Remote Data Unit (RDU) along with the optional Tachometer to record motor RPM and 3 temperature sensors so we can mount them to the motor, ESC and battery (or battery connectors) to monitor temperatures.
We got this from R/C Dude Hobbies Randy was extremely helpful and knowledgeable about the Emeter. And no, we do not get anything for promoting R/C Dude Hobbies, or anyone else; no free product, no kick-backs, etc.
This unit was first introduced in 2009 so it's a bit outdated, but the recording abilities are still superb. The RDU records all of the data during a run. Afterwards, you plug the RDU into the meter and download the data to see all the variables every second or two over the entire run. All we had to do was solder connectors to the RDU (EC5s in our case) and supply a 4GB or smaller SD card for the meter which allows us to move the data to the computer for more detailed analysis.
The variables the RDU records are: Time; Volts; Amps; Watts; RPM; mAh (in & out); 4 temperatures (the RDU has a temp sensor built in); and a few others particular to R/C planes such as height/altitude.

Random Thoughts and Projects for our R/C vehicles
Is buying a Ready-To-Run (RTR) R/C boat better than buying something you fix and/or upgrade? The question depends largely on your budget and how much you like a good challenge. If you're up for a challenge and think you can make a better running boat than the manufacturer, then doing an upgrade or build-up (starting with nothing but a hull and/or hardware) will be fun and rewarding.
There are many ways to go about this. You can buy a RTR from your favorite R/C boat manufacturer and slowly upgrade it over time (like we did with Stealthwake #1). You can buy a used R/C boat that might not work and rebuild it to your specifications as long as the hull is in good condition (like we did with Stealthwake #2). You can buy just a hull and build it completely from the ground up (like I did with the Invincible Razor). Again, it all depends on your experience level and the type of challenge you're looking for.
Having upgraded 2 Pro Boat Stealthwakes I can confirm that the final cost was more than say a stock Pro Boat Sonicwake. Several people have questioned why we would spend so much time and money on a Stealthwake, and my answer is simply "because it's fun and a good learning experience!"
Related, having built the Invincible Razor from a bare hull that needed some work, again, it cost more than a new one or a similar Pro Boat RTR model. It was fun and I learned a LOT about fiberglass work, picking components, testing and testing to get it dialed in, etc. Plus, instead of a one time large outlay of cash, I was able to spread the purchases out over several months.
Can you fiberglass your plastic/ABS boat hull to reinforce it?
I have put a few layers of fiberglass on the transom of both Stealthwakes. I am no expert but these are a few things I learned in the process. This is my experience so far. Note, however, that I only fiberglassed the transoms where the bolts for all of the running hardware are basically holding the fiberglass in place! I have not fiberglassed an entire ABS hull yet. With that said, at least on Stealthwake #2 when I knew what I was doing, none of the fiberglass is coming loose where it's not being held in place with bolts!
- Epoxy, in general, does not hold well to ABS or many other plastics
- Surface preparation is key - you HAVE TO sandpaper the hull to rough up the surface so the epoxy has something to grab onto. Use 200 grit sandpaper and just rough up the surface. Be sure to clean it well after sanding!
- West System G/flex is about the only thing that I found works well with the ABS hull transom I reinforced (Stealthwake #2). I used their "655 Thickened" (first photo on the left below) but you can get it without the thickening agent and just add a thickener if you want it.
- I used "5 ounce" Fiberglass Cloth from Hobbico. The 1 square yard package would probably be enough to do the entire Stealthwake hull. I chose the heavy weight fiberglass cloth because I wanted strength and it was inside so appearance was not critical.
- I used 2 layers of cloth. After the first layer cured for 24+ hours, I applied a second layer. I did not do any surface prep between the first and second layer (I read somewhere that as long as you apply a second layer right after the first, the two layers will bond very well. If you wait days, weeks or longer, then you have to prep the original layer before applying the second layer.
- BSI Slow‑Cure epoxy (second photo below) worked well when I was putting additonal layers of fiberglass onto a hull that already had fiberglass (Invincible Razor).
- I used the BSI Slow-Cure on Stealthwake #1 to reinforce the ABS hull transom and it did not stick to every surface. Full disclosure, it was my first time fiberglassing anything and I did not prepare the hull properly so it could have been partly my fault.
- I also used the BSI to fiberglass the motor mount into the Invincible Razor (a full fiberglass hull, not ABS plastic) and it did not hold. After that, I found the West System G/flex and the motor mount has never come loose again.
- In using both epoxy resins, the heat generated during bonding was not an issue. The epoxy layer on the cloth is so thin that it won't get real hot. It also means it takes longer to cure. The thicker the epoxy, the hotter it gets and the faster it cures. Your LiPo battery sitting on your hull probably gets hotter than the epoxy does!
This is the video I made on the Stealthwake #1 that includes fiberglassing the transom: Pro Boat Stealthwake rudder upgrade and fiberglass transom, Summer 2020


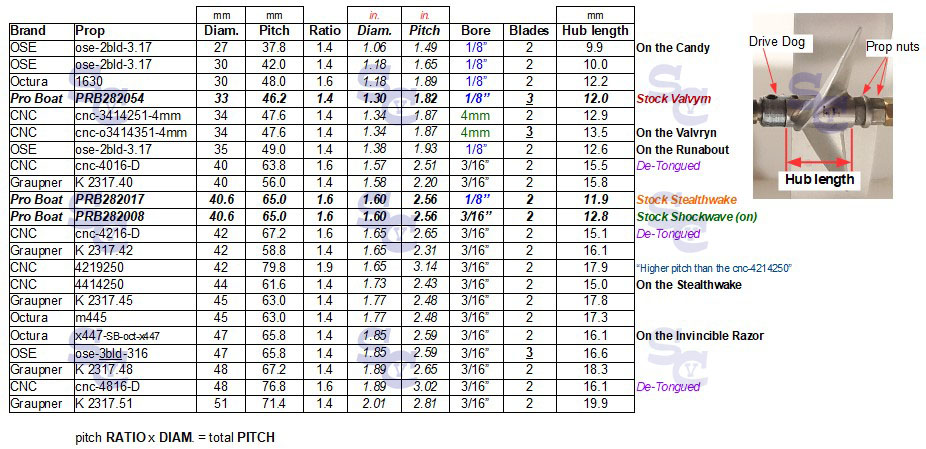
R/C Boat Props we own and specs
These are the propellers we own and their specs including which ones are currently in use.
Updated: January 2023